Archetype Companion Manual
Author: Martin A. Koch, PhD
Copyright: 2025-2026, CatSalut. Servei Català de la Salut
Version: 0.11.0 (Last updated: 2026-03-25)
This manual and the Archetype Companion application have been developed during the openEHR
fellowship 2025 in collaboration with
![]() and
and ![]() .
.
Licence
This manual is licensed under the Apache Licence, Version 2.0 (the "Licence"); you may not use this manual except in compliance with the Licence. You may obtain a copy of the Licence at:
http://www.apache.org/licenses/LICENSE-2.0
This manual is provided “as is”. The information contained herein is subject to change without notice. No warranty of any kind, either express or implied, is made in relation to the accuracy, reliability, or fitness for a particular purpose of this document. The authors and publishers shall not be liable for any errors or omissions, or for any incidental or consequential damages arising from the use of this material.
Welcome
Welcome to the openEHR Archetype Companion! This application was developed in the course of the openEHR fellowship programme 2025. This platform helps you search, plan, and visualise archetypes for your clinical modelling projects. Whether you are new or experienced, we hope that this application can help you to model more efficiently.
This tool is designed for clinical modellers and informaticians who need to find, organise, and manage openEHR archetypes. The aim is to streamline your workflow by providing a fast search for existing archetypes and visualising dependencies.
Search archetypes - You can quickly find archetypes from a database, using filters and keywords.
Visualise archetype dependencies - The visualisation features of the tool help you understand parent-child relationships, inclusions, exclusions, and similar archetypes at a glance. You can even get recommendations for similar or related archetypes.
Plan archetypes and template projects - Using the collection feature, you can organise archetypes, pre-plan new archetypes, interconnect them, and assign them to previously defined data elements of your project.
Video Tutorials
Example Projects
To help you get started, we provide a selection of example project files. These examples are designed for you to explore and experiment with, so you can try out features and workflows without putting your own projects or data at risk. Feel free to use, modify, or test these files as you learn more about the system.
These example projects are loosely based on existing openEHR templates. They are provided for illustrative and educational purposes only. No copyright ownership is claimed over the original openEHR templates or materials. The examples may be incomplete, simplified, or adapted, and should not be considered authoritative or comprehensive representations of the original templates. For official and complete versions, please refer to the original openEHR resources.
You can download individual example files directly:
- example_vital_signs2_project.json
- example_generic_lab_test_result_example_project.json
- example_ear_primary_hip_arthroplasty_report_project.json
A brief overview of the interface
When opening the application, the user is presented with a graphical interface.
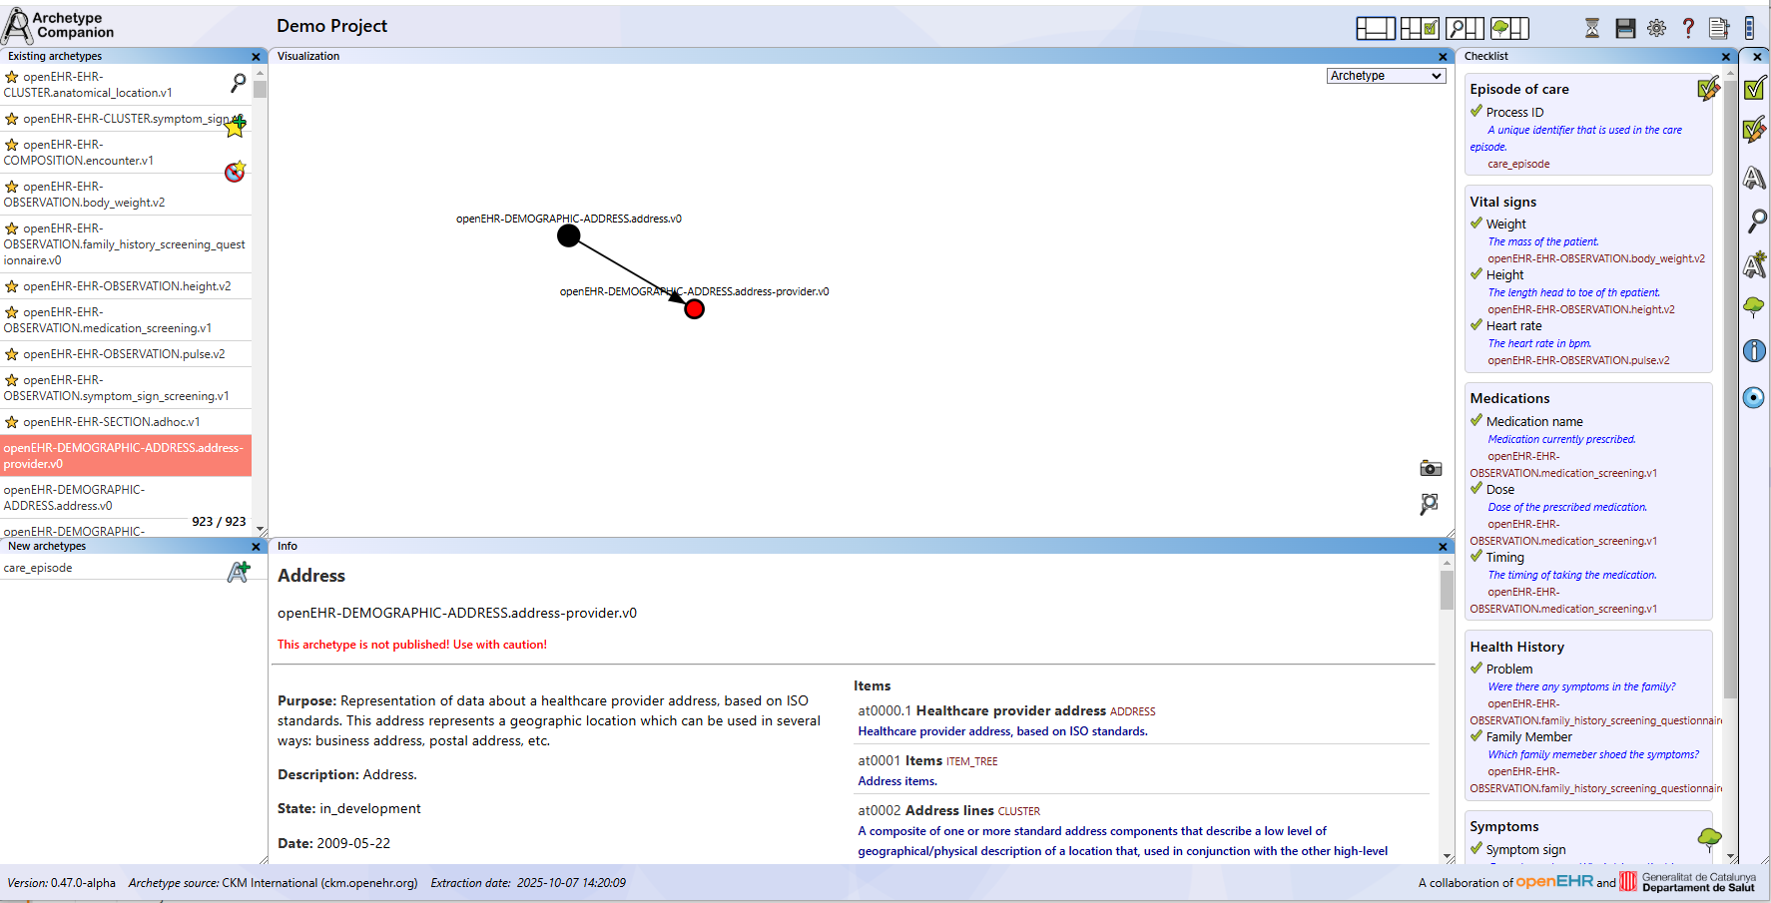
The archetype companion user interface.
The following image highlights the location of the current project name at the top of the interface.

The current project name in the top of the interface.
Here you can see the section of the interface that provides fast access to essential functions. These quick-access buttons allow users to perform frequent actions and access important tools without unnecessary steps.

Easy access functions on the top of the interface.
In the centre of the interface you will find the workspace area, where users can organise their work using draggable and resizable windows.
The workspace with draggable and resizable windows.
At the bottom of the interface you will encounter the version information panel. It displays the current version of the Archetype Companion tool, as well as the source and extraction date of the archetype database in use.

The version of the companion, source and extraction date of the archetype database.
Also, at the top you will find the four predefined view configurations available in the Archetype Companion. These standard views are designed to support different aspects of the application (from left to right):
- Standard view: The standard view, ideal for browsing and viewing information about archetypes.
- Checklist editor view: This view opens the checklist editor panel to the right.
- Search view: This view opens the search panel to the left.
- Template planner view: This view opens the template planner panel to the left.

The 4 predefined view configurations.
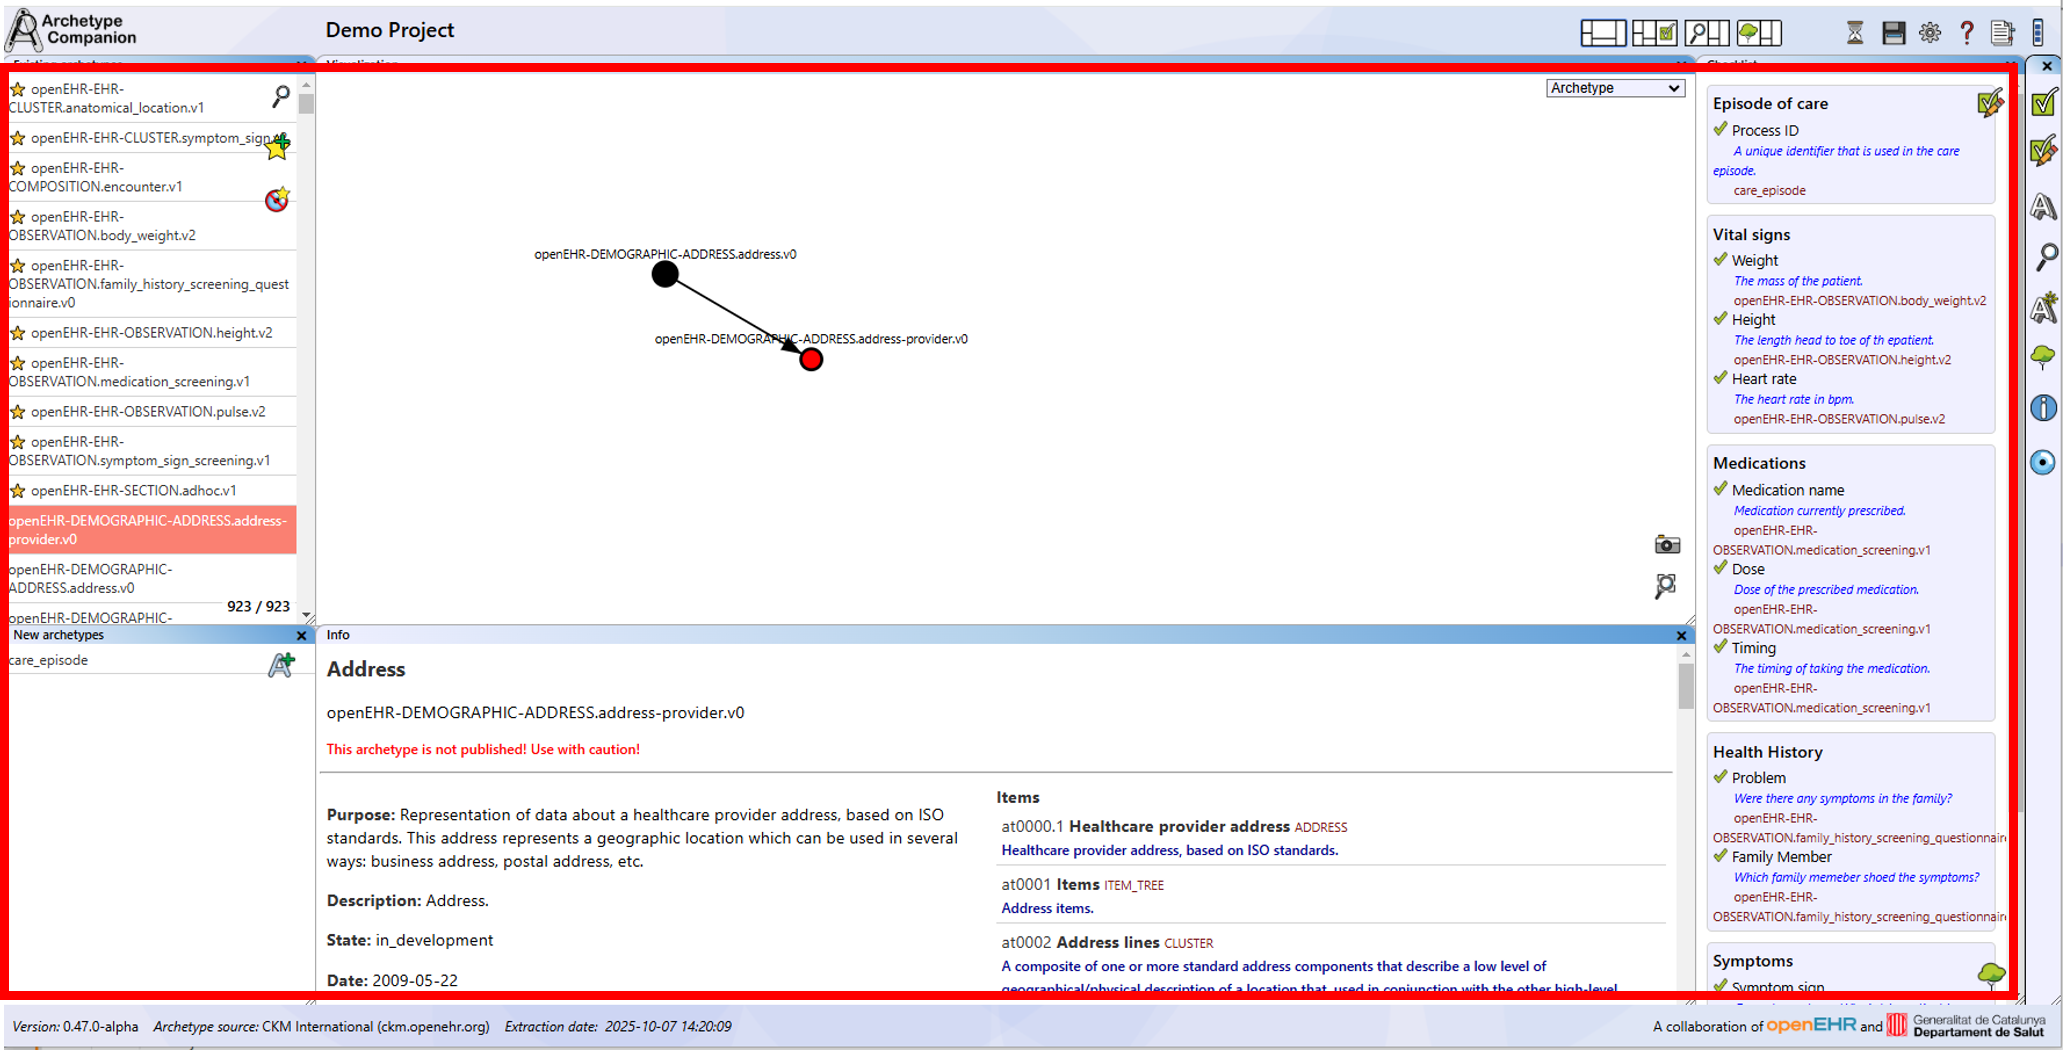
For flexible use of the different windows in the interface, the various windows can be opened with the windows access bar on the right-hand side of the interface.
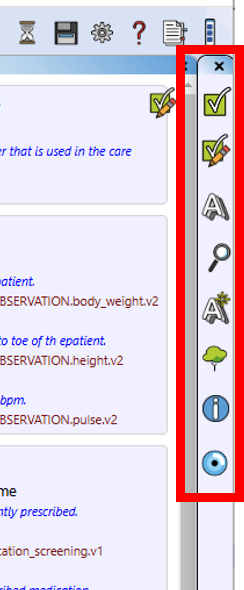
The windows access bar.
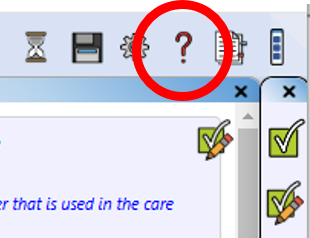
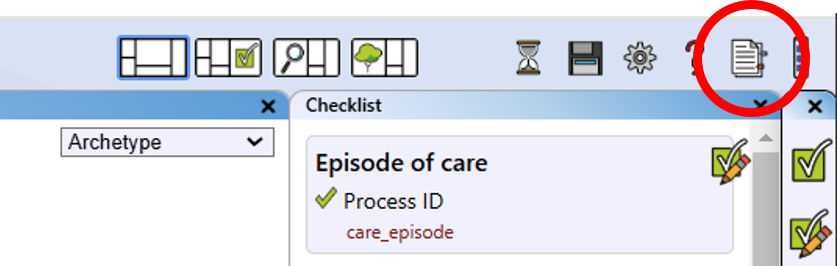
The windows fast access bar can be opened with a button in the upper right of the interface.
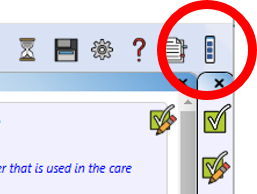
Access to the windows access bar.
About Page and Manual
Information about the application and the archetype data can be accessed via the "About" button in the upper right-hand corner of the main view.
Open the About page.
In the About window, an "Open manual" button allows you to open the application's online manual in a new browser tab.
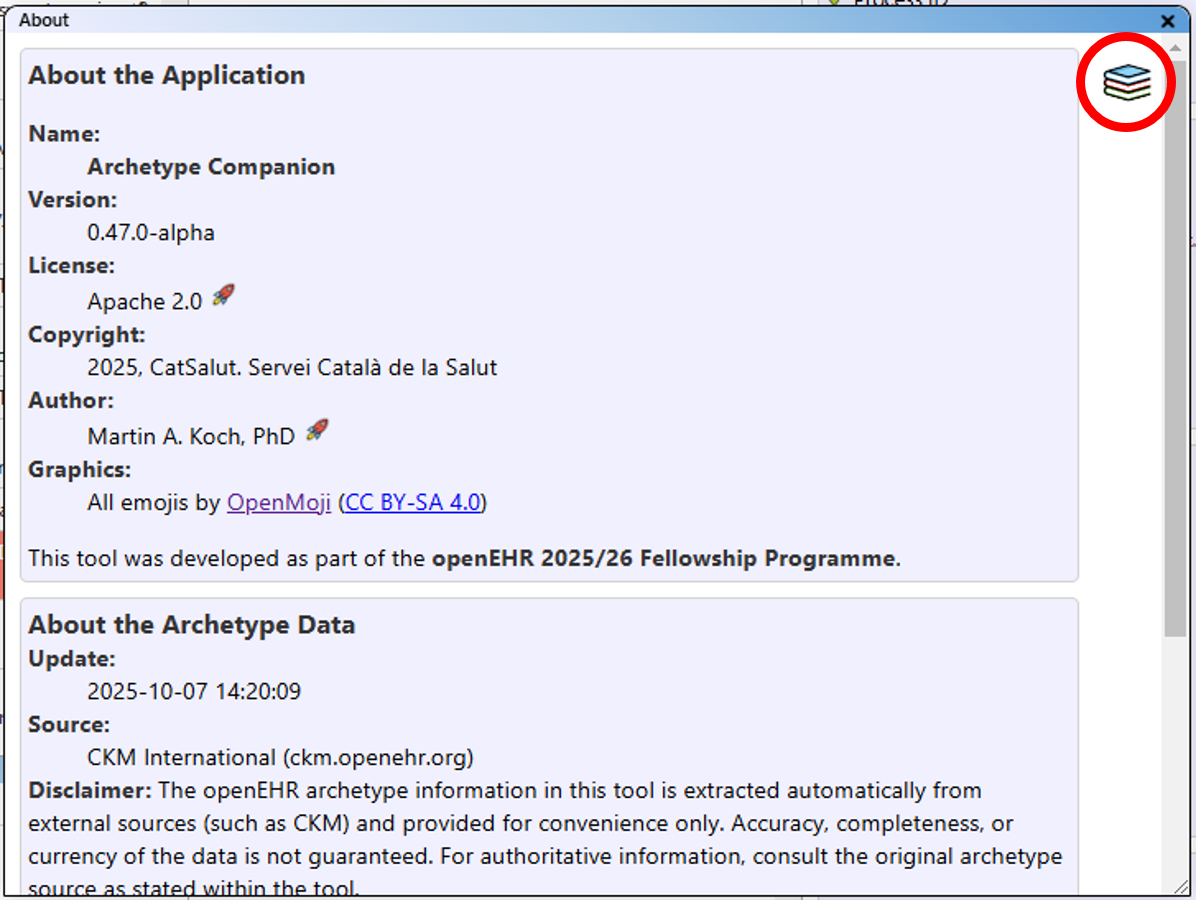
Access the manual.
The About page can be closed by clicking the "X" in the upper right-hand corner of the window.
Managing a Project
All your data in the Archetype Companion is saved within a project. Projects allow you to group archetypes and checklists of data elements for a specific modelling task.
Project options are accessible from the main view of the application via the "Project options" button.
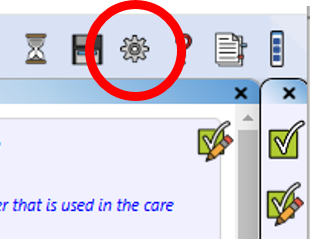
Access the project options.
Create a Project
To start a new project, click “Create Project” on the right-hand side of the options menu. This deletes any existing project information.
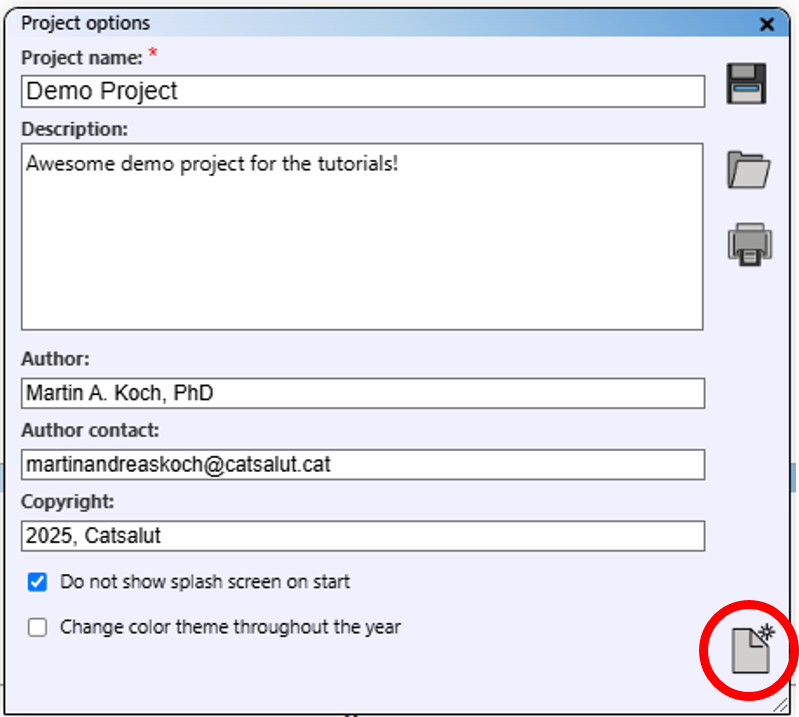
Create a new project.
The project receives a default name, which you can change. You may also add a description, author, and copyright information.
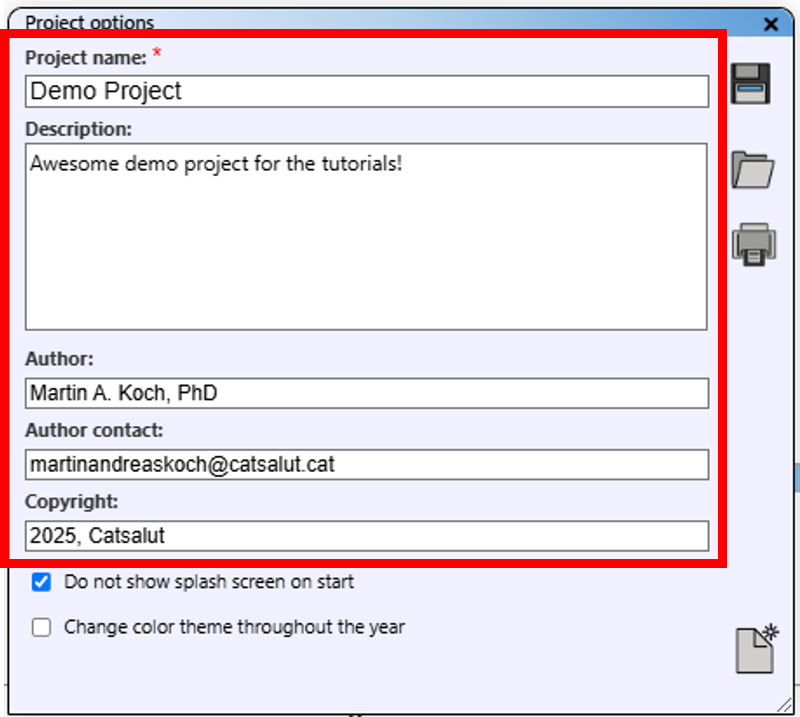
Insert project information here.
Save a Project
Your project is periodically saved to your browser's local storage. Note that this information may be lost if your browser cache is cleared. To save your project as a JSON file, use the "Save project" button in the "Project options" menu.
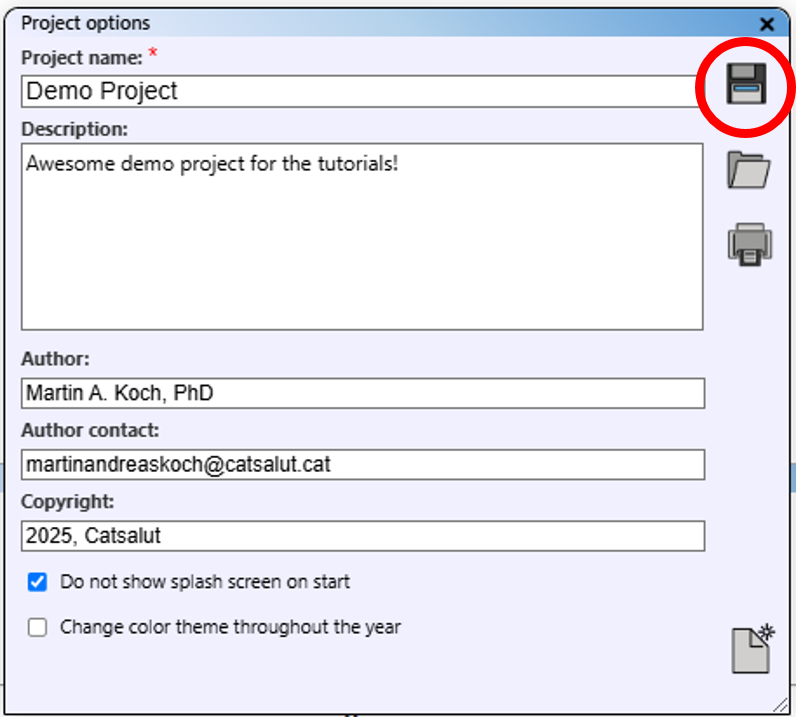
Save project from options window.
The file is saved to your browser's download directory and contains your current project state, including archetypes, checklists, and collections. The filename includes the date, time, and project name (with spaces replaced by underscores). For convenience, you can also use the "Save" button in the main view.
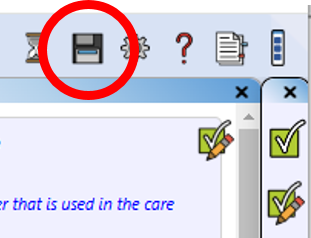
Save project from main view.
Load a Project
To load a saved project JSON file, open the "Project options" view and use the "Load Project from JSON File" button. Select your file in the standard file dialogue. The project will then be loaded into the application.
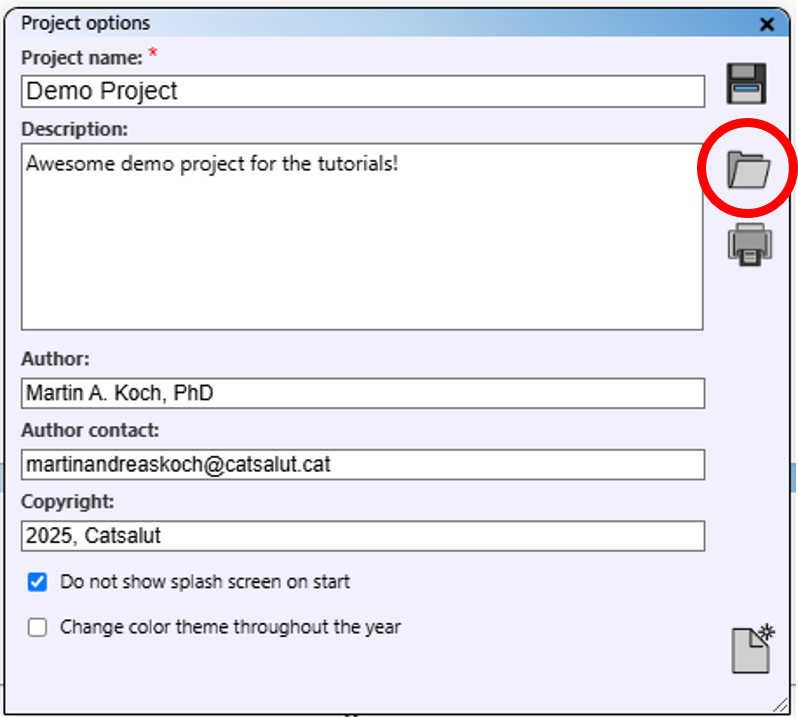
Open project from file.
Delete a Project
To delete existing project data, click “Delete/Create Project” on the right-hand side of the options menu (see "Create a Project"). This deletes any existing project information and creates a new project.
Create a Report
Generate a summary report of your project by opening the "Project options" view and clicking "Create report".
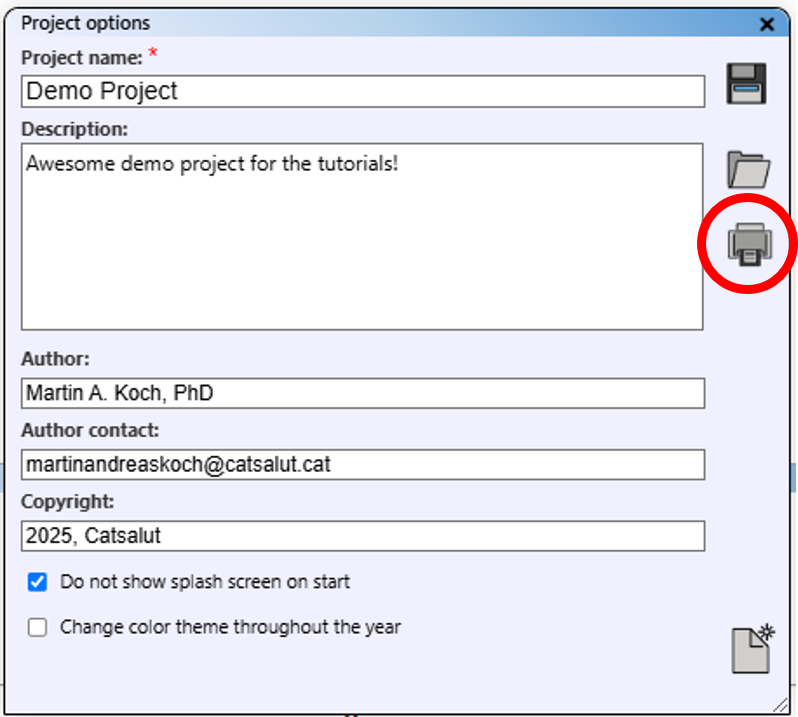
Create a project report.
This produces a simplified HTML view of all project data elements and assigned archetypes, which you can print as a PDF for documentation.
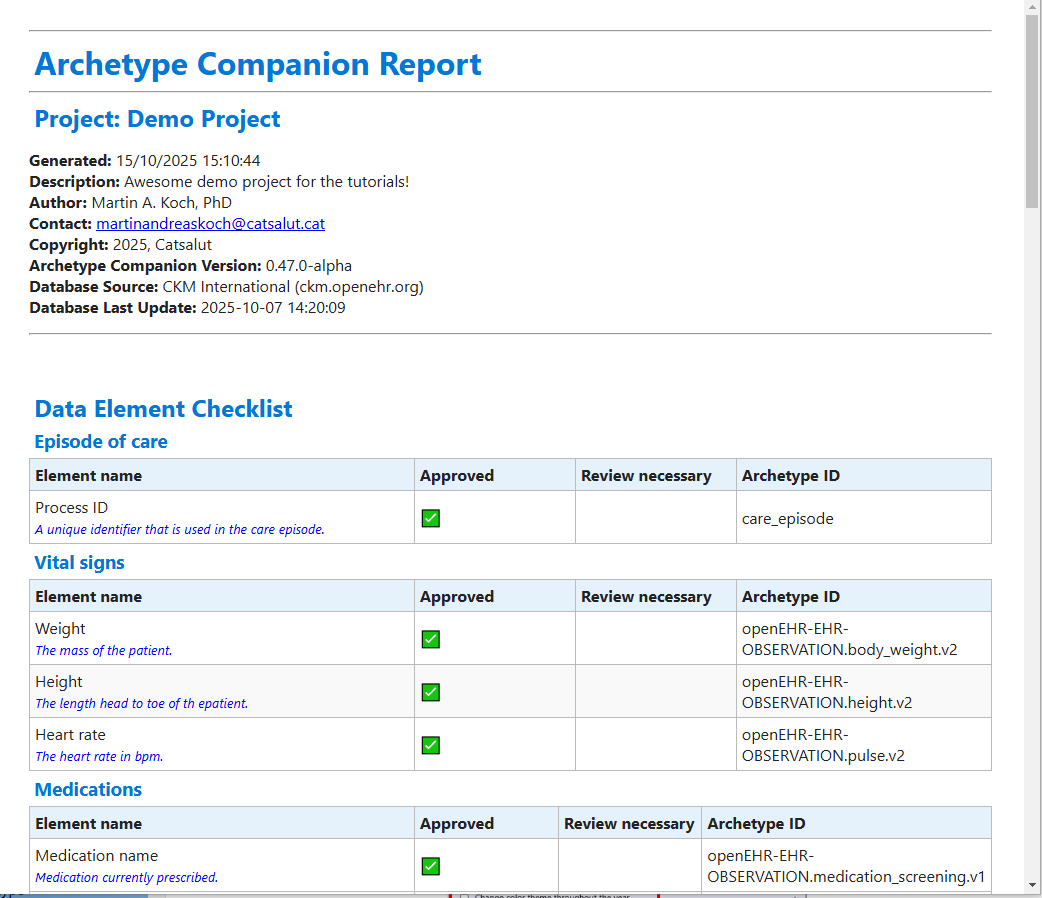
The project report.
- Project information: All information from the project options, including the software version and the version of the archetype data.
- Data element checklist: Table with all data from the checklist.
- List of Archetypes: List of archetypes that have been assigned to data elements from the checklist.
- New Archetypes Details: List of all new prototyped archetypes with all information from the editor view.
- Planned Archetype Tree: Visualisation of all information from the template planner in the form of a tree-like structure.
Note: When creating the report, an HTML version of the report is automatically downloaded. The filename includes the time, date, and project name (which may be modified for compatibility).
Other Project Options
Within "Project options", you can deactivate the splash screen at start-up and activate the colour theme change, which adjusts interface colours based on the time of year.
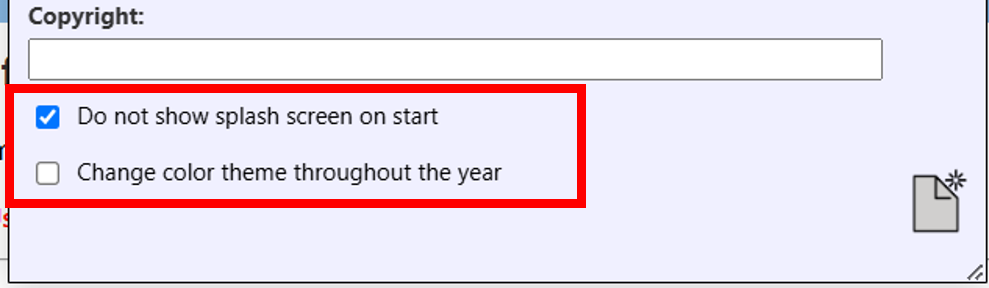
Additional options.
Navigate and Search for Archetypes
The main function of the application is browsing and searching openEHR archetypes. In addition to an easily accessible list of archetypes, this application provides a fast search engine for an openEHR archetype repository, allowing you to find archetypes relevant to your needs.
Navigating the Archetype List
The information for archetypes extracted from a repository is presented as an alphabetised "Existing archetypes" list of archetype IDs on the left-hand side of the standard view. You can scroll through the list using the mouse wheel while hovering over it, or by using the scroll bar on the right-hand side.
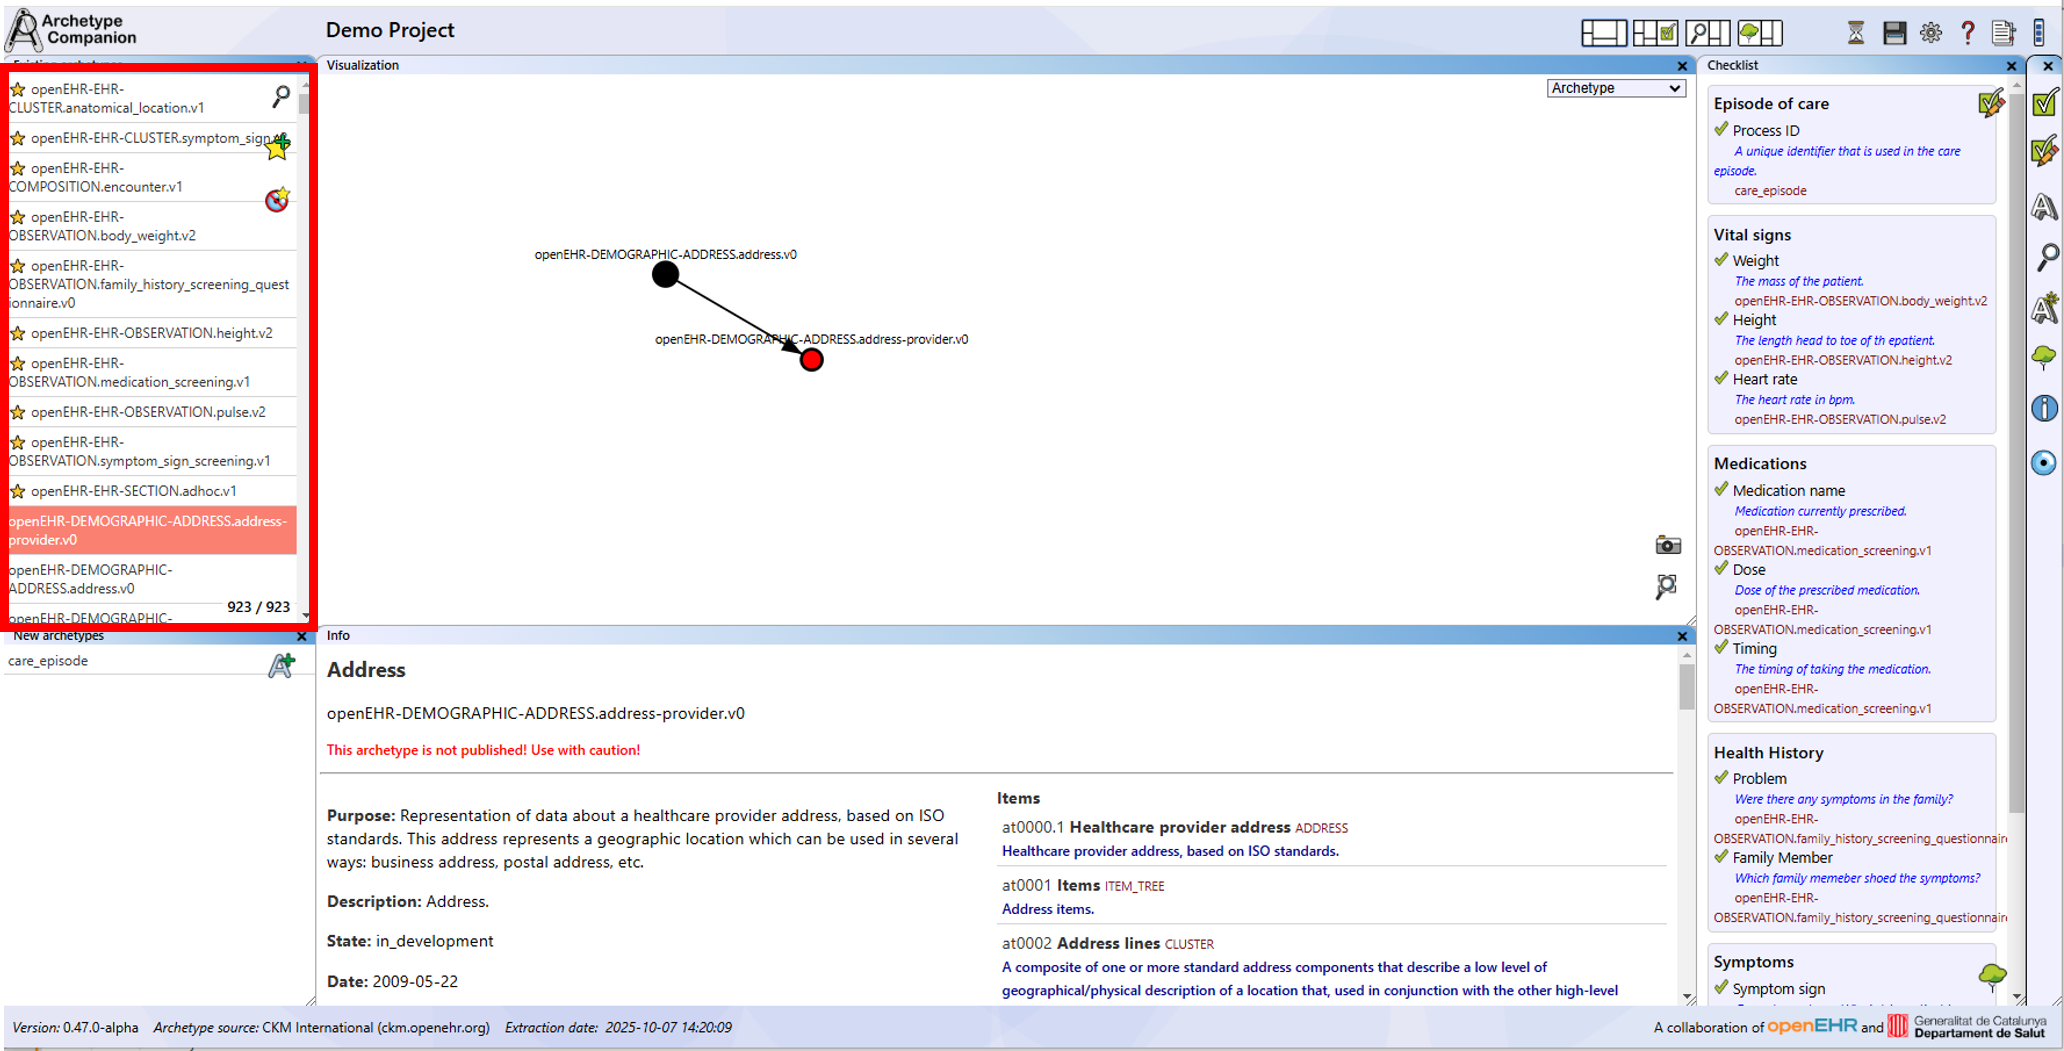
Default position of the "existing archetype" list.
Clicking on an archetype in the list sets it as the selected archetype. As a result, the archetype's data is loaded into the information window, and the visualisation updates to the new archetype if you are in "Archetype" or "Similar" view mode. The active archetype is marked in salmon colour in the list.
The selected archetype can be added to the collection view using the "Add to collection" button. Please refer to the Managing a Collection section for more information about collections.
Move the selected archetype to the collection.
In the bottom right of the list, a number shows how many archetypes from the database are currently displayed. This number may vary depending on filters and how many archetypes have been added to the collection list.
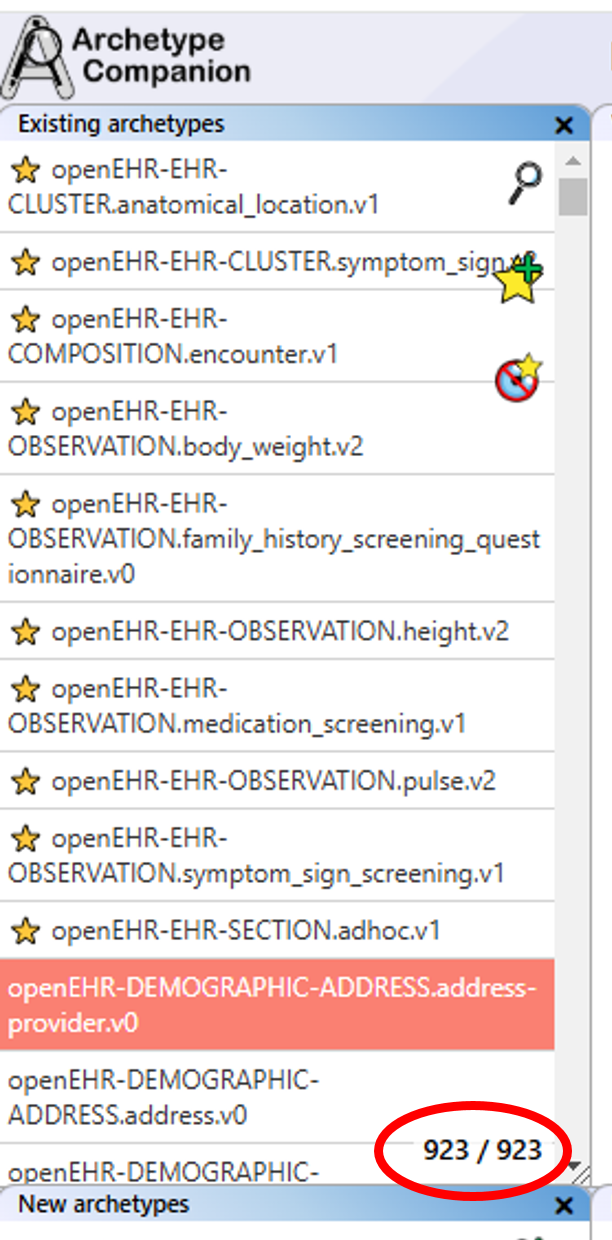
How many archetypes from the database are in this list?
The Search View
How to Access: The dedicated archetype search can be accessed via the "Open search" button in the "Existing archetype" list or the "Search view" button at the top right of the main view. In the search view, you have the archetype list as in the "Existing archetypes" list, and you can select and transfer archetypes to the collection in the same way.
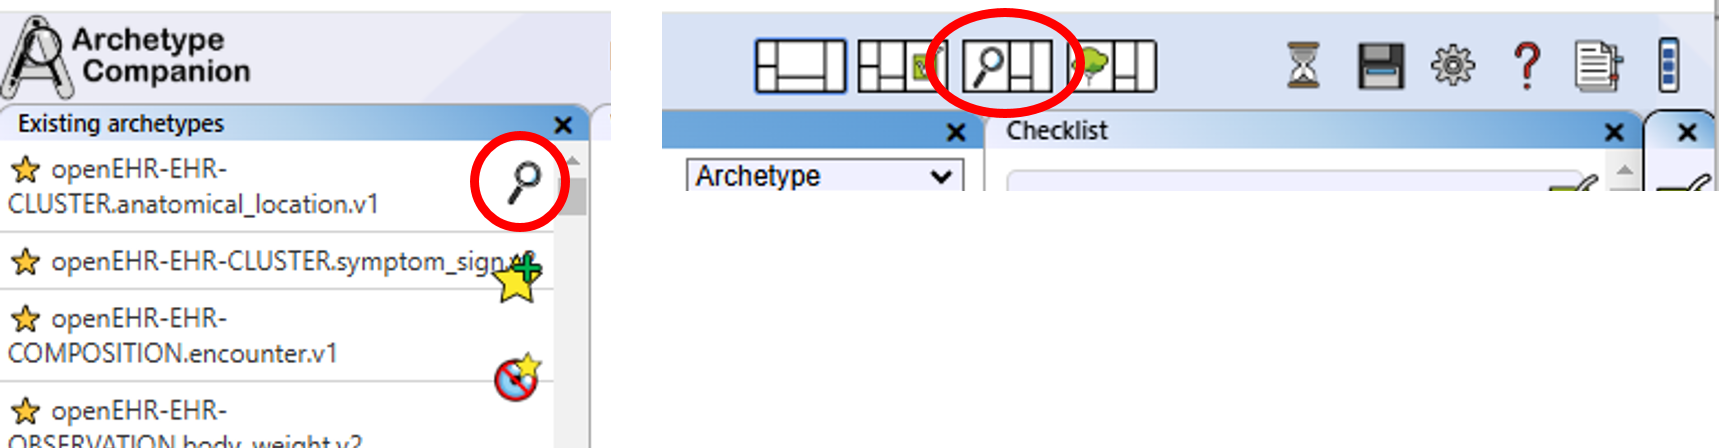
Access the search panel via the archetype list or fast access button.
Add Filter: There are different filter options. First, all archetypes can be filtered by class by selecting the desired class in the dropdown menu.
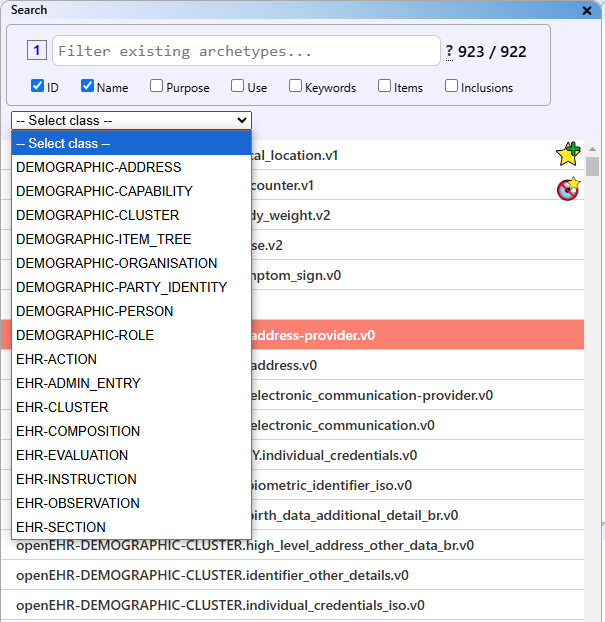
Select a class to filter all archetypes.
Second, archetypes can be filtered by text: enter your search term in the search bar, and the filter will be applied automatically with every keystroke.
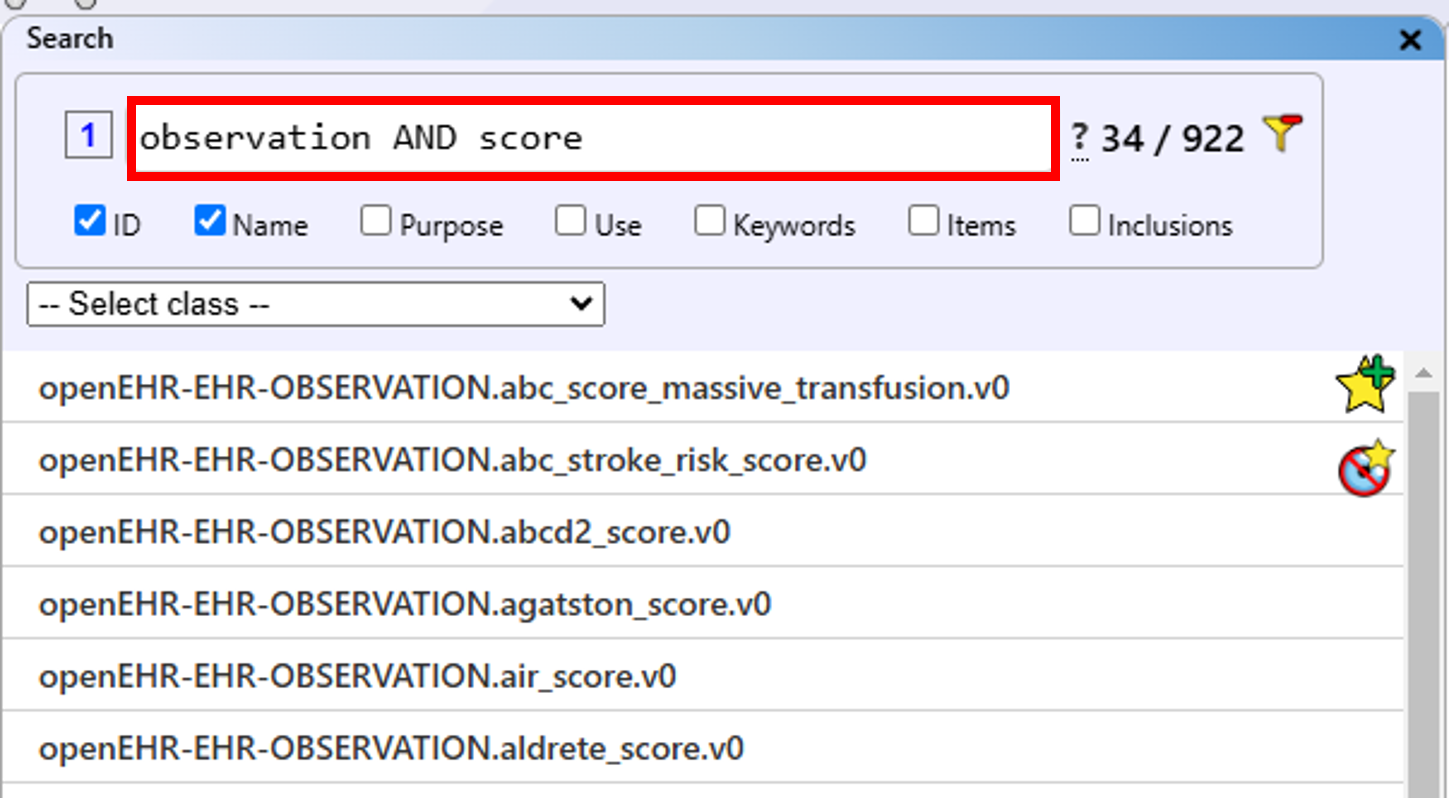
Enter a search term in the search bar.
You can add multiple filters at the same time. For example, you can search for one term in the archetype name and a different term in the purpose. Select the filter by clicking on the number to the left of the searchbar.
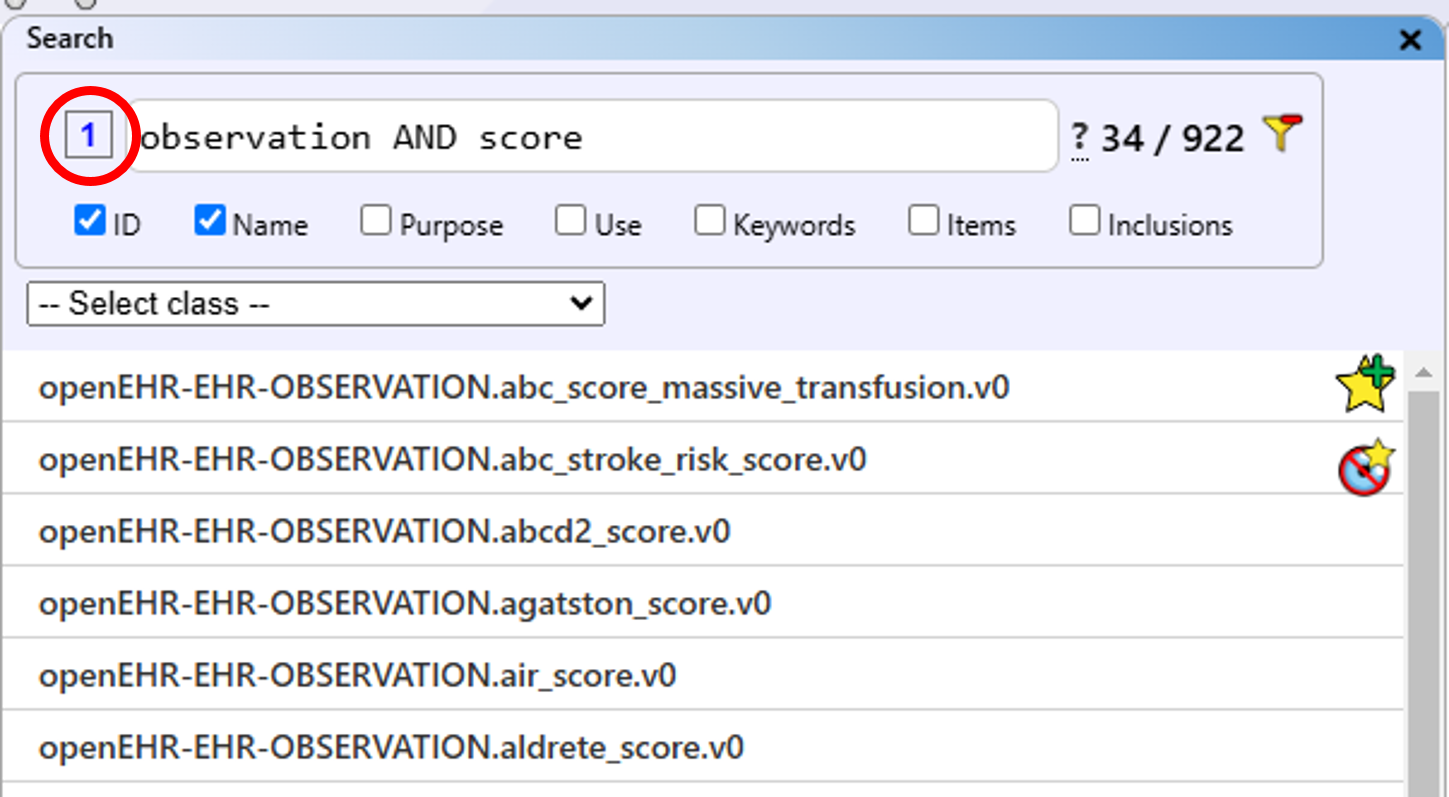
Select another filter to create specific searches in different parts of the archetype.
Archetype Companion: Search Syntax Guide
This section explains the search syntax used in the Archetype Companion. Searching for archetypes supports basic Boolean operators, such as AND, OR, and NOT.
General Considerations
-
Single Term Search: Type a term (e.g.,
Location) into the search bar. The search is not case sensitive, except for Boolean operators, which must be in uppercase. - Highlighting: The searched term is highlighted in the archetype information.
-
Multiple Terms: Add another term (e.g.,
Geographic). Both terms will be highlighted separately. -
Phrase Search: To search for an exact phrase, enclose the terms in quotation marks
(e.g.,
"Geographic Location"). Only the exact phrase will be highlighted.
Using Boolean Operators
-
AND Operator: To find archetypes containing both terms, add
ANDbetween them (e.g.,Geographic AND Location). This works the same as putting a space between two terms. -
OR Operator: To find archetypes containing either term, use
OR(e.g.,Geographic OR Anatomical). -
Combining Operators: To combine searches, use parentheses. For example:
(Geographic OR Anatomical) AND Location. Ensure there is a space before and after the parentheses for correct operation. -
NOT Operator: To exclude drafts (version zero), add
AND NOT v0to the search bar. All version zero drafts will be excluded from the results.
You can select which attributes of the archetype to search (archetype ID, name, purpose, keywords, items and/or inclusion statements). Note that selecting all attributes may slow down the search. The number of relevant archetypes is shown beside the search bar.
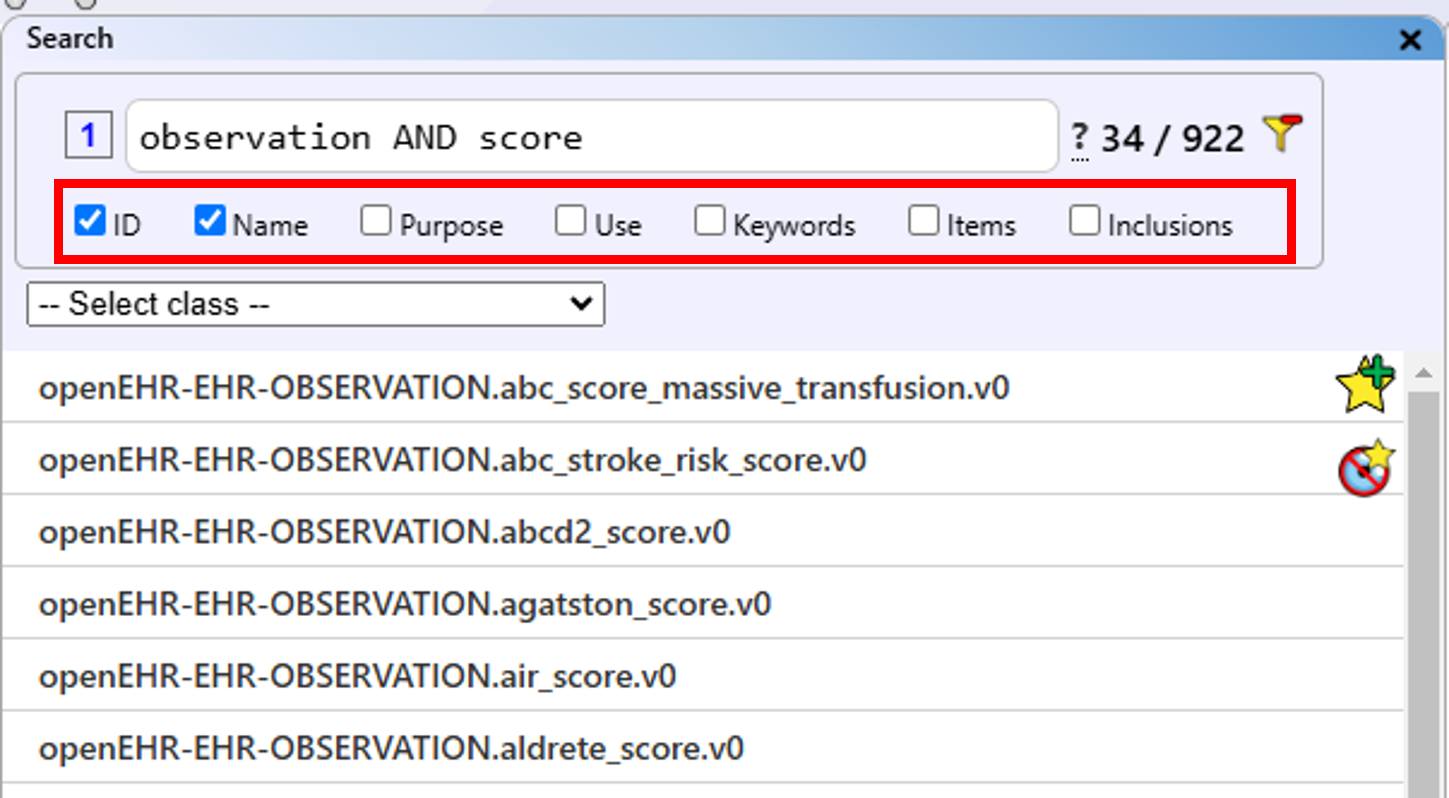
Select the attributes to be included in the filter.
Delete Filter: Whenever a filter is applied to the "Existing archetypes" list, a "Delete filter" button appears beside the search bar. Clicking this button resets all filter settings. This button will also appear in the "Existing archetypes" list if a filter is active.
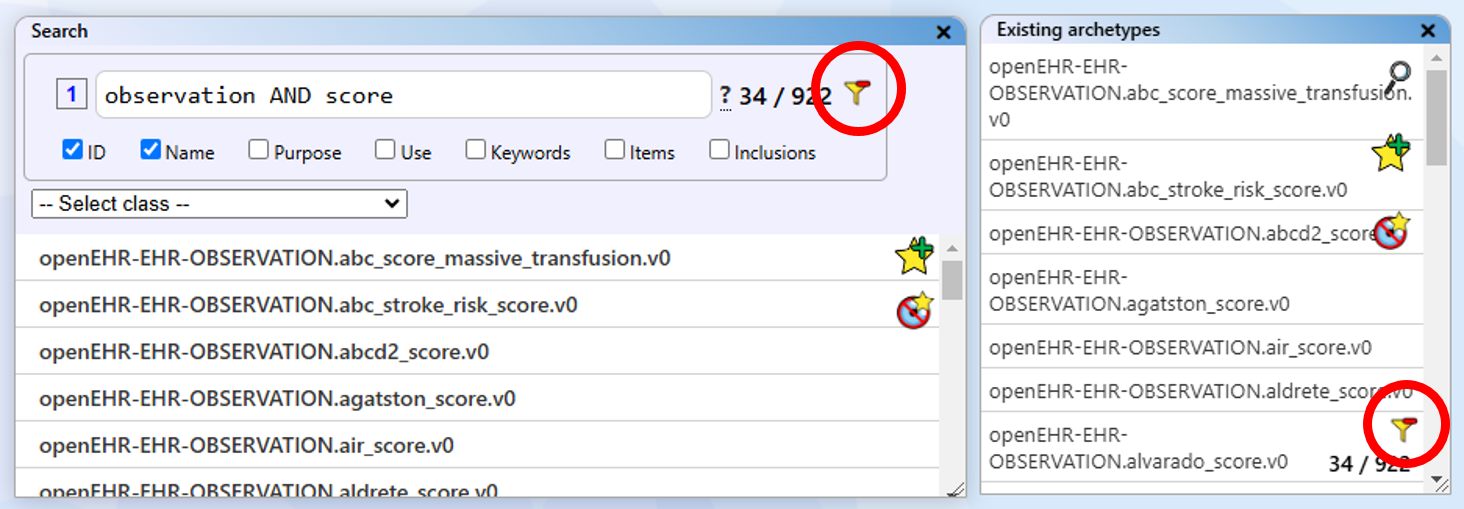
Resetting the filter from the search panel and "Existing archetypes" list.
Guide: Search Strategies in openEHR Archetypes for Clinical Modelling
(Beginner
friendly)
Recommended Order of Operation
- Define your data element and context.
- Search for a suitable
COMPOSITIONarchetype. - Decide if
SECTIONs are needed for structure. - Find the correct
ENTRYarchetype for your data. - Add
CLUSTERarchetypes for extra detail if needed. - (Advanced) Consider RM attributes if no archetype fits.
- Document your choices and reasoning.
1. Understand the Goal
The aim is to find the most suitable archetype for a specific clinical data element (for example, “Blood pressure” at a patient's first GP visit). This can be challenging because:
- The archetype name may differ from your search term.
- The archetype's context or class may not match your use case.
- Sometimes, you need to combine (slot) archetypes together.
2. Start with the Big Picture: The COMPOSITION Archetype
What is it? The COMPOSITION archetype is the top-level structure for
storing clinical information in openEHR.
Why start here? It defines the context (e.g., “first visit to GP”) and provides
slots for adding other archetypes.
- Search for
COMPOSITIONarchetypes in the international CKM (Clinical Knowledge Manager). - Read the “purpose”, “use”, and “misuse” sections to ensure it fits your scenario.
- Example: For a GP visit,
openEHR-EHR-COMPOSITION.encounter.v1is often suitable.
3. Add Structure: SECTION Archetypes (Optional)
What are they? SECTION archetypes help organise your data into logical
headings (e.g., “History”, “Examination”).
When to use? Use SECTIONs if it helps organise your data model, not
just to match a form layout.
- Not every model needs
SECTIONs—only add them if they make data retrieval or reuse easier. - Tip:
openEHR-EHR-SECTION.adhoc.v1is a flexible, general-purpose section archetype.
4. Find the Right ENTRY Archetype
What are ENTRY archetypes? These represent the main clinical content and come in several types:
- OBSERVATION: For measured or reported data (e.g., blood pressure).
- EVALUATION: For clinical opinions, diagnoses, or assessments.
- ACTION: For actions performed (e.g., procedures).
- INSTRUCTION: For future actions (e.g., medication orders).
- ADMIN_ENTRY: For administrative data (not clinical content).
How to choose?
- Match the
ENTRYtype to your data's context. - Do not pick an
ENTRYjust because it contains your data element—context matters! - If you cannot find a perfect fit, consider requesting a new archetype or discussing changes in the openEHR community.
- Always prefer published archetypes over drafts!
| Archetype Class | Definition | Type of Document | Example Clinical Document/Data |
|---|---|---|---|
| COMPOSITION | The top-level container for a clinical document or event, grouping all related content for a clinical encounter or record entry. | Discharge summary, consultation note, progress note | |
| SECTION | A logical grouping of ENTRYs within a COMPOSITION, often used to structure documents into headings or chapters. | “History of Present Illness” section, “Medications” section | |
| CLUSTER | A reusable structure for grouping related data elements, often used as a building block within ENTRYs or other CLUSTERs. | Blood pressure measurement (systolic/diastolic), address details, device details | |
| OBSERVATION | Records data resulting from an observation or measurement made about the patient, often with a time series. | snapshot, history, examination, measurements, test results, scores, scales | Vital signs chart, laboratory test result, blood pressure reading |
| EVALUATION | Represents a clinical opinion, assessment, or summary, typically not directly measured but inferred or concluded. | opinion, synthesis, summary | Diagnosis note, risk assessment, problem list entry |
| INSTRUCTION | Specifies what should be done for the patient, including orders, plans, or requests for future actions. | services, therapeutics | Medication order, care plan, referral request |
| ACTION | Records actions that have been performed, usually as a result of an INSTRUCTION. | services, therapeutics | Medication administration record, procedure performed |
| ADMIN_ENTRY | Captures administrative or non-clinical information about the patient or encounter. | administrative | Admission note, discharge summary, demographic update |
5. Expand Details: CLUSTER Archetypes
What are they? CLUSTER archetypes add detailed data elements to
ENTRY archetypes (e.g., a “Blood pressure” CLUSTER inside an OBSERVATION ENTRY).
- Use
CLUSTERs to add or expand on details when theENTRYarchetype allows it (check for available slots). - If you could not find your data element in an
ENTRYarchetype, try to find theCLUSTERfirst and then add it in anENTRYthat can include theCLUSTER.
6. Check the Reference Model (RM) as a Last Resort
What is it? The RM is the technical foundation of openEHR. Sometimes, data can be stored in RM attributes if not covered by archetypes.
- Only use this if you cannot find a suitable archetype or
CLUSTER. - This requires advanced knowledge and is rarely needed for beginners.
7. Tips for Effective Searching
- Use Synonyms: Archetype names may differ from your search term. Try related words or broader/narrower terms.
- Read Descriptions: Always check the “purpose” and “use” sections of archetypes.
- Check Examples: Look for example usages in CKM or community forums.
- Ask for Help: If stuck, reach out to the openEHR Discourse or CKM forums.
8. (Optional) Learn About Querying: AQL
AQL (Archetype Query Language) lets you search and retrieve data from openEHR
repositories using archetype structures.
Beginners do not need to master this immediately, but knowing it exists is helpful for future data
retrieval.
openEHR
AQL Specifications
Extra Beginner Tips
- Do not worry if you do not know everything—searching and checking is part of the process.
- Take notes and keep track of archetypes you consider.
- Use available tools (Archetype Companion, CKM, Archetype Designer, etc.) to browse and compare archetypes.
- Remember: The structure of your data model does not have to match the user interface or a paper form.
Archetype information
Disclaimer: The information about openEHR archetypes presented in this tool has been extracted automatically from external sources (such as CKM) and is provided for convenience only. We do not guarantee the accuracy, completeness, or correctness of the extracted data, nor do we claim that it is up to date. This tool does not assert or imply any copyright ownership over the archetypes themselves. For authoritative information regarding authorship, copyright, and licensing, users are strongly advised to consult the original archetype source as stated within the tool.
The Archetype Information view displays all data extracted from the archetypes found in the source repository.
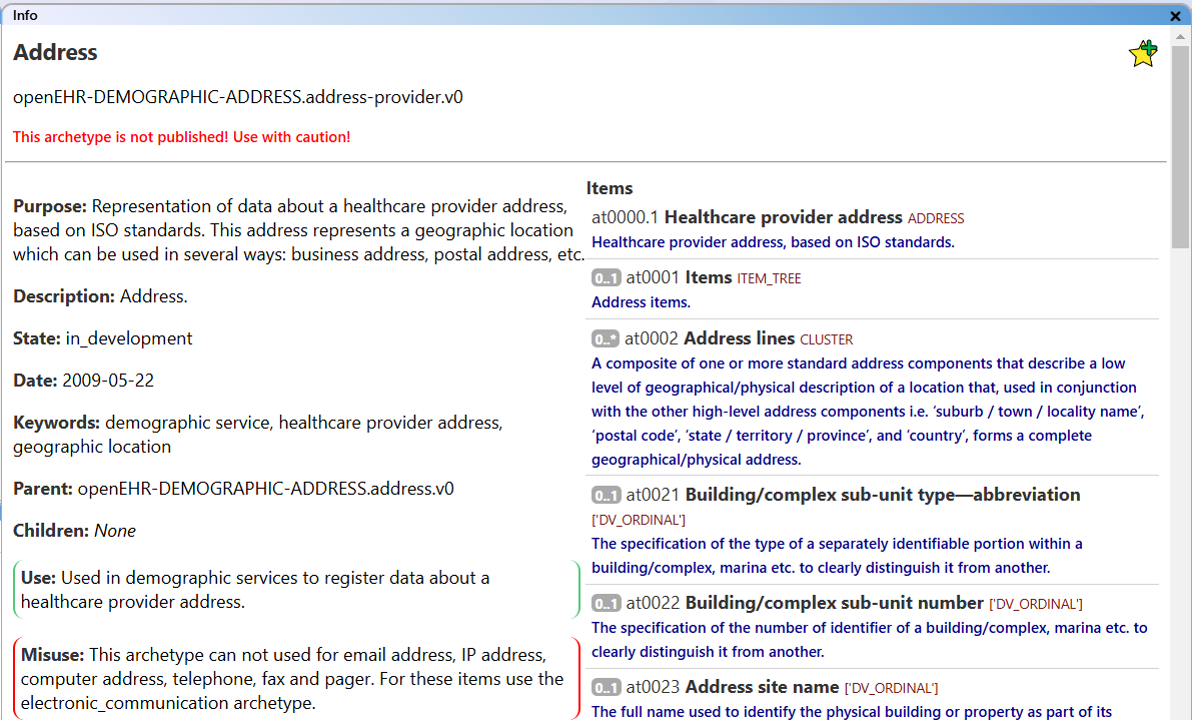
The archetype information view.
This includes:
- Archetype name
- Archetype ID
- A warning if the archetype is not published
- Purpose
- Description
- State
- Date of authorship
- Keywords
- Parent archetype
- Child archetypes
- Use
- Misuse
- Data elements by at-code
- Inclusion statements
- Exclusion statements
- Recommended archetypes
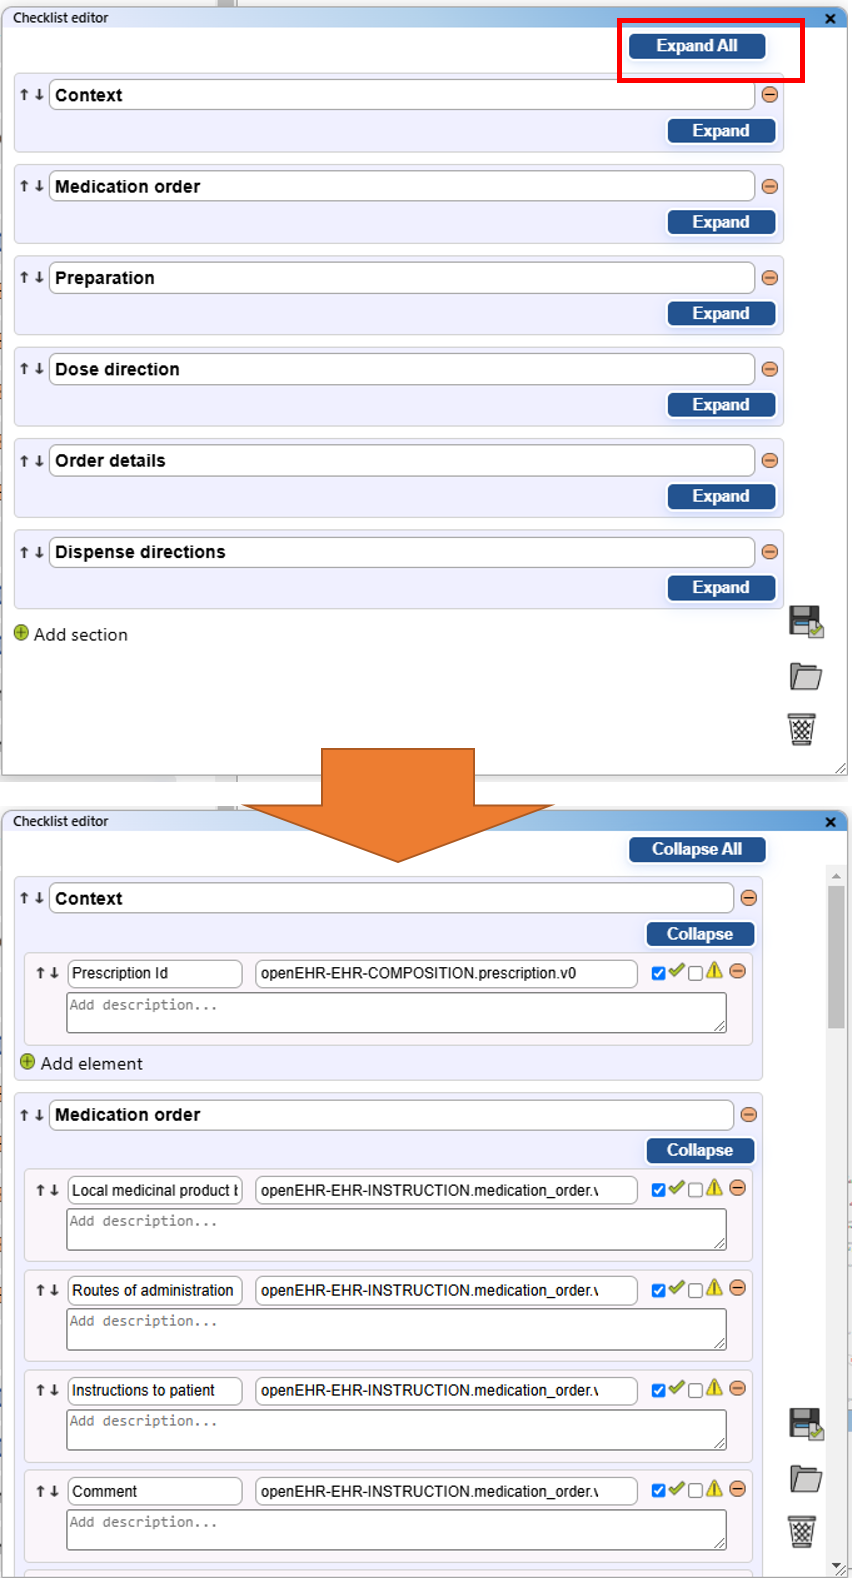
As a special feature, you can view a collapsible representation of the archetype structure. Use the "Expand All" or "Collapse All" buttons to show or hide the entire structure at once. To expand or collapse individual elements, simply click on the desired element.
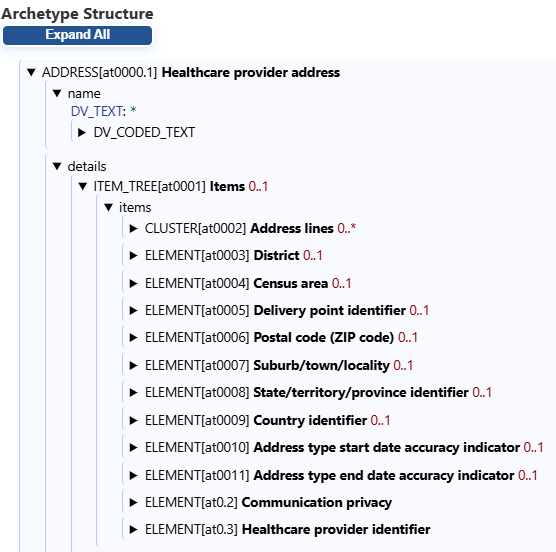
The collapsible archetype structure view.
History
What is it? When navigating through archetypes, it is easy to lose track of those you have visited. The history view allows you to browse through previously visited archetypes.
How to Access: The "History" can be accessed via the "Visited archetype history" button in the upper right-hand corner of the standard view.

Access the history window via the button in the main view.
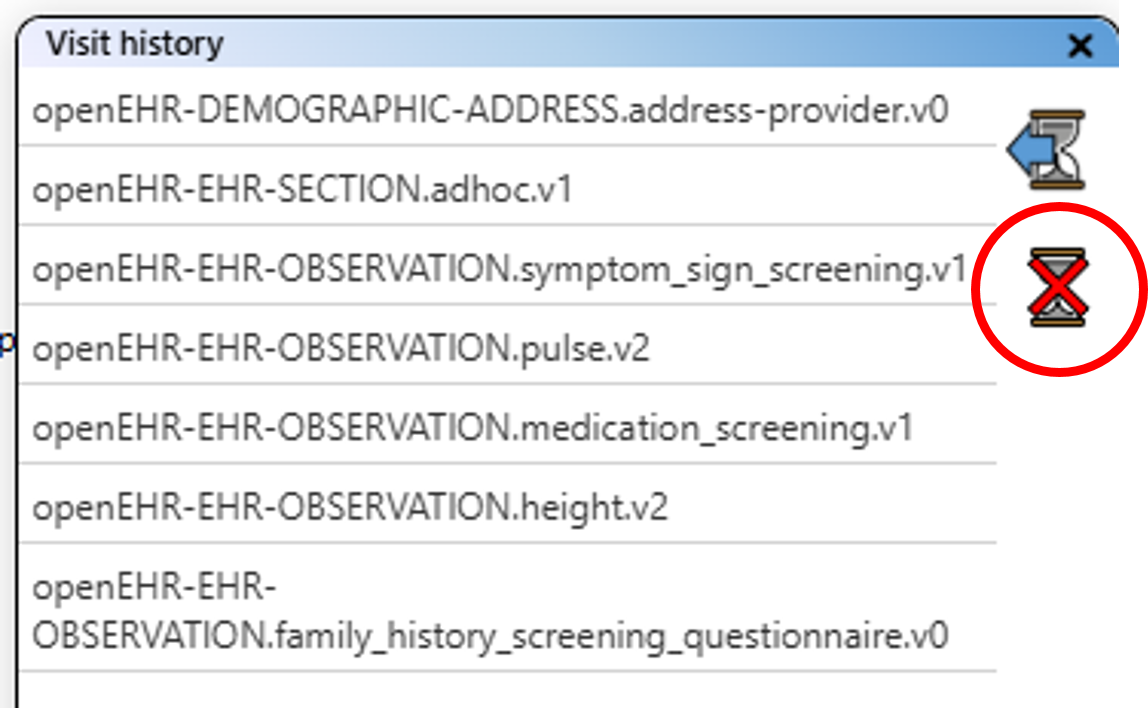
Browse History: In the "History" window, there is a list of all visited archetypes. You can scroll through the list and select an archetype to focus on it.
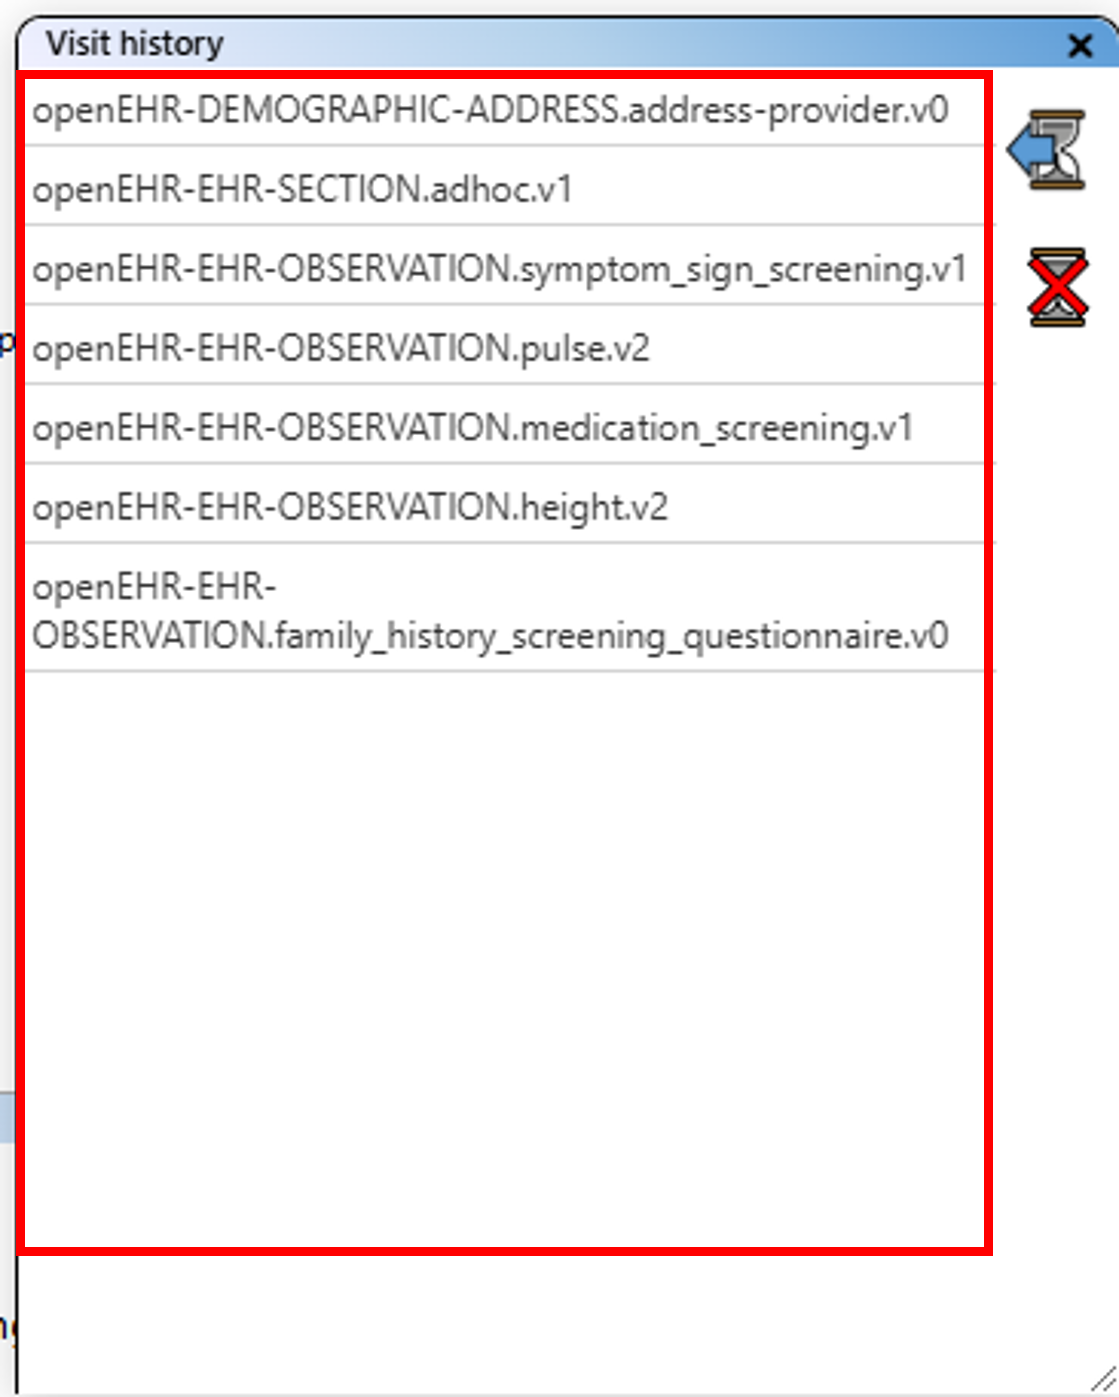
Browse the list of visited archetypes.
Go Back One Step: You can go back step by step using the "Back" button. Note that when going back, the last entry in the history is deleted.
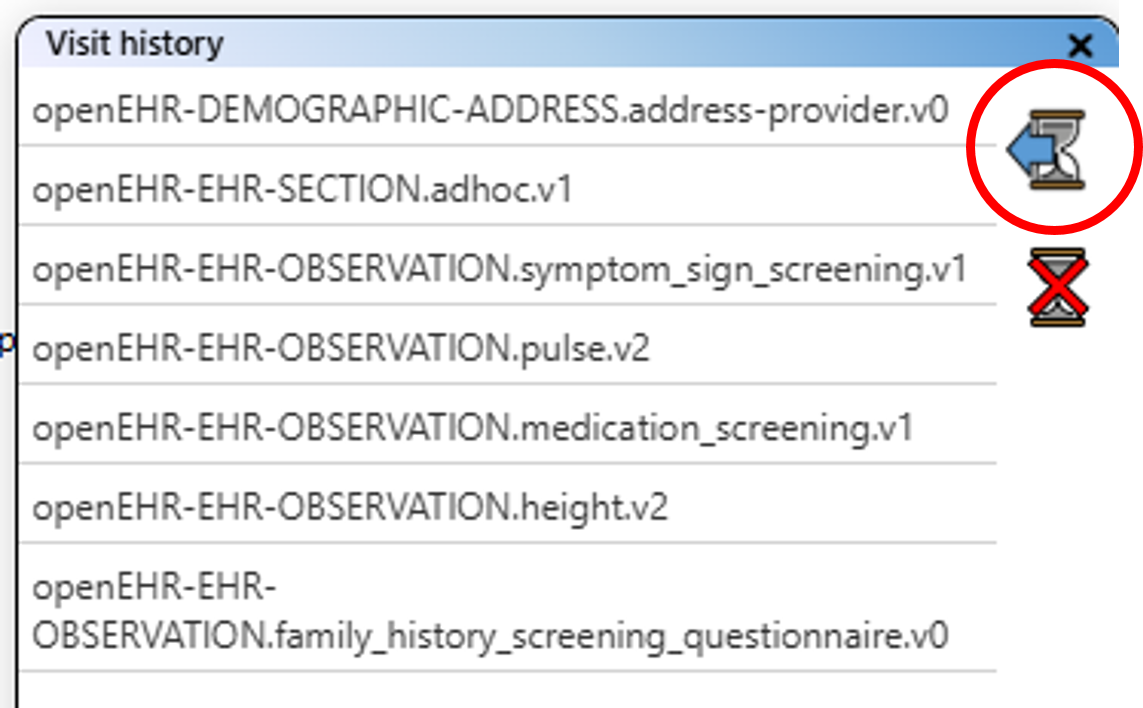
Go back one step in the archetype history.
Delete History: You can delete all history entries by using the "Clear History" button.
Delete the list of visited archetypes.
Managing a Collection
What it is –
The archetype collection is a group of archetypes that you wish to keep together for reference or
(re)use in your project.
A collection contains both "existing" archetypes from the archetype database and basic "new" archetypes
that you can define yourself.
Where to find it –
The collection is composed of existing archetypes that have been marked as collection items and all new
archetype prototypes.
The existing archetypes can be found in the archetype list, marked with a star.
The new archetypes are located on the lower left-hand side of the main view interface.

Default position of the "collection" list.
Add an Existing Archetype
Add archetypes from the "existing archetypes" list to your collection.
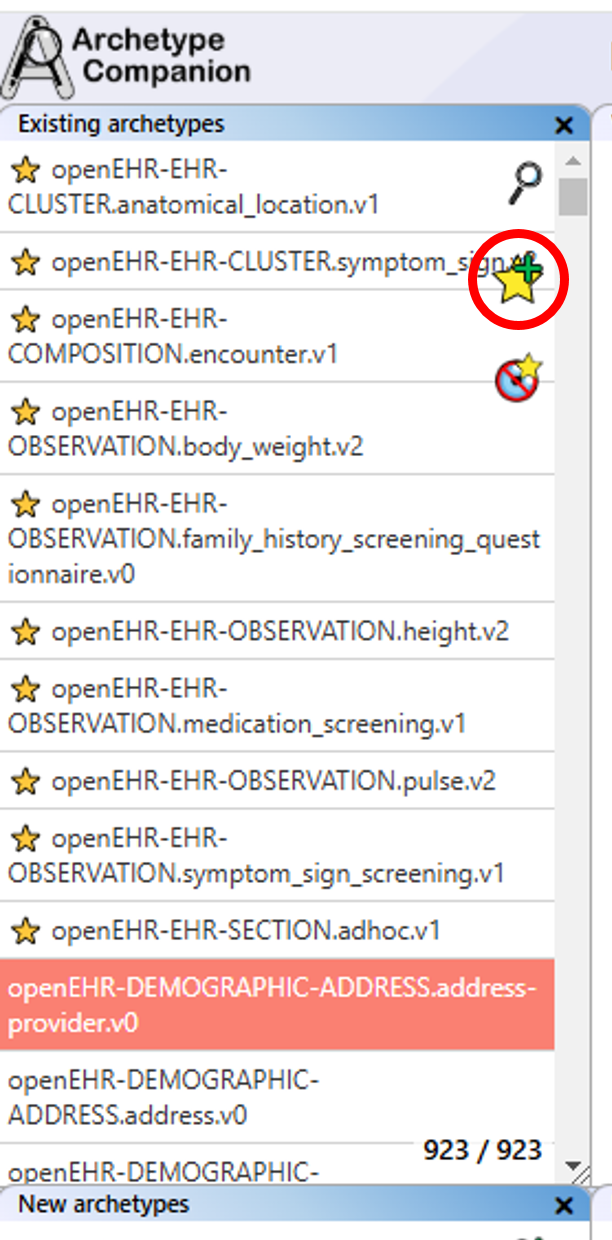
Select the desired archetype in the "existing archetypes" list by clicking on it. An icon will appear on the right-hand side of the list. Click the "Add to collection" icon, and the archetype will be marked as part of the "collection" list.
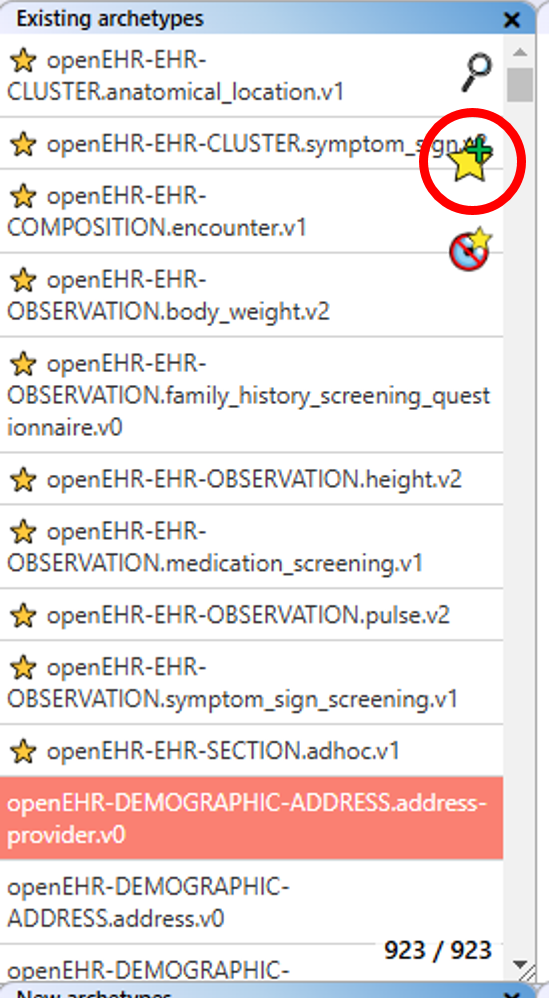
Add an "existing" archetype to the collection list.
Note: Apart from being part of the collection, the archetype is now available in the dropdown menus of the checklist editor.
Remove Existing Archetype
If you no longer wish to keep an "existing" archetype in your collection, you can move it back to the "existing archetypes" list. Click on the archetype in the collection list to select it. An icon will appear on the right of the collection list.
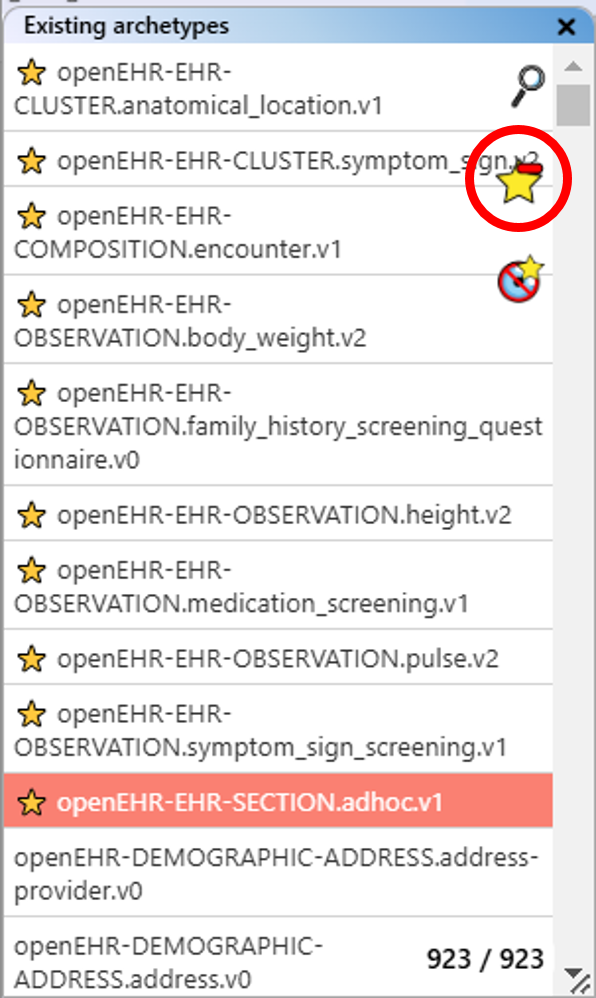
Remove an "existing" archetype from the collection list.
Click the "Remove archetype from collection" icon. The collection tag is removed from the archetype.
Hide or Show Collection Archetypes
Sometimes the accumulation of collection archetypes at the top of the existing archetype list makes the list difficult to use.
You can hide or show the collection archetypes by clicking on the hide or show icon.
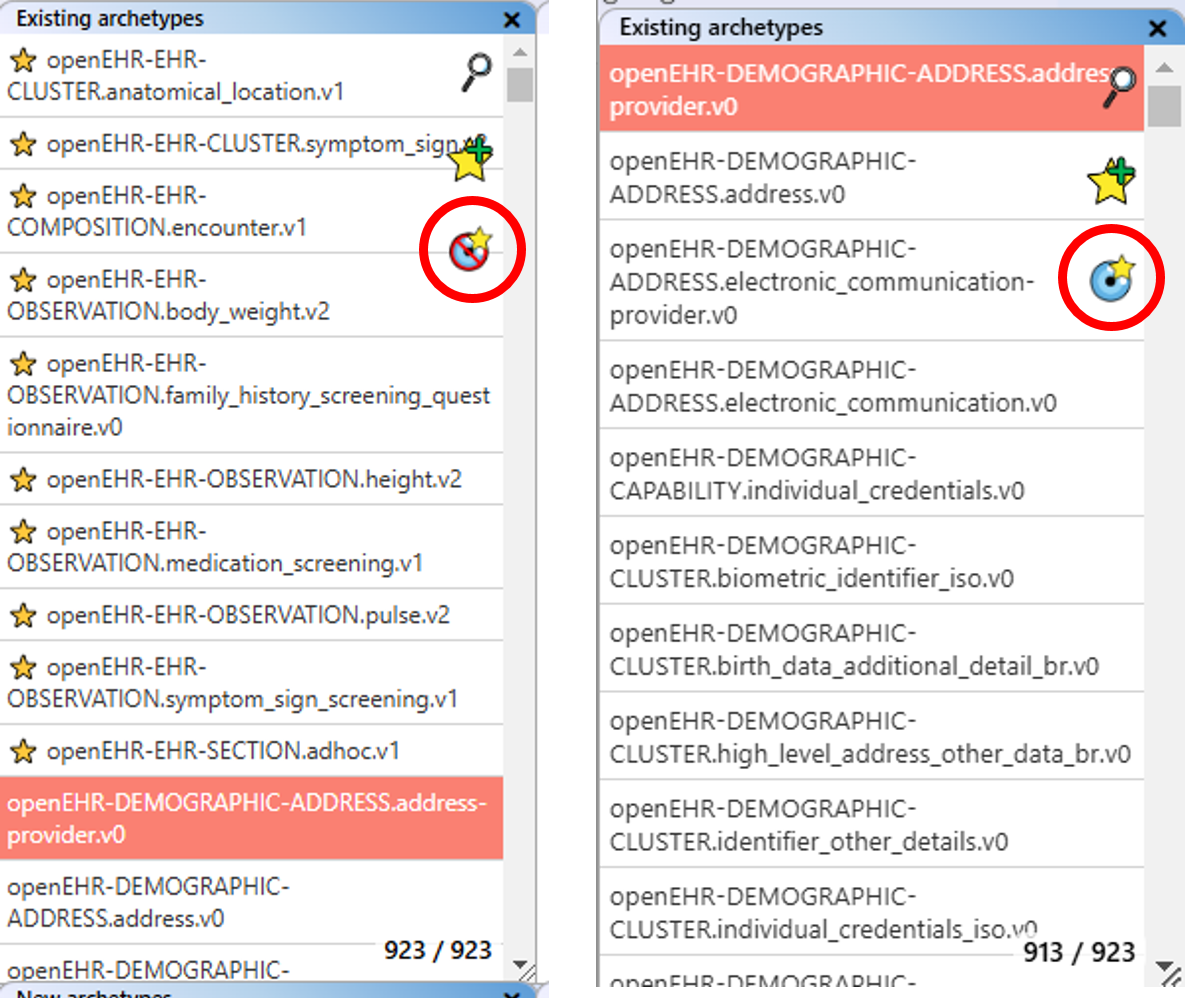
Hide or show collection archetypes from the existing archetype list.
Create a "New" Archetype
If you need to plan a new archetype for your project, you can create a basic placeholder here. On the right side of the new archetype list, you will find the "Add new archetype" icon. Click on it to create a new archetype.
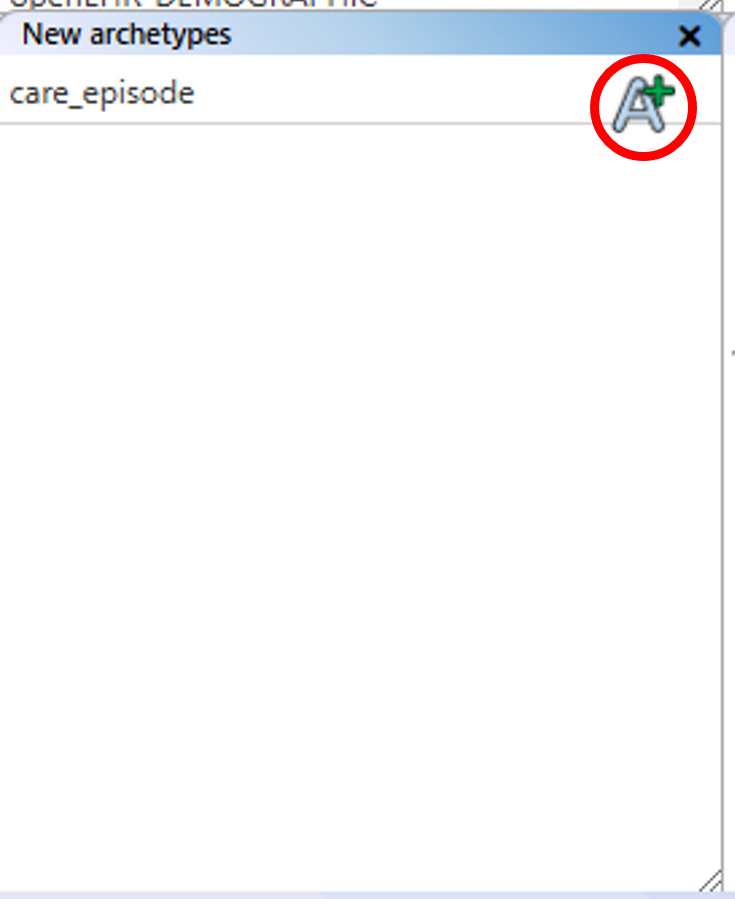
Create a "new" archetype for the collection list.
The new archetype will be selected automatically. As shown in the information view, the archetype has no information associated with it.
Edit a "New" Archetype
Select the "new" archetype you wish to edit in your new archetype list. Note that the archetype data will be loaded into the archetype info window. There is also an edit icon. Click the edit icon to open the editor window.
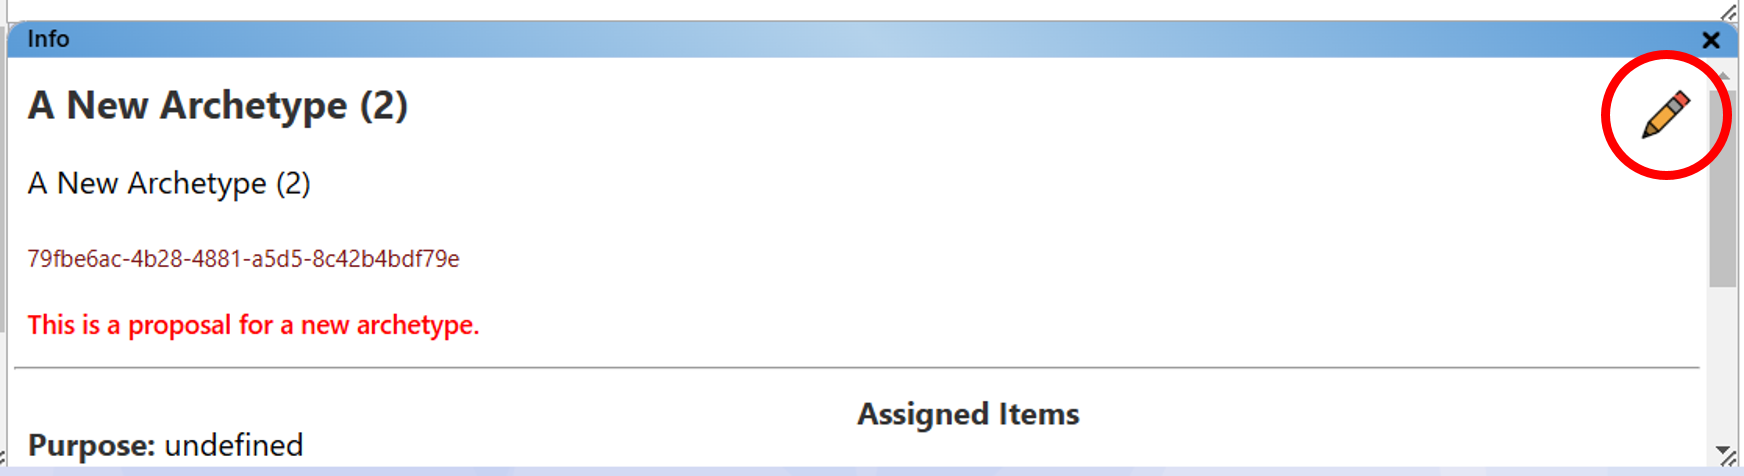
Edit option in the archetype info window, if a "new" archetype is selected.
Here, you can edit the concept name and the archetype ID. New archetypes are identified in the system by a unique UUID assigned during creation.
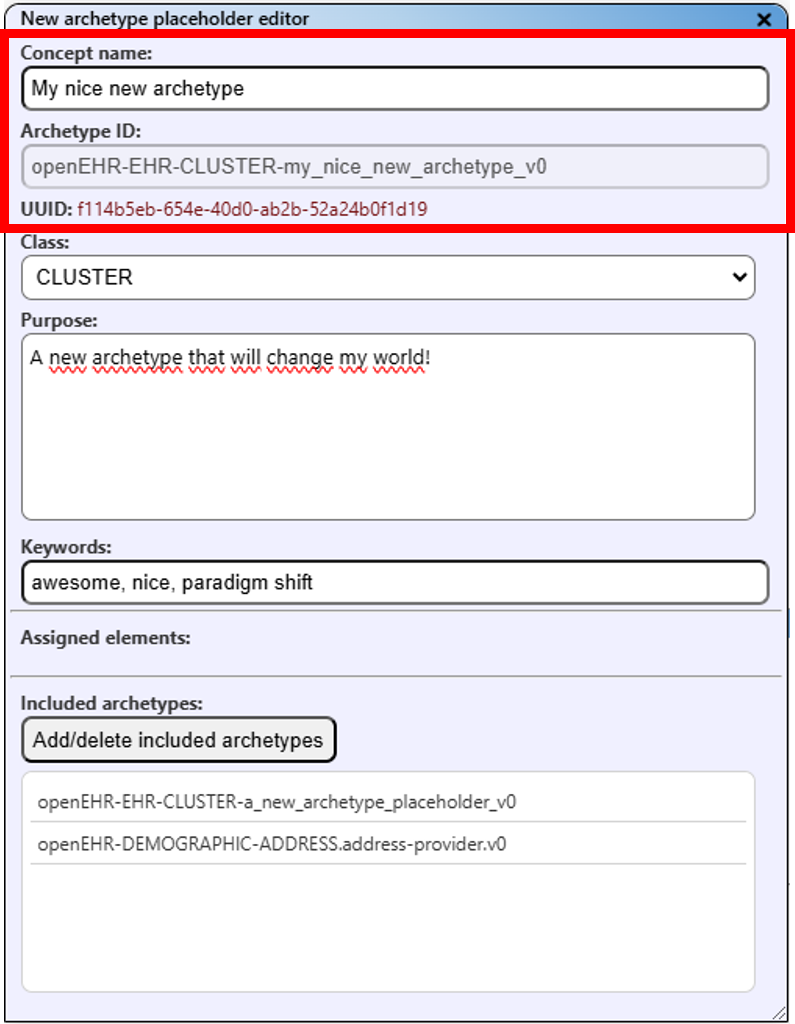
Create an identity for the new archetype.
You may also select a class for this archetype.
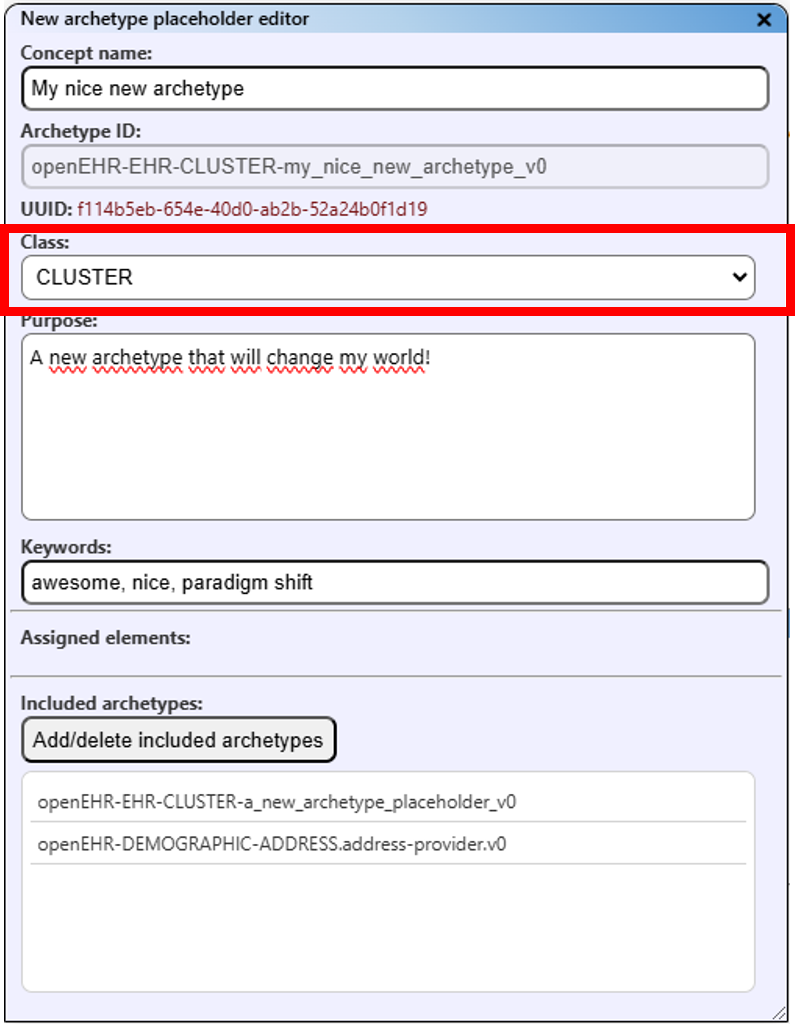
Select a class for the new archetype.
To finish, you can add a purpose and keywords to the new archetype.
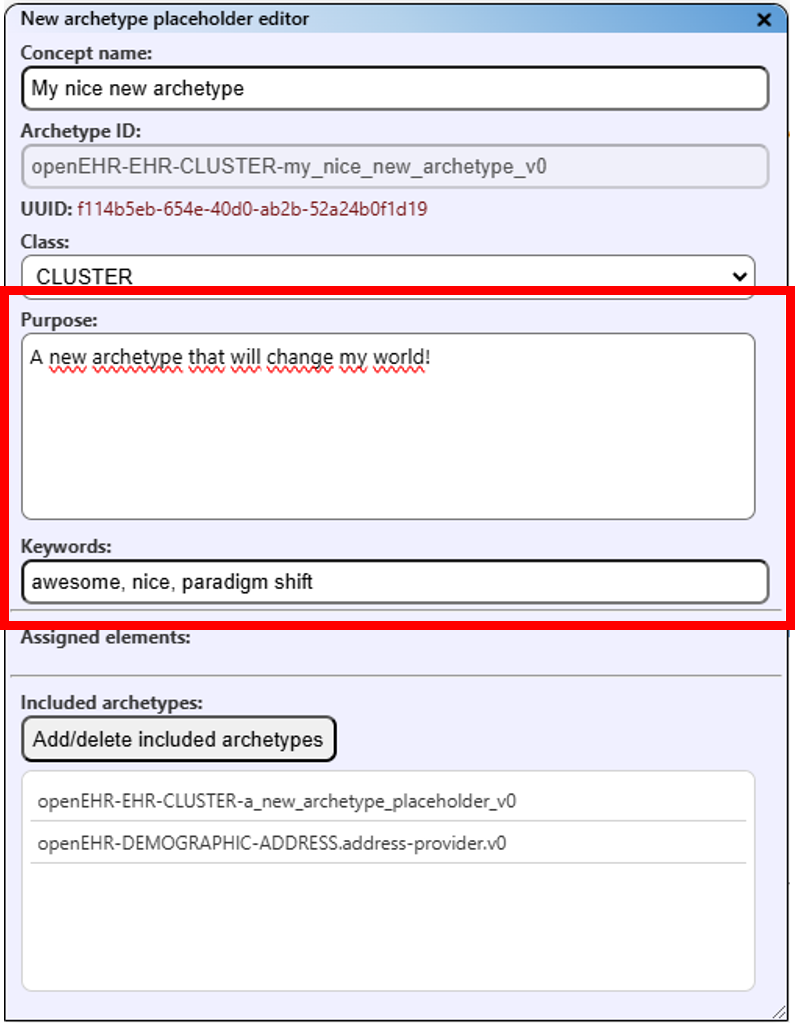
Adding more detail to the "new" archetype.
Please note that this "new archetype" does not constitute a "real" openEHR archetype. It is simply a tool to indicate the need for a new archetype in the repository.
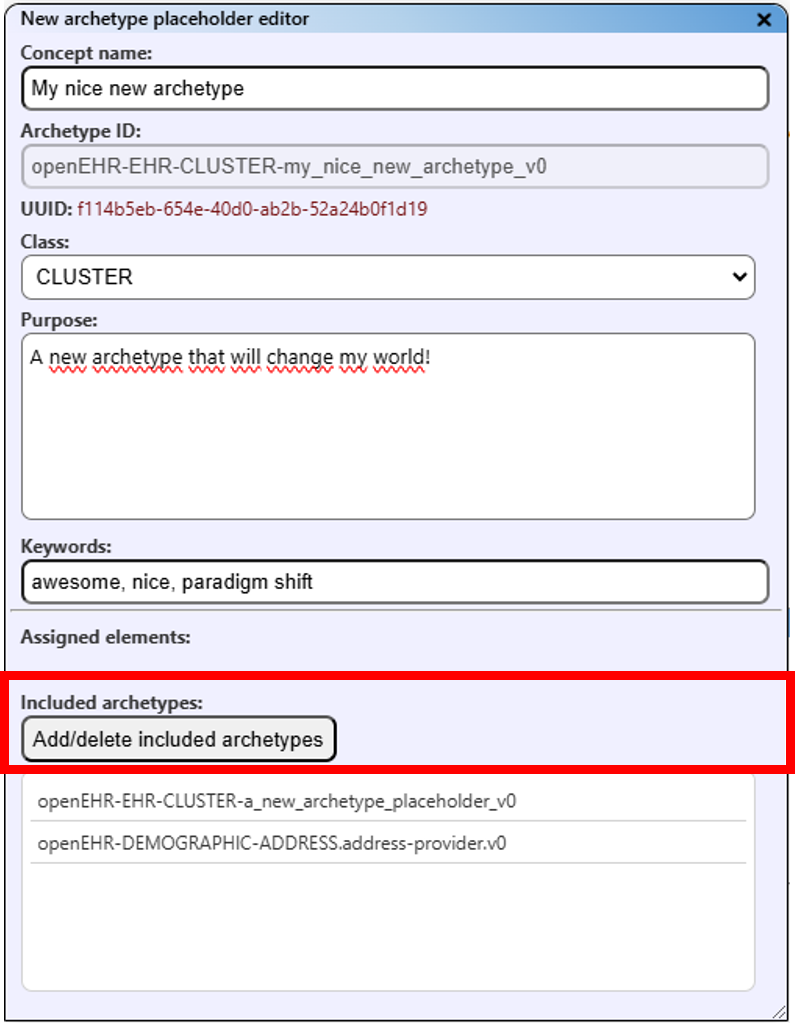
Include Archetype
If you plan to have a Cluster in the "new" archetype that is defined to include, you can add a list of inclusion statements. To do so, click on the "Add/delete included archetypes" button above the included archetypes list.
Select an the button to include (or delete) an archetype from the dropdown list.
In the opened list you can see all archetypes in your current archetype collection. Archetypes that are already in the inclusion list are marked in red, archetypes that are available for inclusion in green. To delete an archetype from the inclusion list, just click on its name in red. To add an archetype to the inclusion list, click on its name in green.
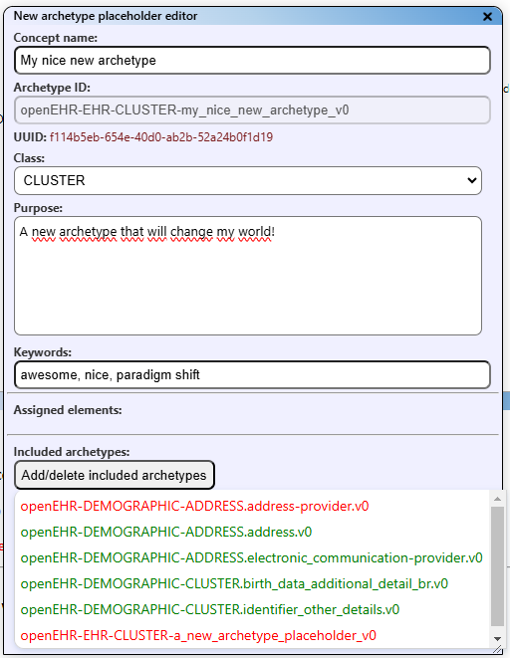
Add or delete the inclusion to/from the "new" archetype by clicking on its name.
Delete a "New" Archetype
If you no longer wish to keep the "new" archetype in your collection, you can delete it from the list. Click on the archetype in the new archetype list to select it. An icon will appear on the right of the new archetype list.
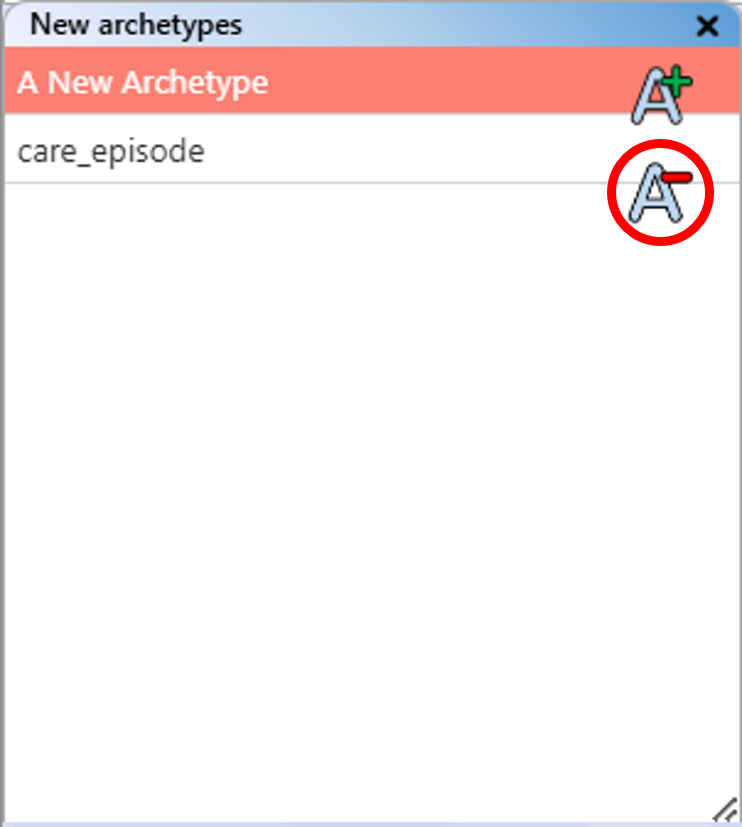
Delete the "new" archetype from the collection list.
Click the "Delete new archetype" icon. The archetype will be deleted permanently and will disappear from the new archetype list.
Managing Checklists
When exploring archetypes, you may need to find specific data elements that match a list you have prepared in advance. We refer to this structured list of data elements as a "checklist". Checklists help you track required data elements and ensure nothing is missed during modelling.
Where to find the checklist
You can see the checklist on the right-hand side of the main view. When creating a new project, this view is empty. To create or edit the checklist, click the "Edit" button in the checklist view. You can also open the editor via the Checklist Editor View at the top of the interface.

Access the checklist editor via the checklist or standard view.
The checklist is structured in sections and elements, allowing you to group data elements into sections for a basic structure.
Creating a Checklist in the Editor
Add a Section: To add elements, you must first create a section by clicking the “Add Section” button.
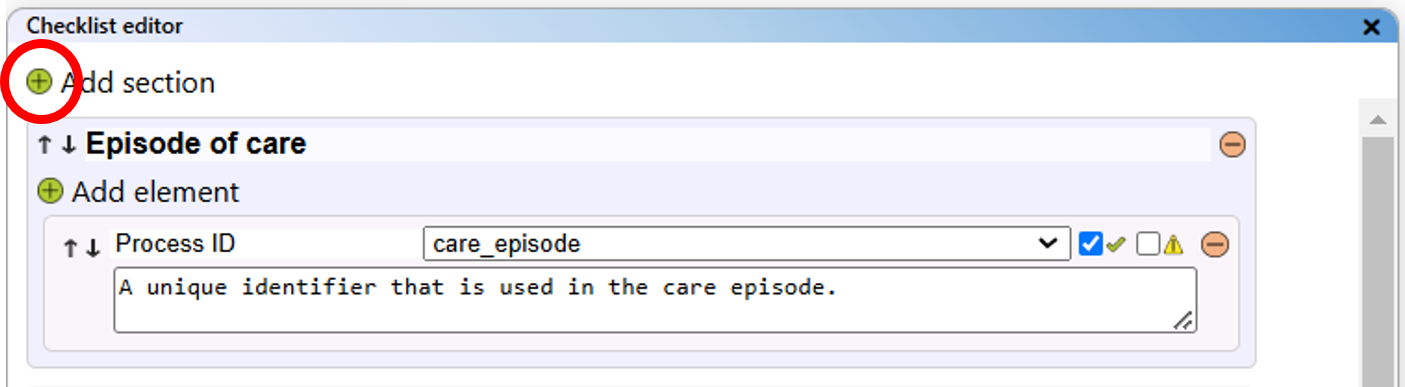
Add a section to the checklist.
You can rename the section by clicking its name and typing a new one. Please ensure each section has a unique name.
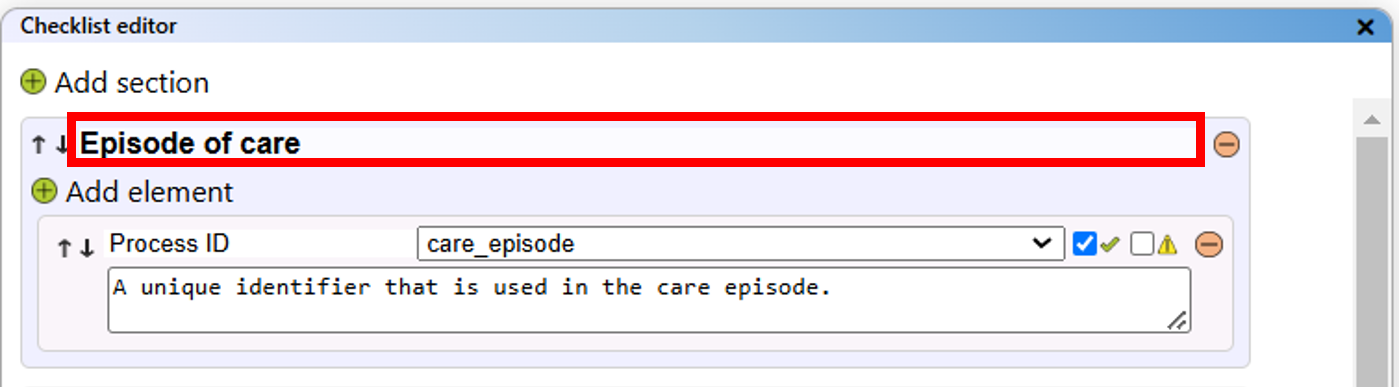
Rename the section with the corresponding input field.
Add Elements to a Section: Within a section, add individual data elements as needed by clicking the "Add element" button below the section name.
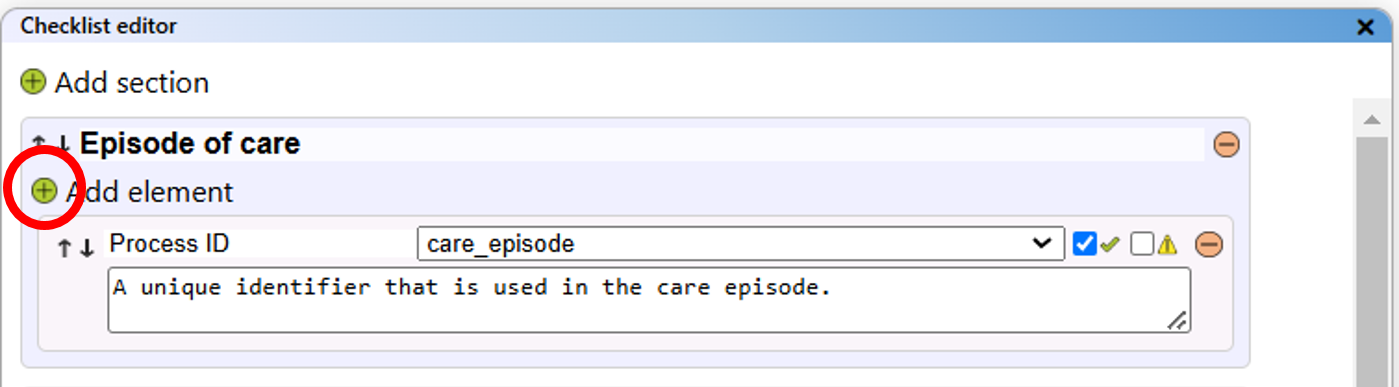
Add an element to a section of the checklist.
Each new element is automatically named, but you can change this by clicking on the name and typing a new one. Ensure element names are unique within each section.
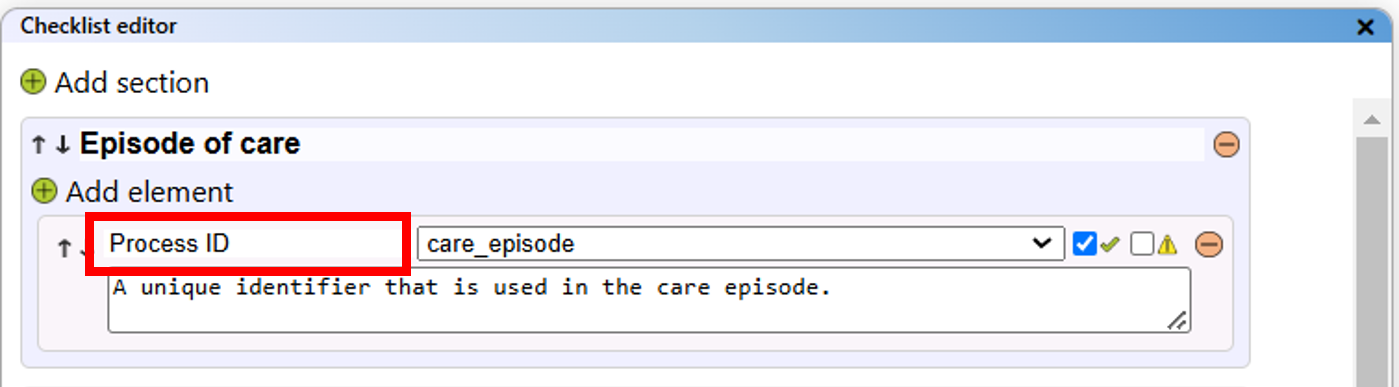
Rename the element with the corresponding input field.
Add element description: Under any element you can add a description in the text field. This description helps to better define the element.
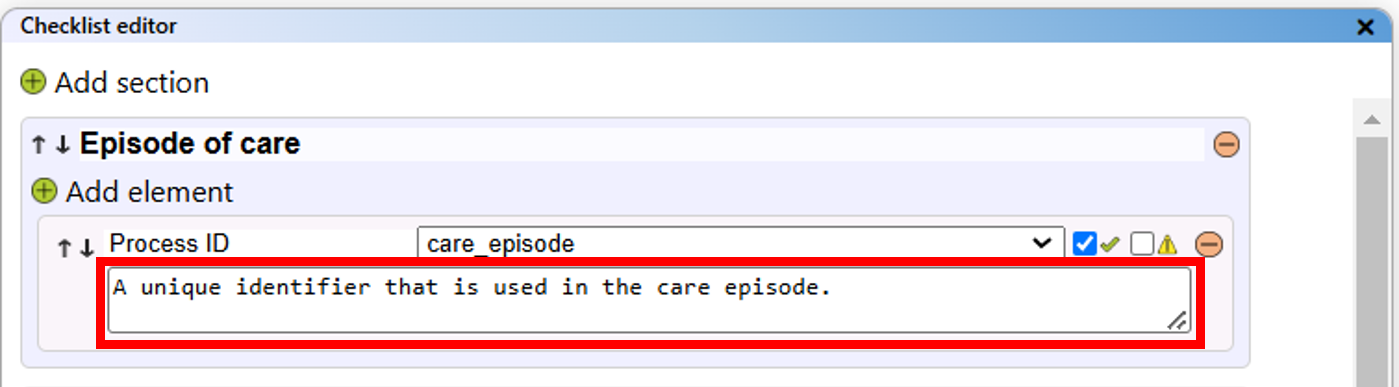
Add a description to an element.
Collapsing/Expanding Branches: Working on the checklist can be challenging. To help you focus on the section you are working on, you can collapse or expand sections as needed. Use the "Collapse All" button at the top to close all sections, or the "Expand All" button to open them. Each section also has a button on its right, labeled "Collapse" or "Expand", depending on its current state. Clicking this button will collapse or expand that specific section.
Collapsing the checklist items in the editor.
Move Sections or Elements: If a section or element is not in the desired position, use the arrow icons in front of the name to move it up or down.

Use the up and down arrow to move whole sections or single elements.
Delete Elements or Sections: To remove an item, click the "Delete" button next to it. Deleting a section will also delete all elements within that section.
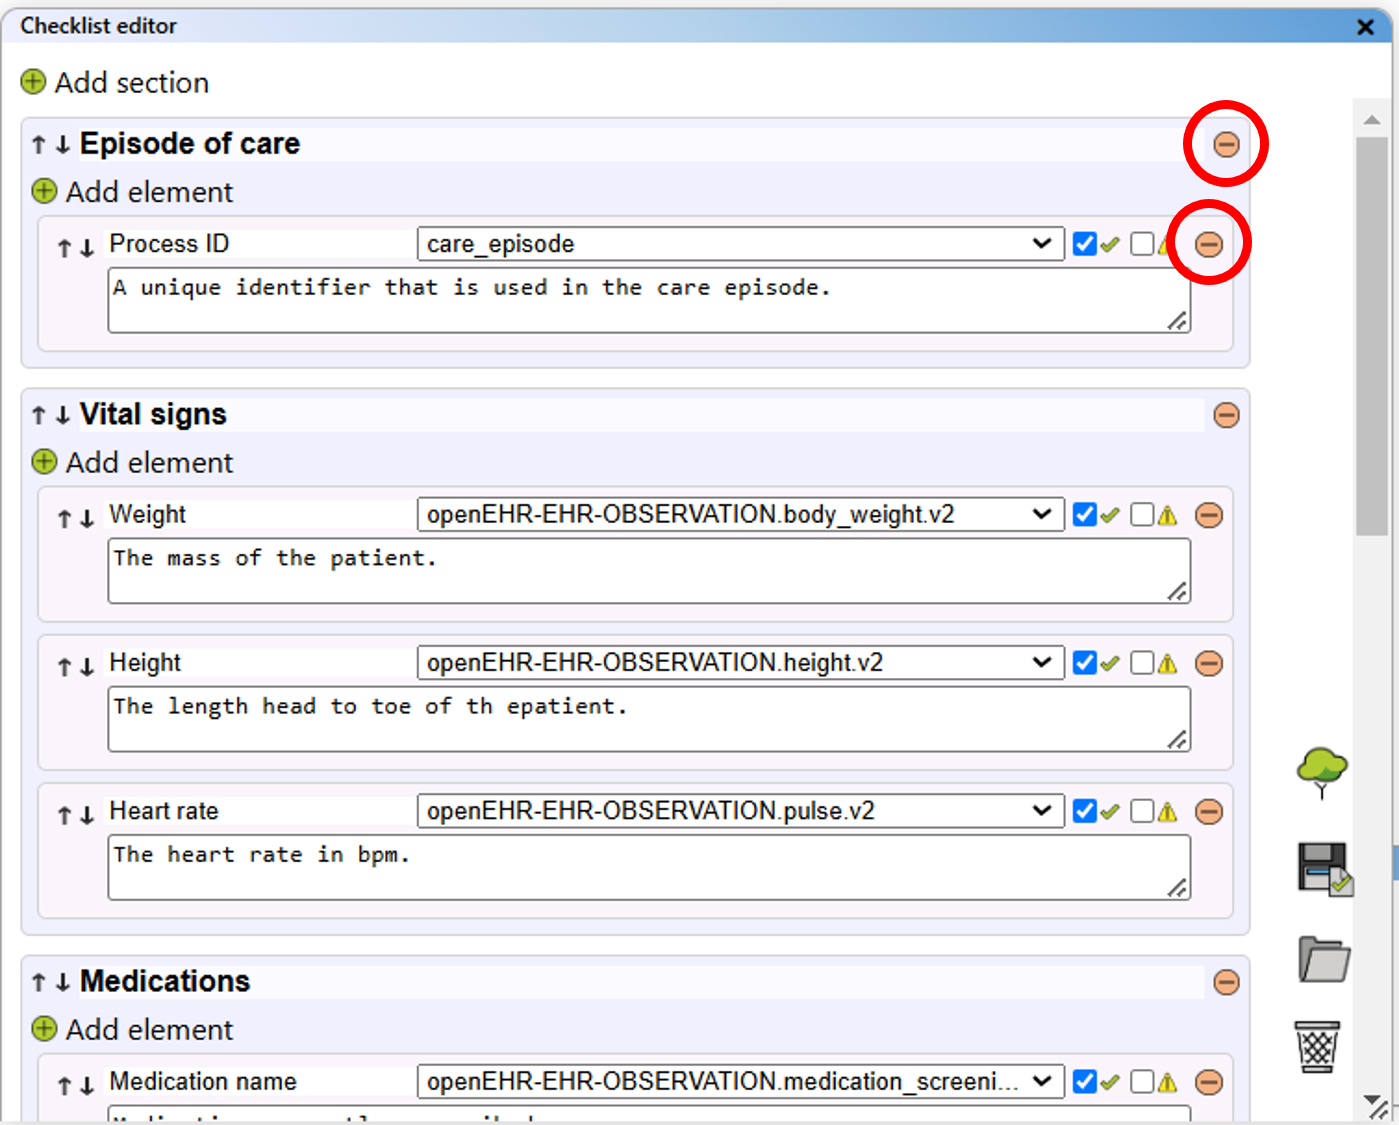
Delete whole sections or single elements.
Assigning Archetypes to Data Elements
If archetypes are available in the collection, you can assign any element to an archetype, indicating that the archetype contains an item equivalent to your data element. Use the dropdown list next to the element name to select the archetype. If an archetype is removed from the collection, any assignments to it will be reset.
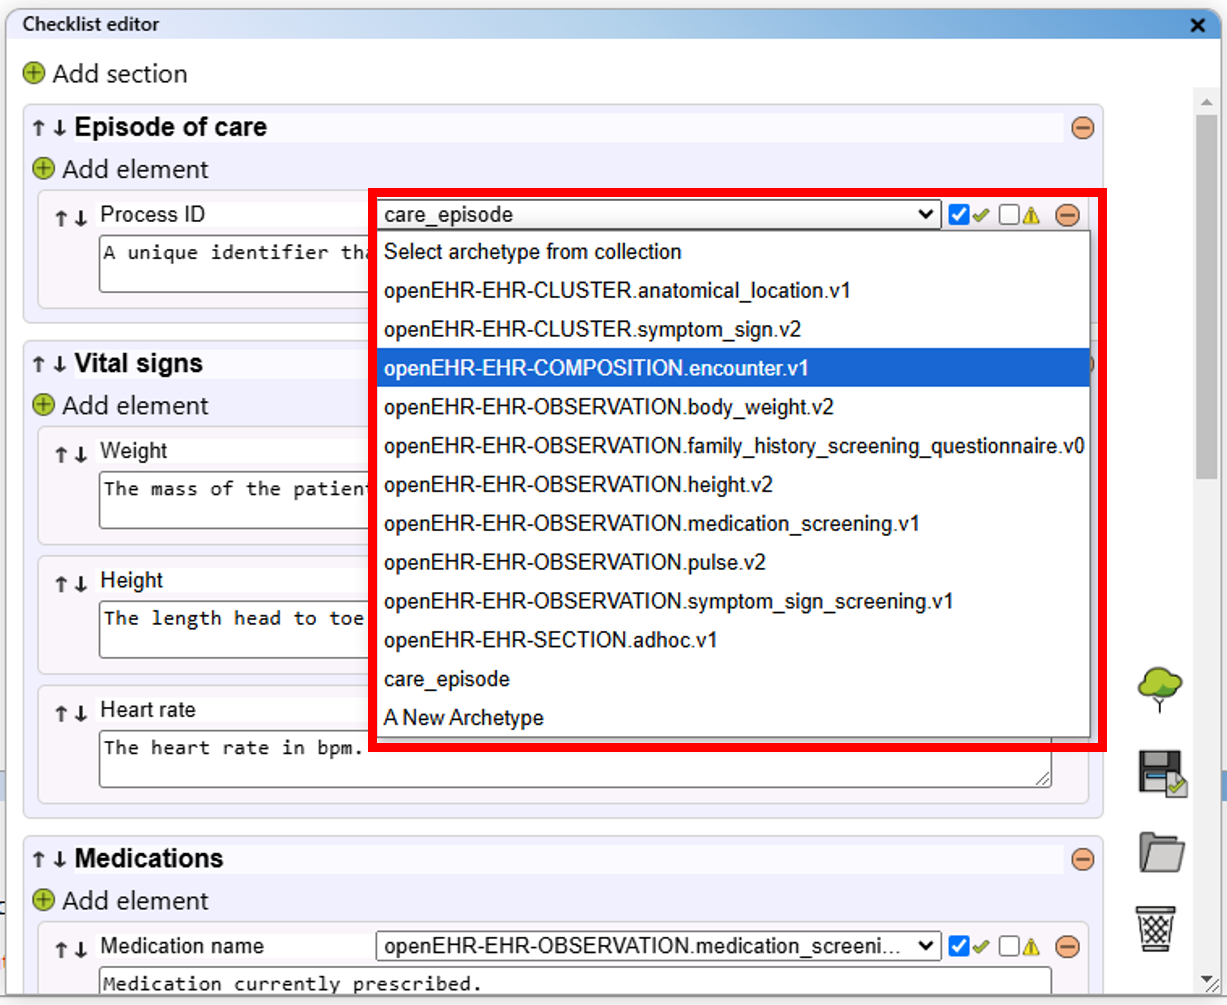
Use the dropdown menu to assign an archetype from the collection to an element.
Flagging Data Elements
Each element in the checklist editor has two checkboxes. Use the left checkbox to indicate that an element is complete. Use the right checkbox to mark elements that need further review.
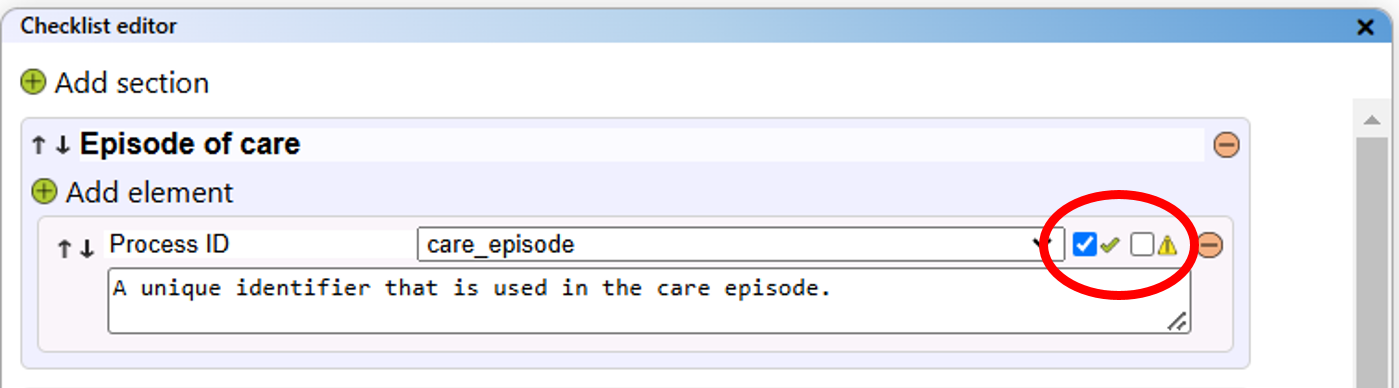
Flag elements as approved and/or pending review.
Hide/Show "approved" checklist items
When the checklist is show as a reminder in the right sidebar, you can toggle the visibility of already "approved" items. This makes it easier to see which items are still missing an archetype assignment.
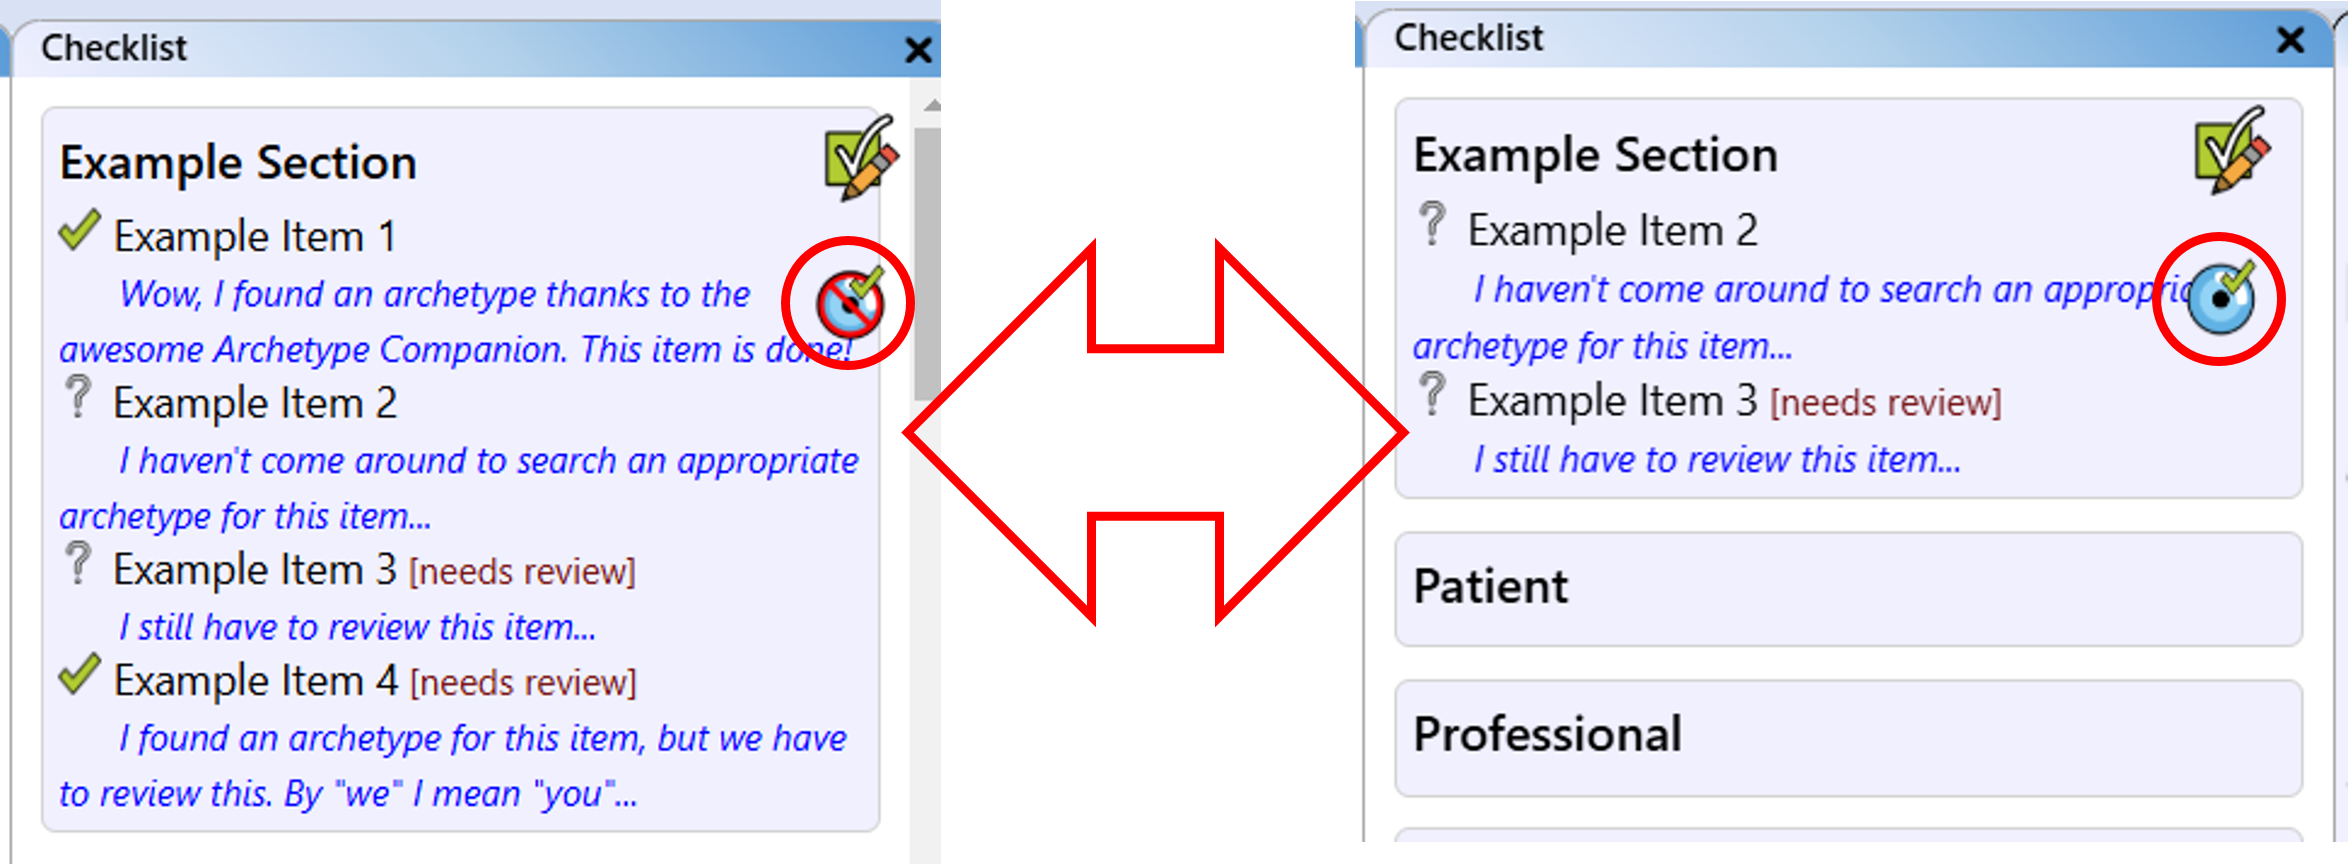
Toggle the visibility of checked items.
Save Checklist to Excel
You can export your checklist as an Excel file for offline editing or sharing. After entering the editor mode, click the "Save Checklist to Excel" button. The file is saved automatically to your browser's download directory. The filename includes the time, date, and project name (which may be modified for compatibility).
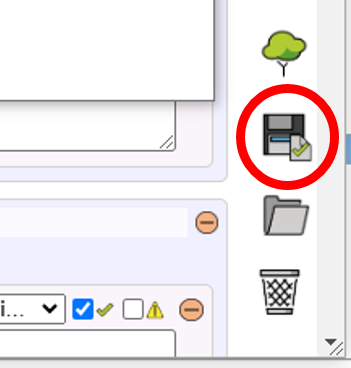
Save checklist to an Excel file.
Open Checklist from Excel File
If you prefer editing the checklist in Excel or have a checklist saved in Excel format, you can import it. In the checklist editor, click "Load checklist from Excel". Use the standard file dialogue to select and open your Excel file, which will load its content into the checklist editor.
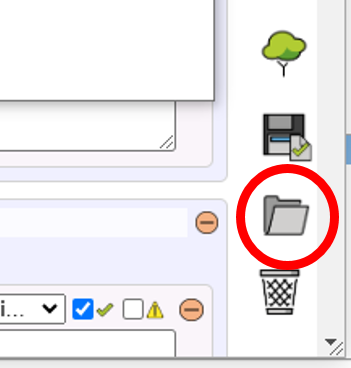
Load a checklist from an Excel file.
Delete a Checklist from Project
To delete the entire checklist, use the "Delete Checklist" button in the checklist editor.

Delete the checklist.
Managing a Template-like Structure (Template Planner)
The Archetype Companion includes a module that allows you to plan a tree structure, similar to an openEHR template. Please note that this tool does not create actual openEHR templates; instead, it serves as a support tool for designing structures before you begin modelling in a dedicated openEHR modelling tool.
When opened, the Template Planner appears on the left-hand side of the interface.
The open Template Planner.
Where to Find the Template Planner Editor
There are several ways to open the Template Planner. To access the standard Template Planner edit view, click the icon located in the upper right-hand corner of the interface. Alternatively, you can open the Template Planner in a floating window by clicking the tree icon in either the checklist view or the checklist editor, or by using the button in the sidebar.
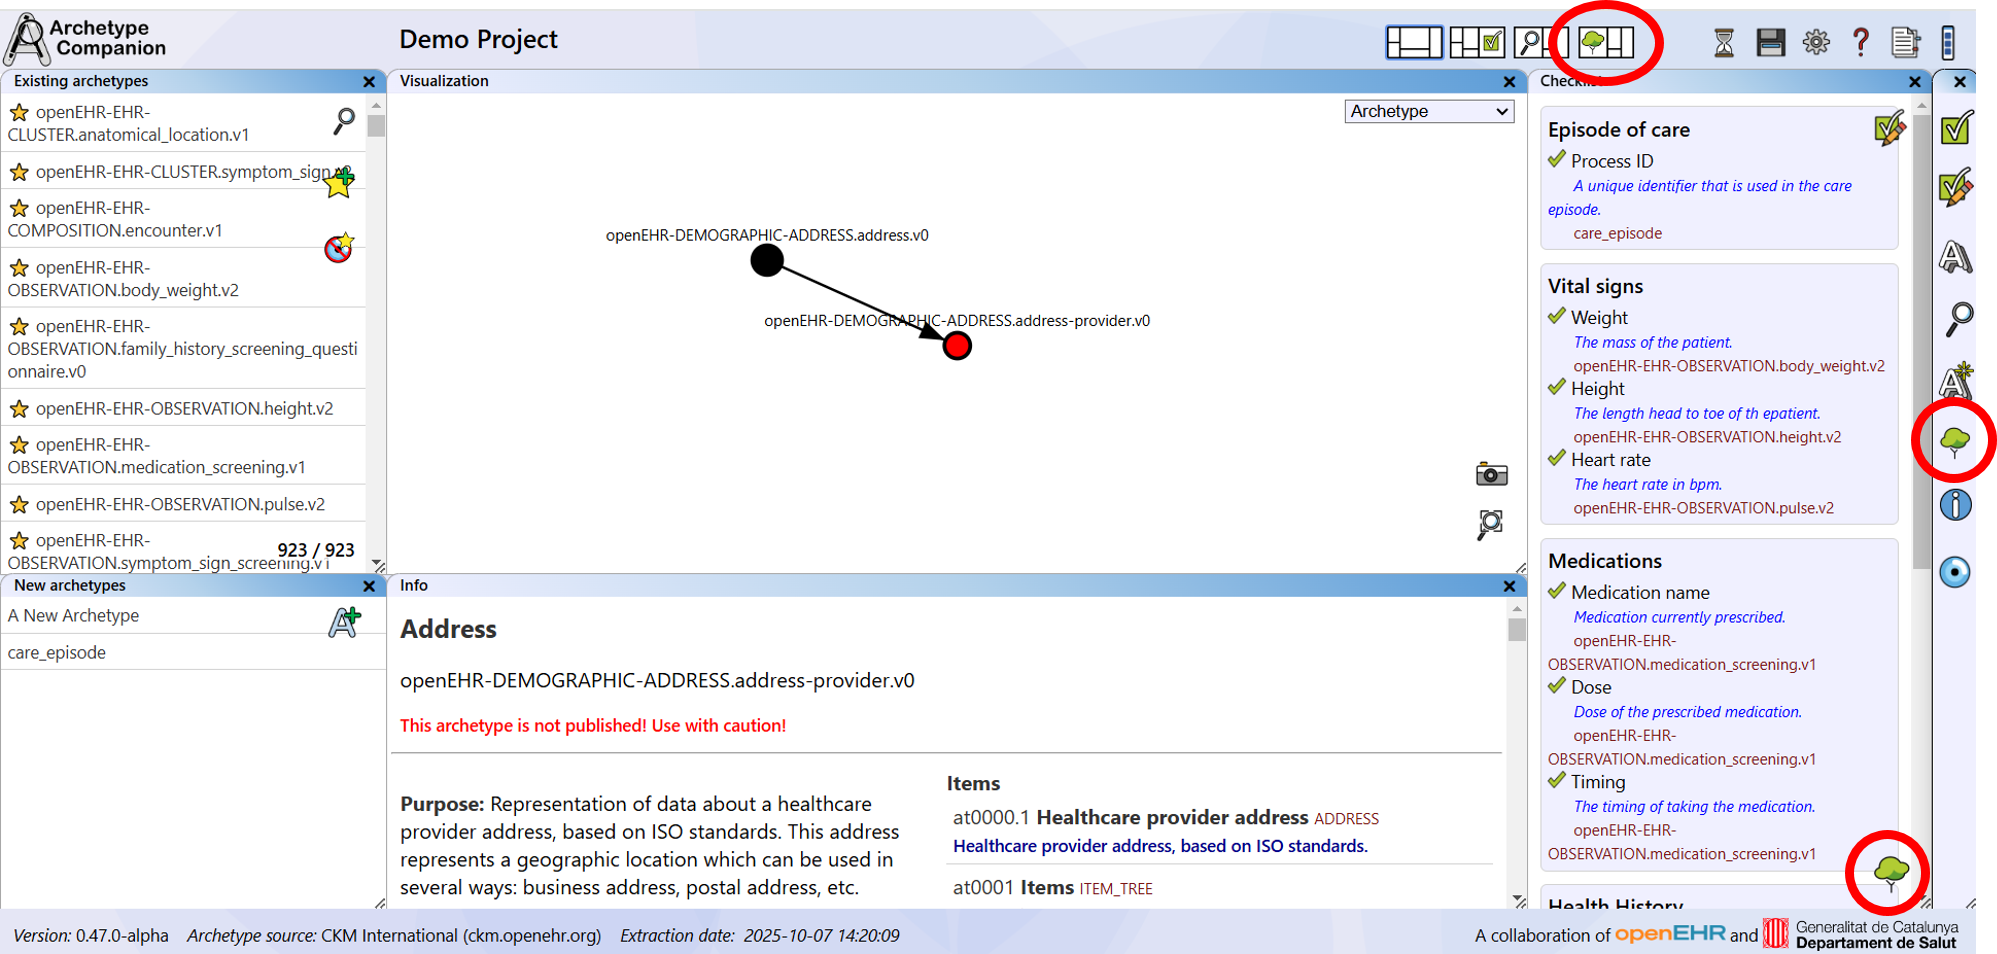
Access the Template Planner via the tree icon.
Selecting an Archetype
When you first open the Template Planner editor, only a single node of the tree is displayed. This node must be an archetype that serves as the root of the "template" (typically a COMPOSITION archetype). You can select one of the archetypes from the dropdown menu; note that only archetypes from your collection will appear here. Once selected, the default concept name of the archetype is inserted as the name. You can change this name if you wish.
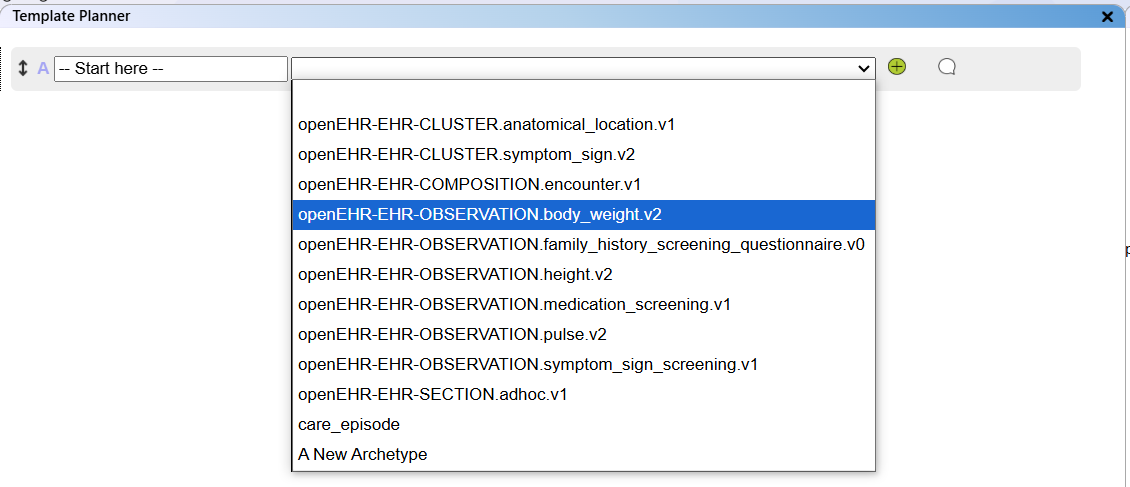
Select an archetype from your collection as a node of the tree.
Add archetype elements automatically
On top of the Template Planner editor you find a checkbox "Prompt archetype autofill".

Enable or diable the autofill option.
When selecting an archetype and the autofill lfeature is enabled, a message pops up that asks for confirmation of the autofill.
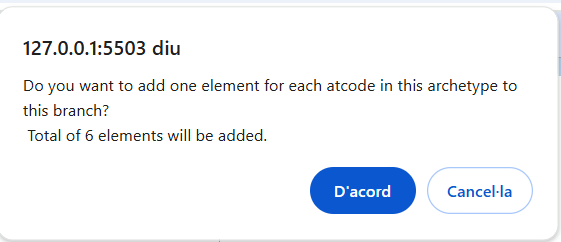
Confirm autofill on archetype selection.
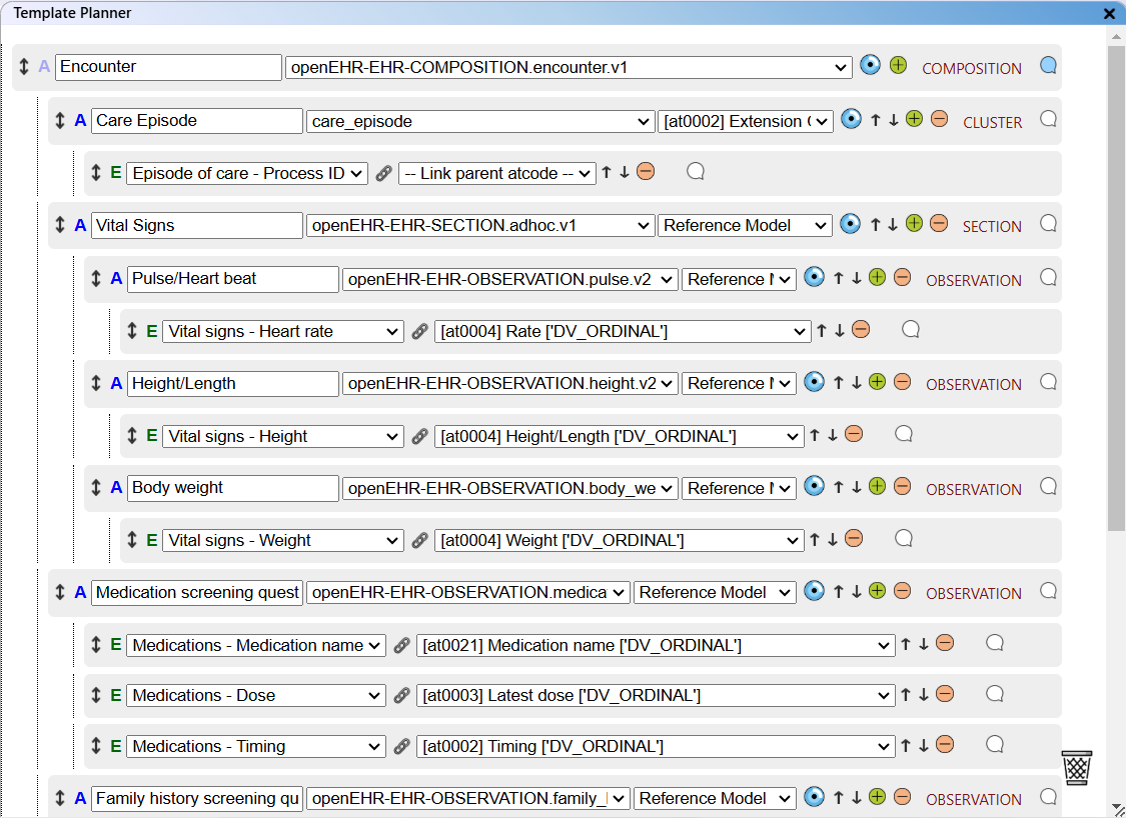
If the message is confirmed, all elements of the archetype are added to the current branch.
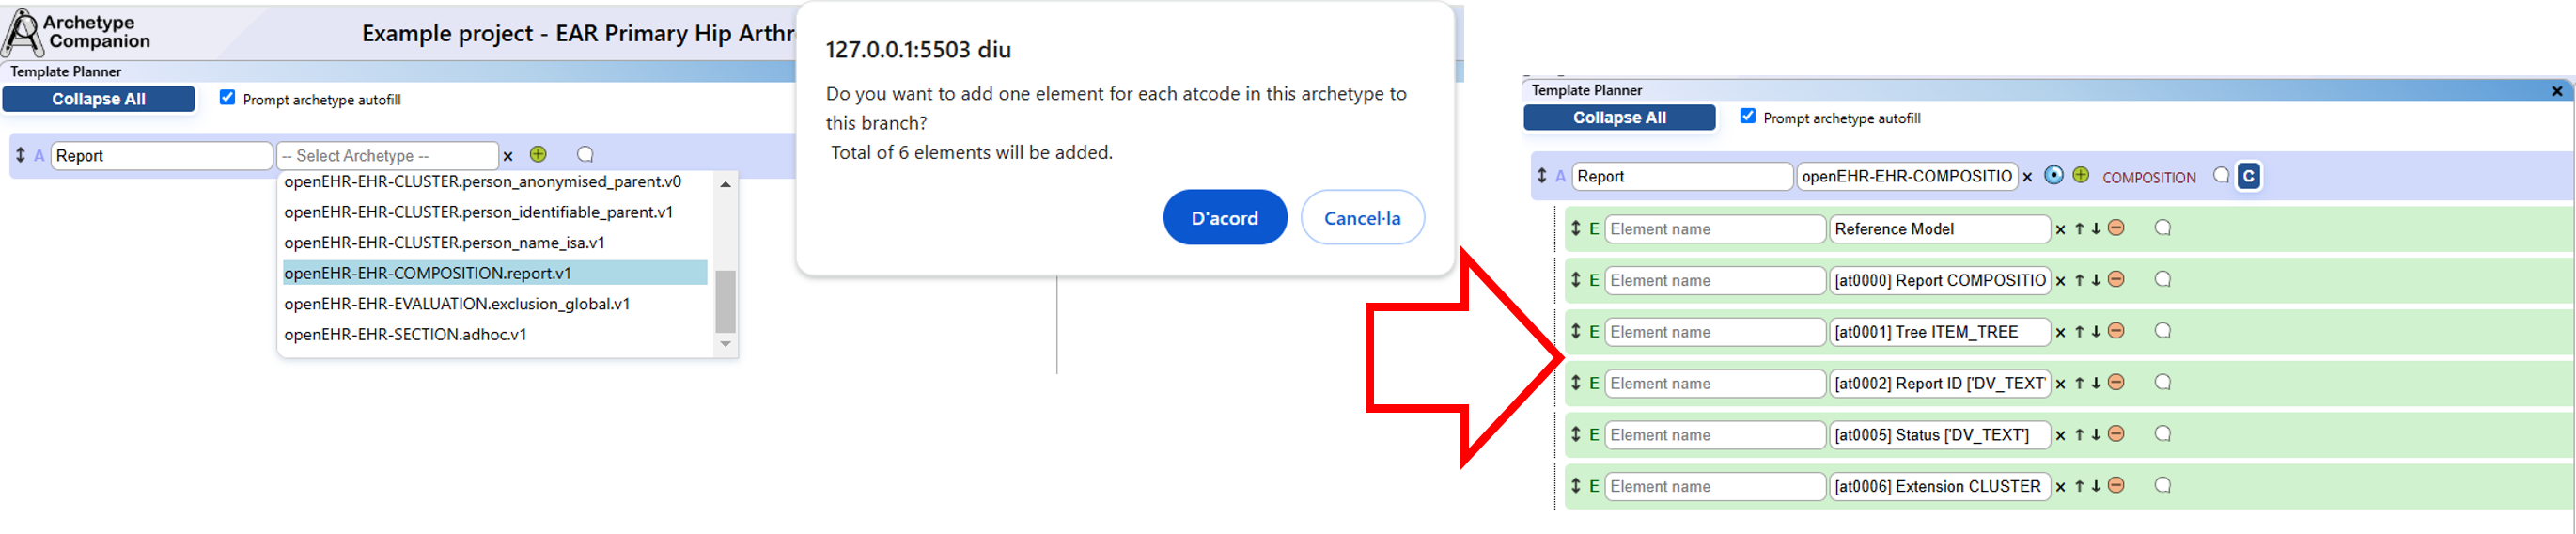
Elements are added automatically to the archetype branch.
Adding a Branch
Each archetype node in the tree can have subsequent archetype or element nodes associated with it. For
example, a SECTION archetype can include an OBSERVATION archetype, which in turn contains a data
element. Note that an element cannot contain other elements or archetypes.
To create a branch under an archetype node, click the "+" icon to the right of the node. This will
create a new archetype node.
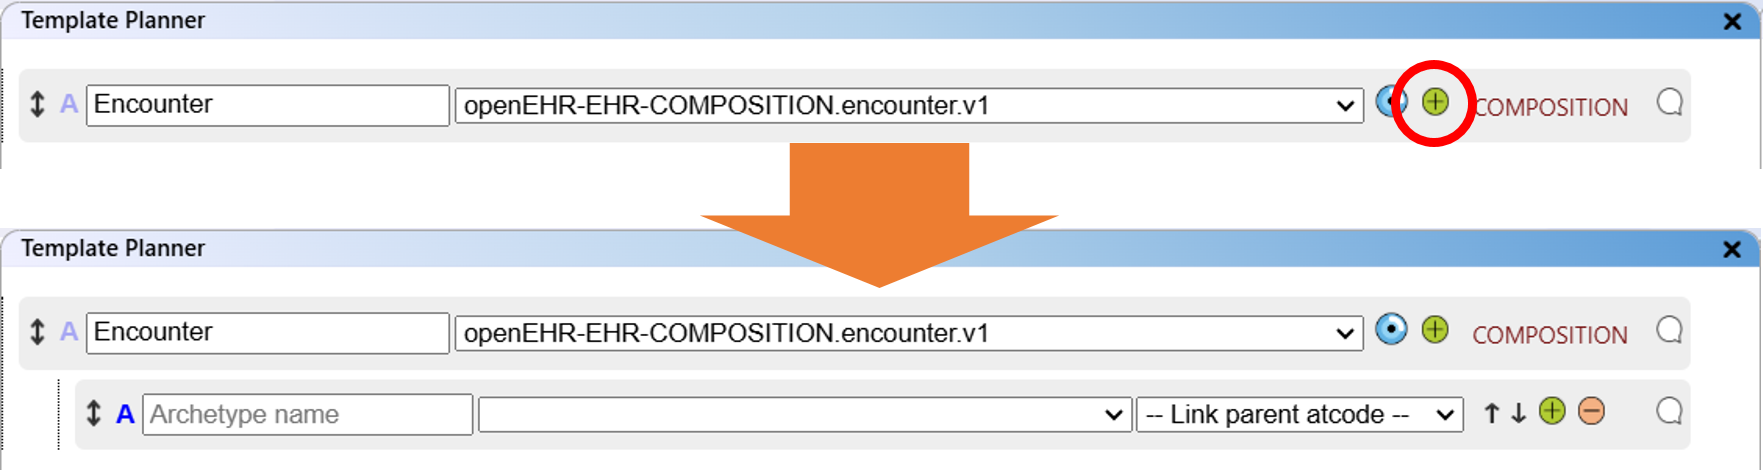
Adding a branch node to the tree.
Cloning a Branch
If you need to model structures with similar sub-structures, you can easily duplicate an entire branch—including its archetype and element hierarchy—by clicking the "Clone branch" button on the relevant archetype node.
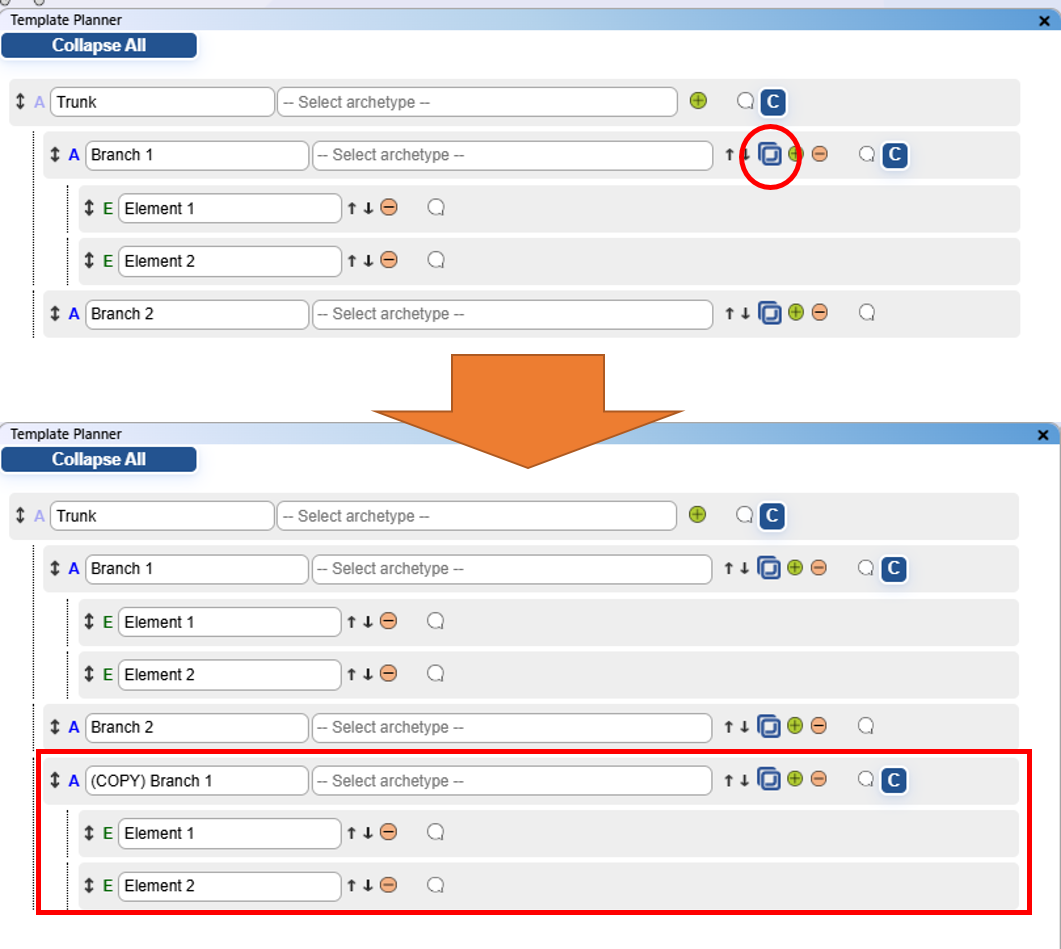
Cloning a branch node of the tree.
Deleting a Node or a Branch
To delete a node from the tree, click the "-" icon to the right of the node. This will remove the node, along with any underlying nodes associated with it.

Deleting a node from the tree.
Collapsing/Expanding Branches
Navigating complex tree-like structures can be challenging, and it’s easy to lose track of the overall layout. To help you manage these structures more efficiently, you can collapse or expand branches as needed. Use the "Collapse All" button at the top to close all branches, or the "Expand All" button to open them. Each archetype node with sub-branches also has a button on its right, labeled "C" (for collapse) or "E" (for expand), depending on its current state. Clicking this button will collapse or expand that specific branch.
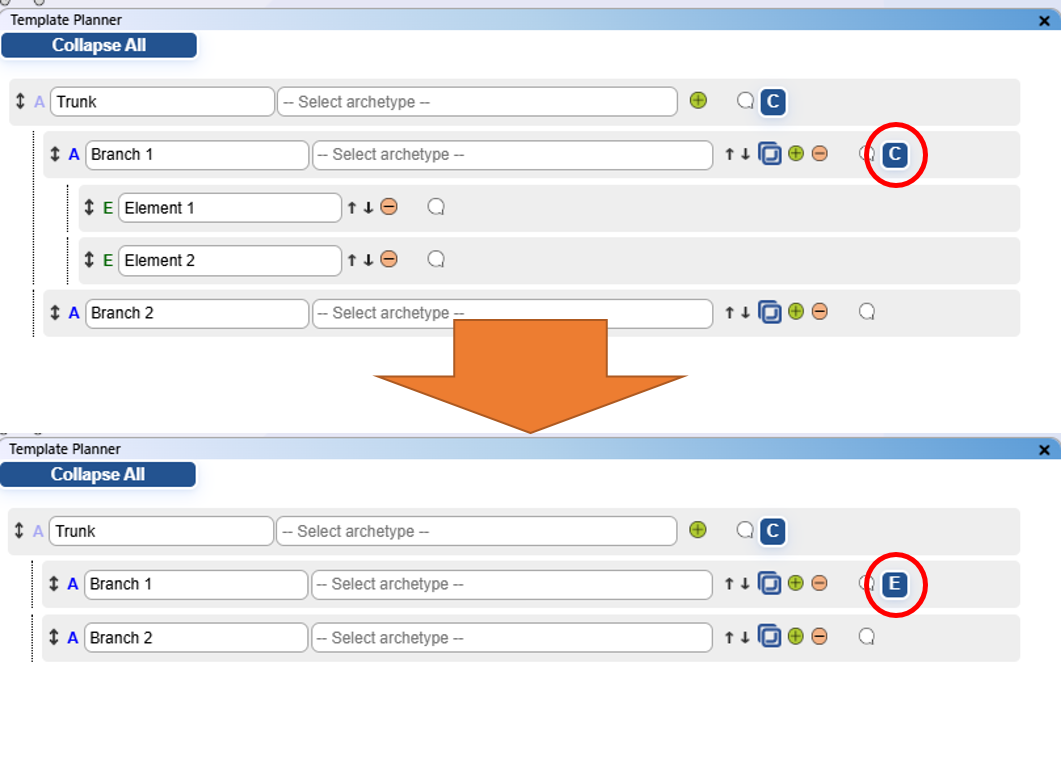
Collapsing a node from the tree.
Moving Nodes and Branches Around
If the order of the nodes or branches needs to be changed in the planned structure, the individual nodes
can be moved.
Every node has an up and down arrow on the right side. By clicking on these buttons, the individual node
is moved up or down.
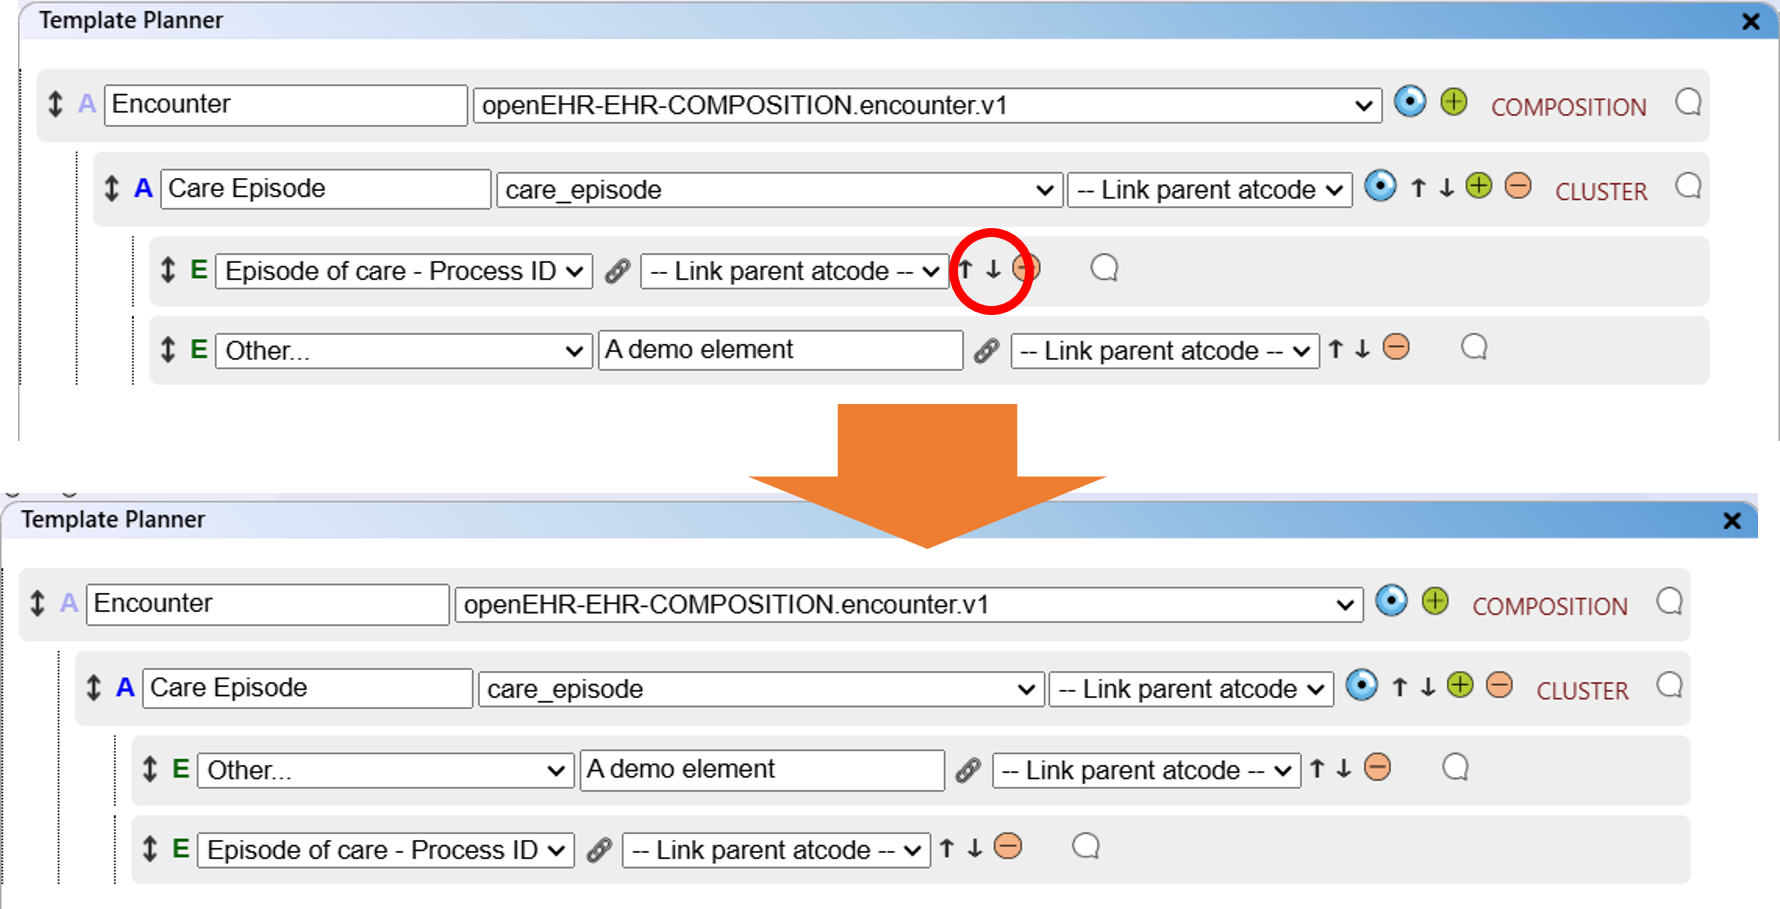
Move a node up or down.
Whole branches and elements can be moved via drag and drop. Click and hold on the double-arrow on the left side of the node. You can now drag the node into another node.
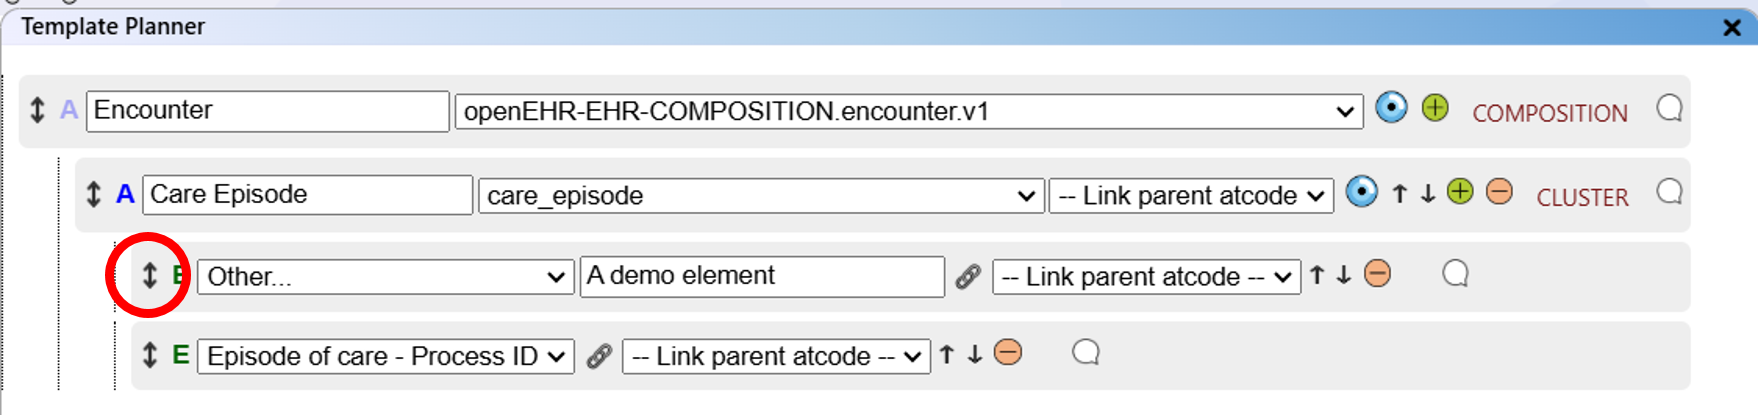
Drag and drop a node or branch.
Switching Between Archetype and Data Element
A node in this tree can represent either an archetype or a data element.
Once a node is created, you can switch between the two modes by clicking the "A" (or "E") icon to the
left of the node.
Please note that changing modes will delete the information associated with the node (such as the name
or archetype ID). Additionally, if you change an archetype node that has sub-nodes, all sub-nodes will
also be deleted.
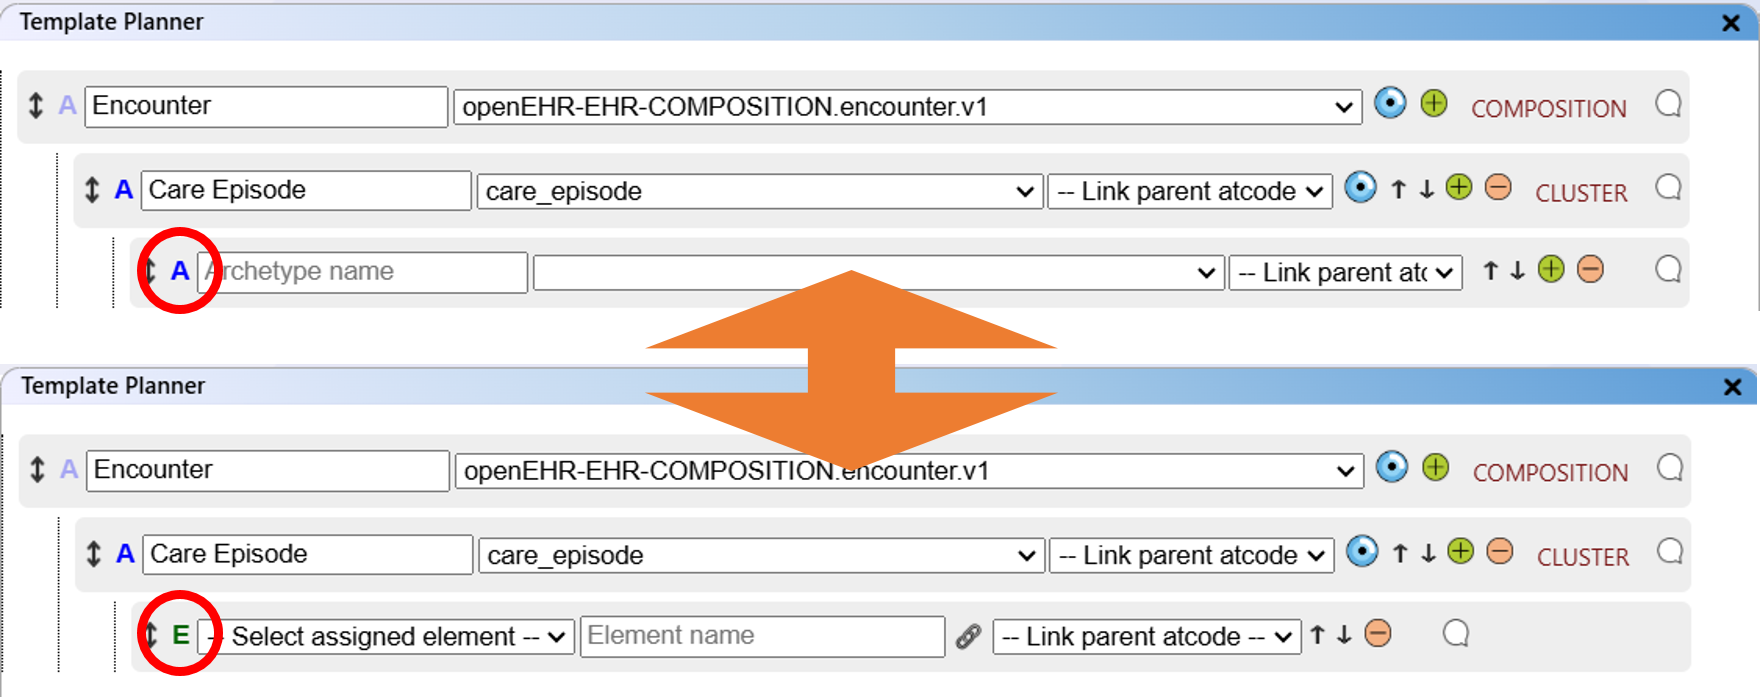
Switching between "archetype" and "data element" node modes.
Archetype Nodes
In contrast to element nodes, an archetype node has a selection dropdown menu to select the archetype from the "archetype collection".
One special item in an archetype node is the ability to "focus" on this node. If an archetype is selected from the collection, you can click on the focus icon. This will select the archetype and load its information in the archetype information window and the visualisation window.

The focus on node icon.
Data Element Nodes
Data element nodes come in two forms. If an archetype has data elements assigned in the checklist, the data element node in the tree that has been added under this archetype becomes a selection. You can select one of the assigned data elements or enter another data element name. Note that the data element names consist of the section and the element name of the checklist.

If an archetype has data elements assigned in the checklist, the data element node in the tree is a selection.
If an archetype has no data element assigned in the checklist, the data element node in the tree is an input field for the name.

If an archetype has no data element assigned in the checklist, the data element node in the tree is an input field for the name.
Commenting Nodes
Every node in the tree can have a comment. To open the comment text field, you can click on the speech bubble on the right of the node.

Toggle the comment text field for a node.
This opens a text field in which you can store a comment. You can collapse the text field by clicking again on the speech bubble.

Enter a comment into the text field.
Note that in the presence of a comment, the speech bubble turns blue. If the comment text fields are collapsed, it is easy to see where comments exist.
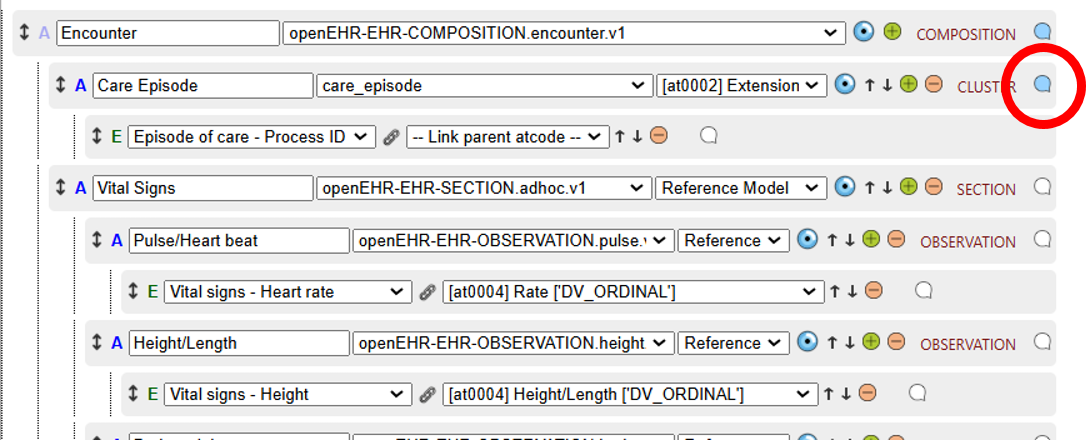
Blue speech bubbles indicate the presence of a comment.
Assigning "atcode" Item to Archetype or Element
If a node is added to an archetype node that has been selected from the archetype collection, you can select the atcode of the archetype that you would like to add the new node to. You can select the code from the dropdown menu. The assignment of the code will be visible in the project report.
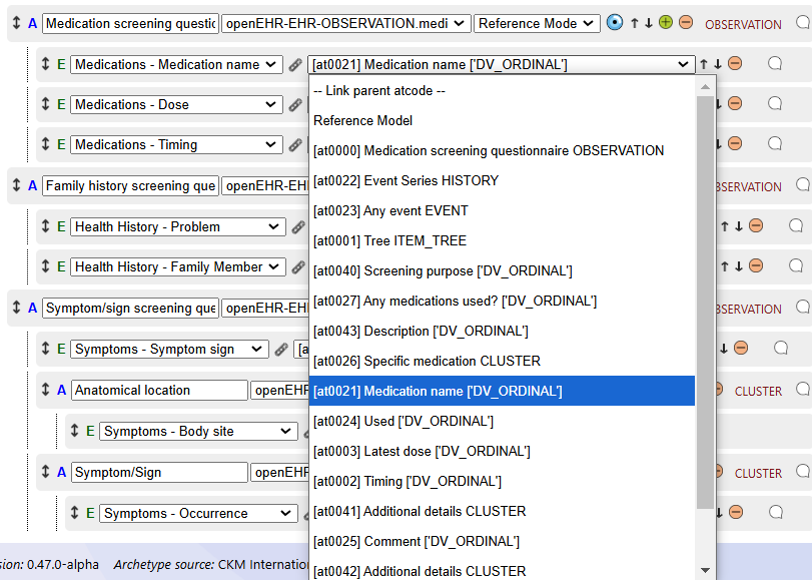
Assign atcode of the parent archetype to the node.
Compatibility Warnings
As a support for the openEHR template modelling process, the Template Planner offers a compatibility
warning for the different archetype classes. In the openEHR framework, not every class can be
incorporated into any other class. A possible compatibility issue is indicated by a yellow warning sign
to the left of the archetype node.
Note that this is only a reminder to check the compatibility between different archetypes. A warning can
be shown, even if the archetypes are compatible.

Compatibility warning for an archetype class that has been included (possibly) incorrectly into another archetype class.
The compatibility between archetype classes can be visualised as puzzle pieces:
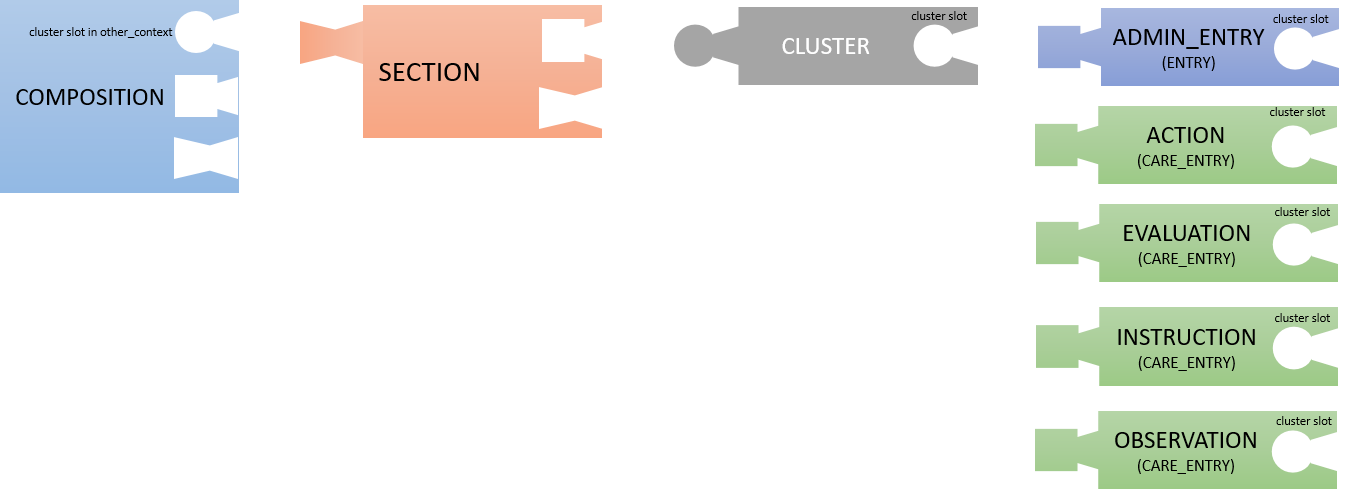
Compatibility between archetype classes.
Translating the previous figure into a table, we can easily check if a class is compatible or not.
| Class | Can be added to | Can contain |
|---|---|---|
| COMPOSITION | --- | CLUSTER (if slot added to context/other_context) SECTION ENTRY |
| SECTION | COMPOSITION SECTION |
ENTRY SECTION |
| CLUSTER | COMPOSITION (if slot provided) CLUSTER (if slot provided) ENTRY (if slot provided) |
CLUSTER (if slot provided) |
| ENTRY (ADMIN_ENTRY, ACTION, EVALUATION, INSTRUCTION, OBSERVATION) |
COMPOSITION SECTION |
CLUSTER (if slot provided) |
Delete All Template Planner Data
To delete all data from the Template Planner, click the "Delete" icon in the lower right-hand corner of the window.
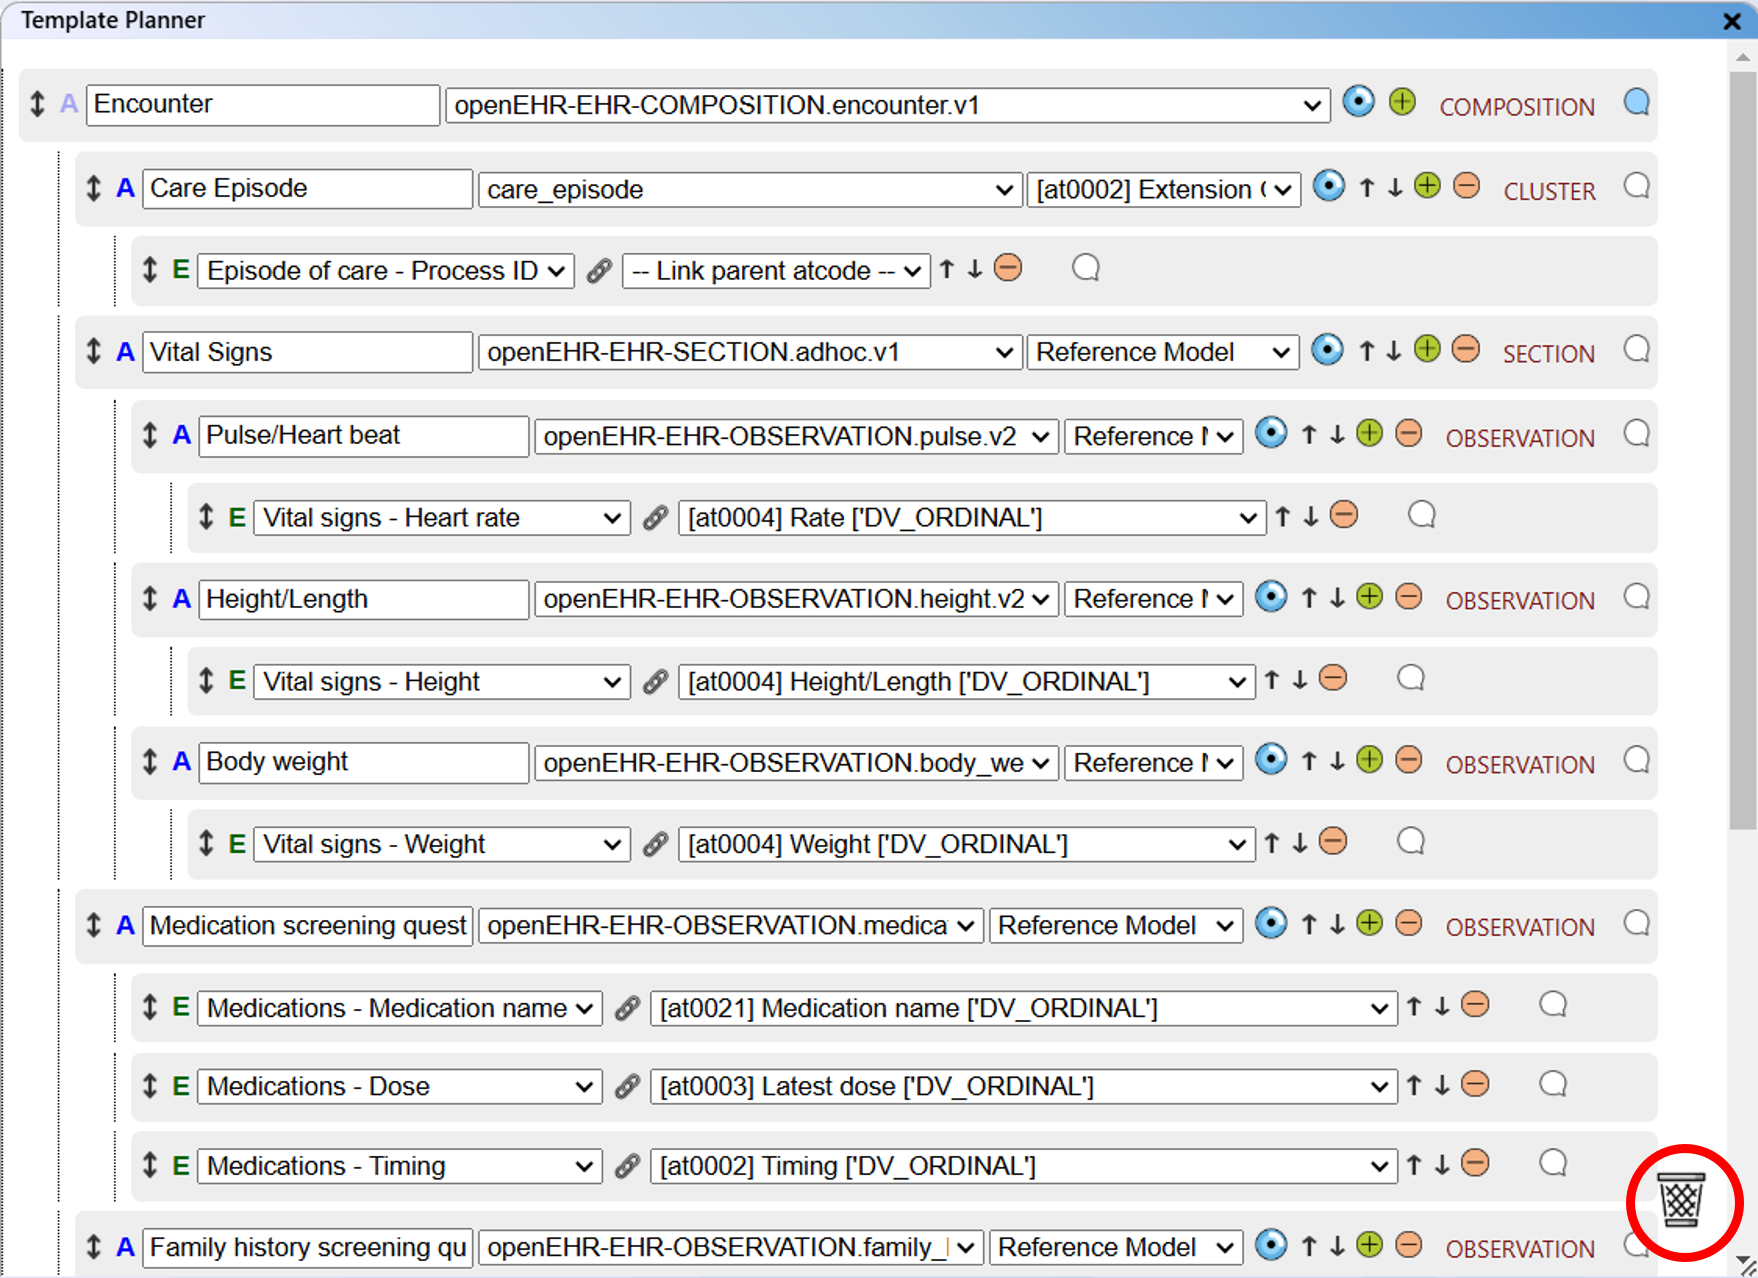
Delete everything in the tree.
Template Planner and Visualisation
If you want to see a simple representation of the Template Planner content, you can select "Template Planner" in the visualisation window. The nodes of this visualisation show the archetypes (blue) and assigned elements (green). This view can help you to navigate the planned structure more easily, without the extended information of the Template Planner.
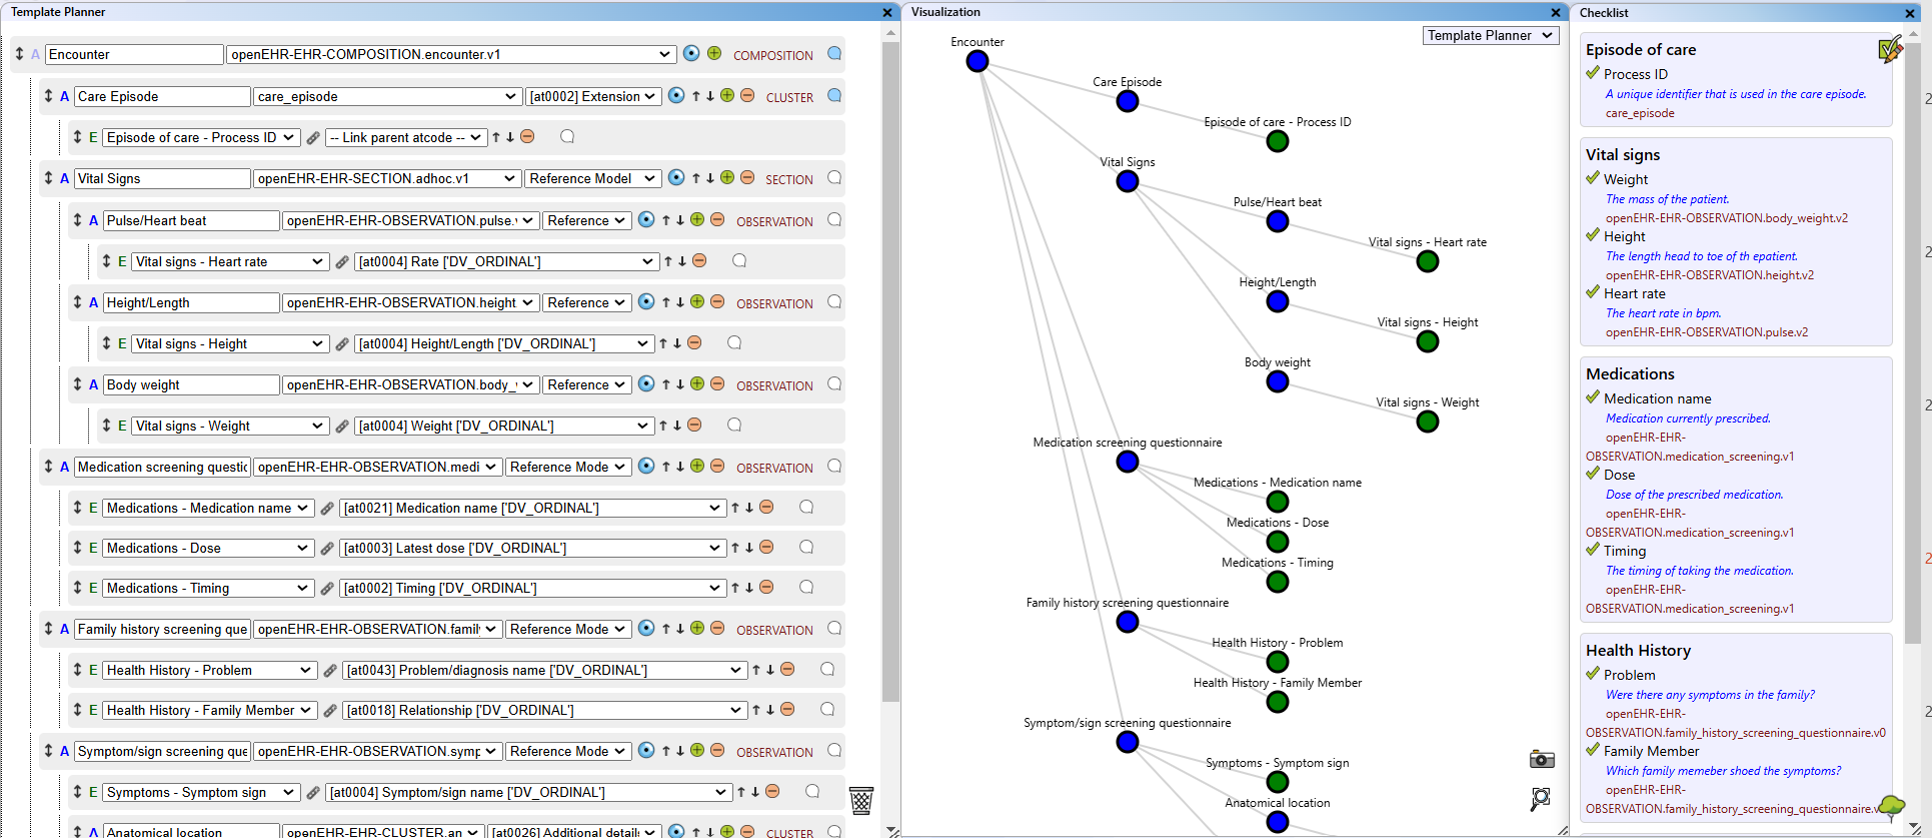
Network visualisation of the planned tree structure.
Template Planner Data in the Report
When creating the report for the project, the data from the Template Planner is used to create a list with all elements that were defined. An example of this list, as found in the report, can be seen here:
-
Encounter
openEHR-EHR-COMPOSITION.encounter.v1
Type: COMPOSITION
archetype
I think that this is the best archetype for the job.-
Care Episode -- [at0002] Extension
CLUSTER
care_episode
Type: CLUSTER
archetype
This is a specific archetype for our DEMO institution. It helps us to track the care episode.-
Episode of care - Process ID
element
-
Episode of care - Process ID
-
Vital Signs -- Reference
Model
openEHR-EHR-SECTION.adhoc.v1
Type: SECTION
archetype-
Pulse/Heart beat -- Reference
Model
openEHR-EHR-OBSERVATION.pulse.v2
Type: OBSERVATION
archetype-
Vital signs - Heart
rate -- [at0004] Rate
['DV_ORDINAL']
element
-
Vital signs - Heart
rate -- [at0004] Rate
['DV_ORDINAL']
-
Height/Length -- Reference
Model
openEHR-EHR-OBSERVATION.height.v2
Type: OBSERVATION
archetype-
Vital signs - Height --
[at0004] Height/Length ['DV_ORDINAL']
element
-
Vital signs - Height --
[at0004] Height/Length ['DV_ORDINAL']
-
Body weight -- Reference
Model
openEHR-EHR-OBSERVATION.body_weight.v2
Type: OBSERVATION
archetype-
Vital signs - Weight --
[at0004] Weight ['DV_ORDINAL']
element
-
Vital signs - Weight --
[at0004] Weight ['DV_ORDINAL']
-
Pulse/Heart beat -- Reference
Model
-
Care Episode -- [at0002] Extension
CLUSTER
Visualisation
The network visualisation feature of the application provides an intuitive way to see relationships between archetypes. Different visualisation modes allow you to display archetype dependencies, similarities, your archetype collection, the overall project structure, and the template planner tree.
Where to Find the Visualisation Window
In the standard main view, the visualisation feature is located in the centre section of the screen. Before exploring the different views, it is helpful to understand how to navigate the visualisation canvas.
Where to find the visualisation.
Navigating the Visualisation
Move: To move the network visualisation canvas, click and hold the left mouse button on an empty space and drag the network around.
Zoom: To zoom in or out, use your mouse wheel while the cursor is over the canvas. Alternatively, you can use pinch gestures on a trackpad.
Reset Zoom: To reset the position and zoom, click the "Reset Zoom" icon in the lower right-hand corner of the visualisation.
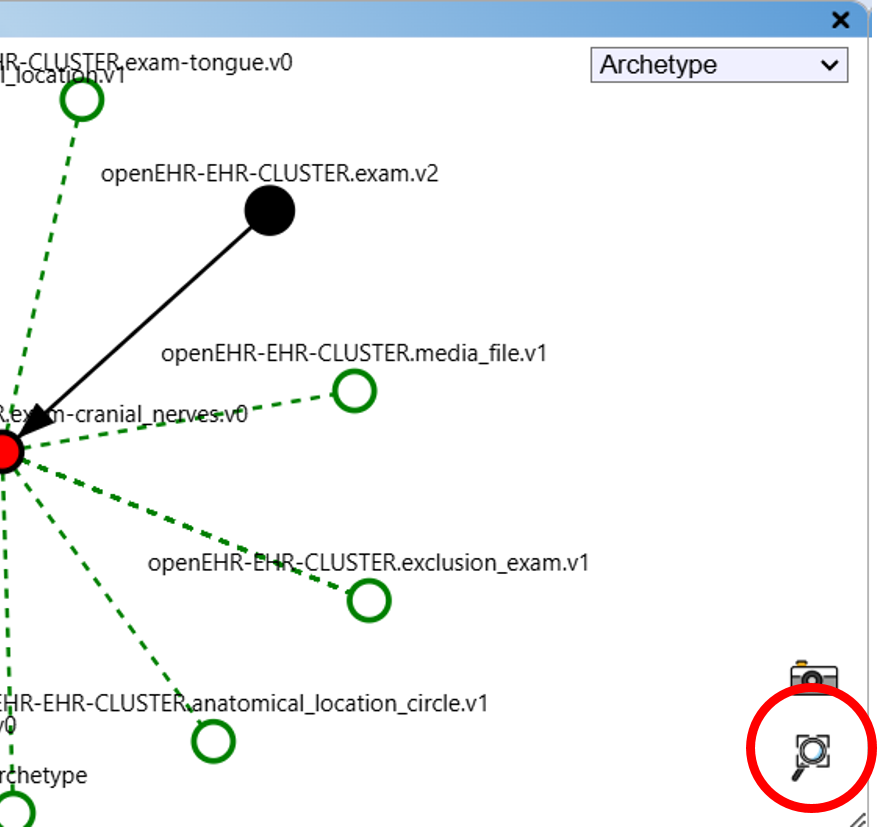
Reset zoom button.
Focus on Archetype: To focus on a specific archetype in the network, click on its node with the left mouse button.
Go back one archetype at the time: When more than one archetype has been shown in the past, a button apppears in the upper left corner. By clicking this button, you can focus en the last visited archetype.

One step back button.
The Different Views
The network visualisation has various views that can be selected with the dropdown menu on the upper right side of the window. You can select between Archetype, Archetype Structure, Similar, Archetype + Similar, Collection, Project, and Template Planner view.
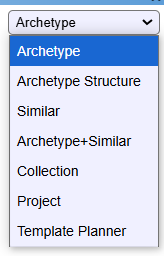
The view selection.
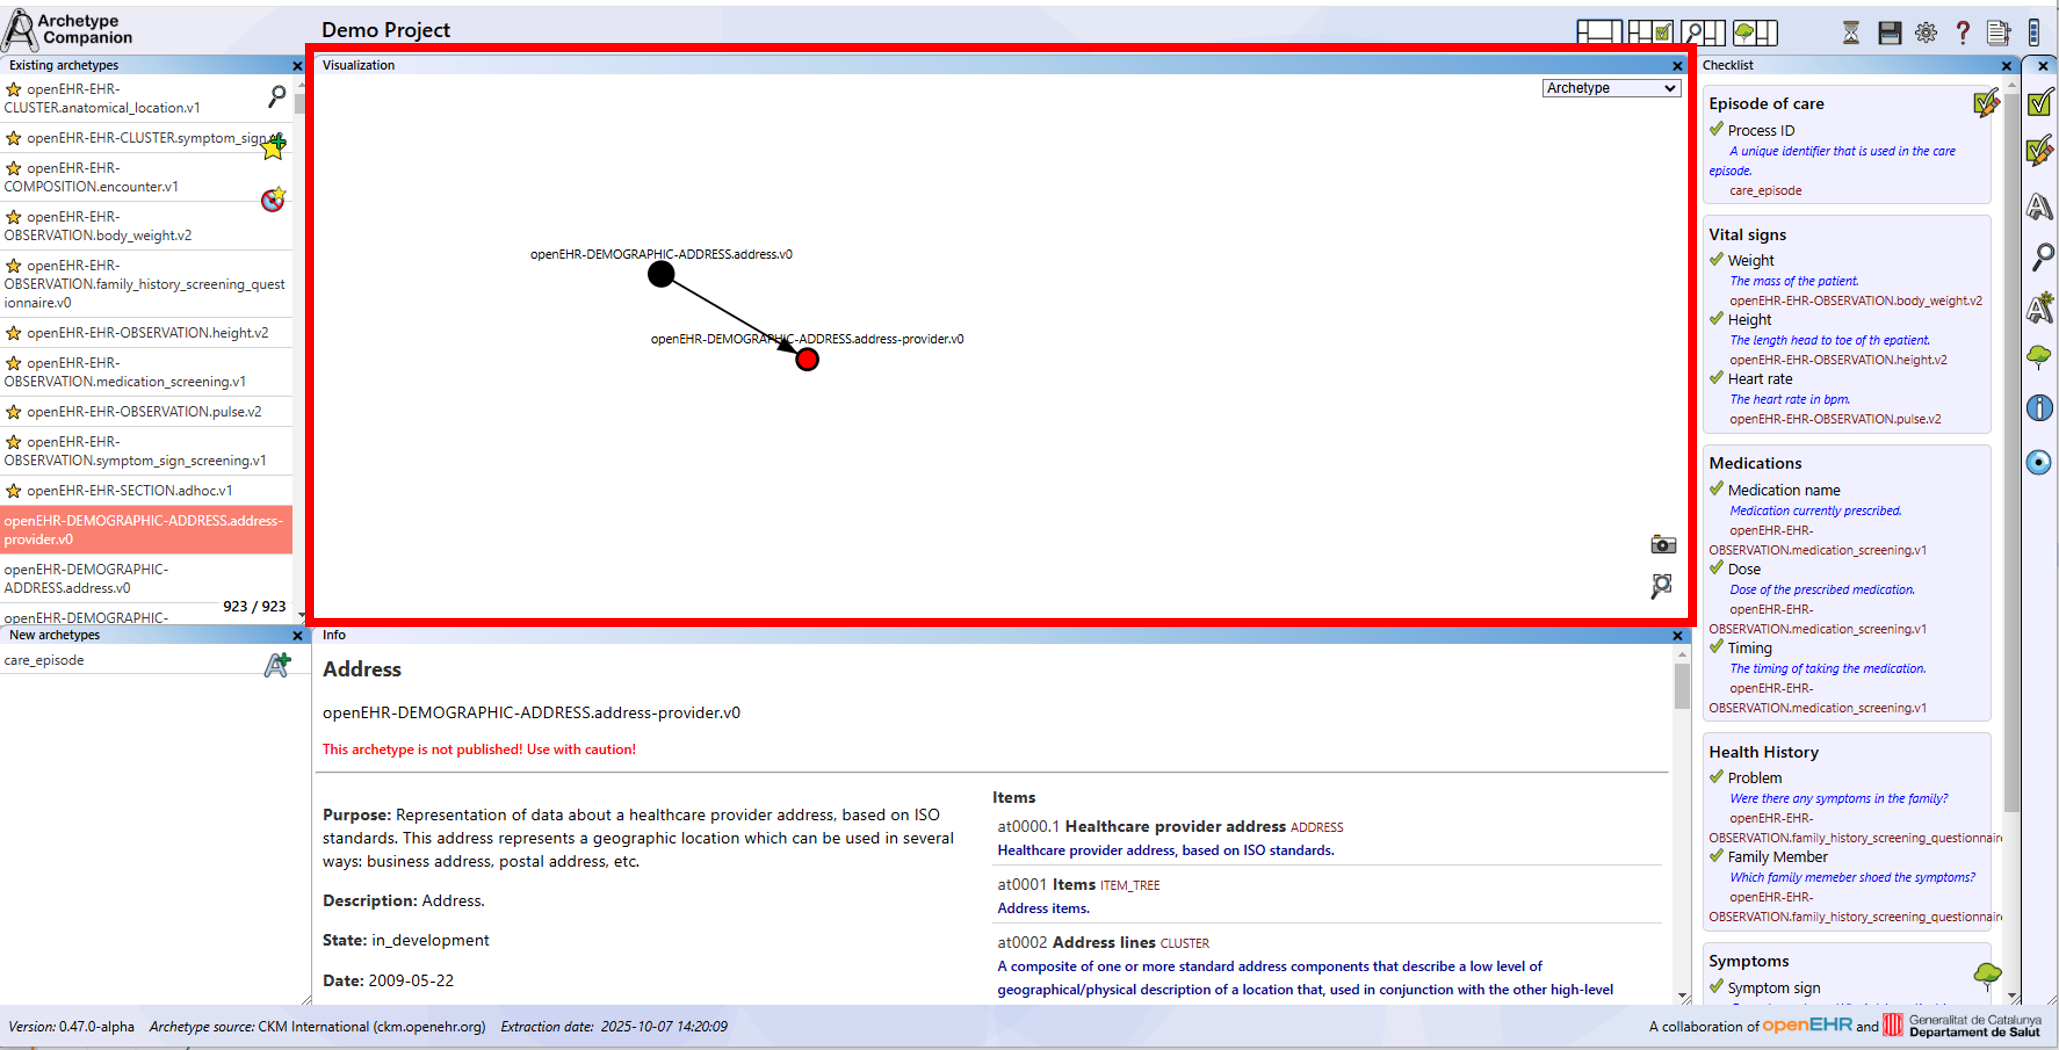
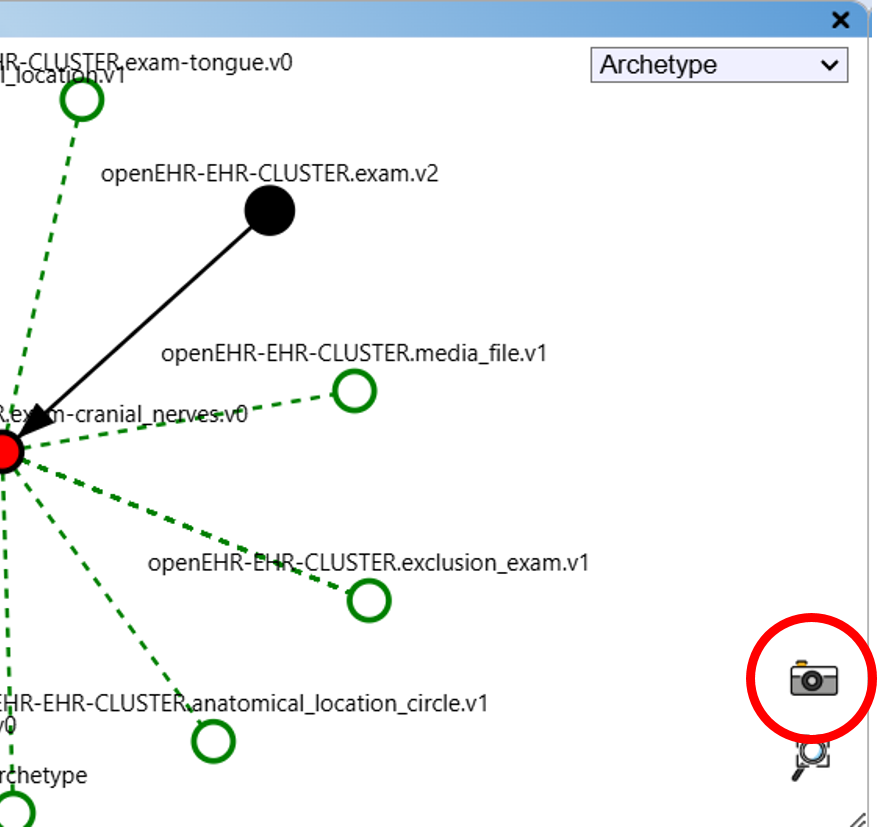
Archetype:
- In the "Archetype" view, you can see the relationships of an archetype with others.
- The currently selected archetype is shown as a red node.
- Parent-child relationships are indicated by solid black lines, with arrows pointing from parent to child.
- Inclusion and exclusion relationships are shown as green and red dashed lines, respectively.
- This is the default view when opening the application.
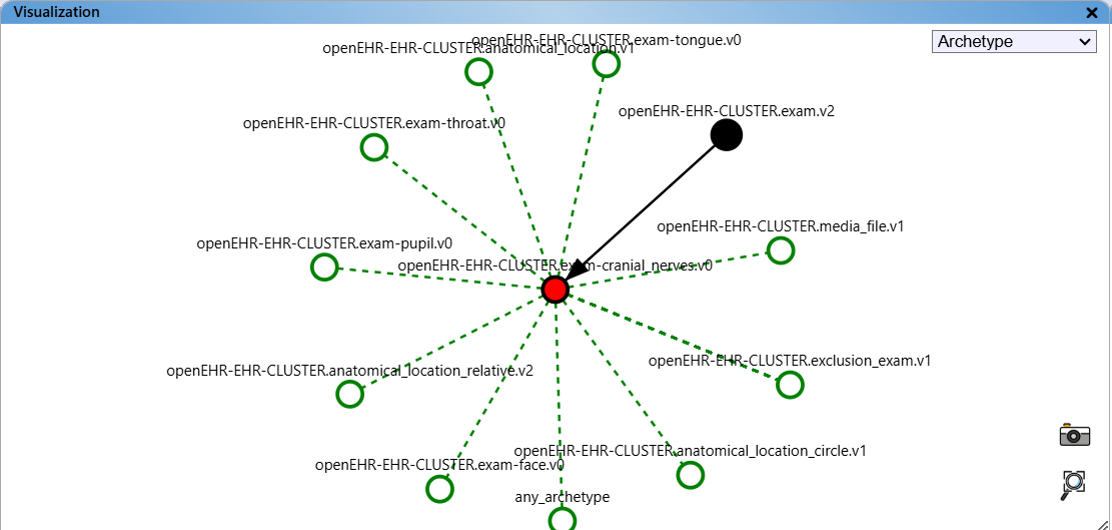
The archetype view.
Archetype Structure:
- In the "Archetype Structure" view, you can see the relationships of the elements included in an archetype.
- The currently selected archetype is shown as a red node.
- Nodes with an at-code and a label are grey with a black outline, nodes without at-code are grey.
- Endpoints that stand for values are pink.
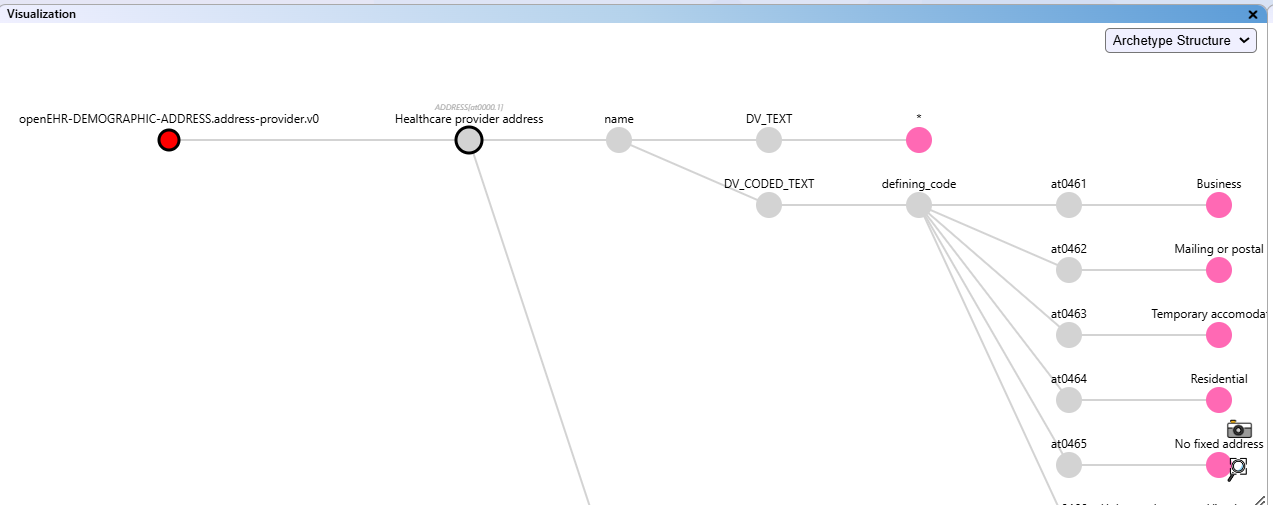
The archetype structure view.
Similar:
- The "Similar" view displays recommended archetypes that may be related or similar to the current one.
- These are shown without connecting lines.
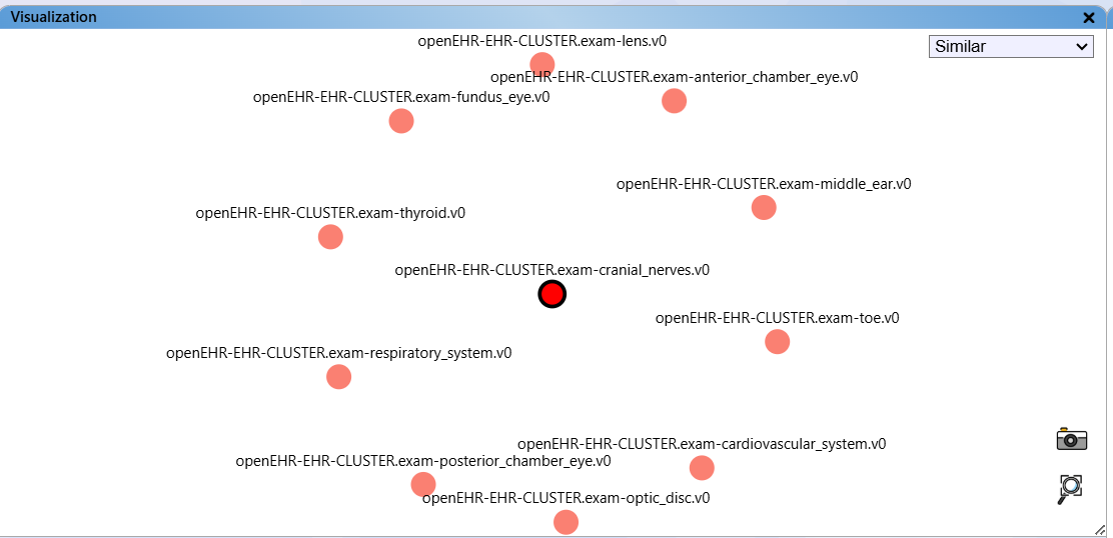
The similar archetypes view.
Archetype + Similar:
- This view combines the "Archetype" and "Similar" views, showing both relationships and recommendations.
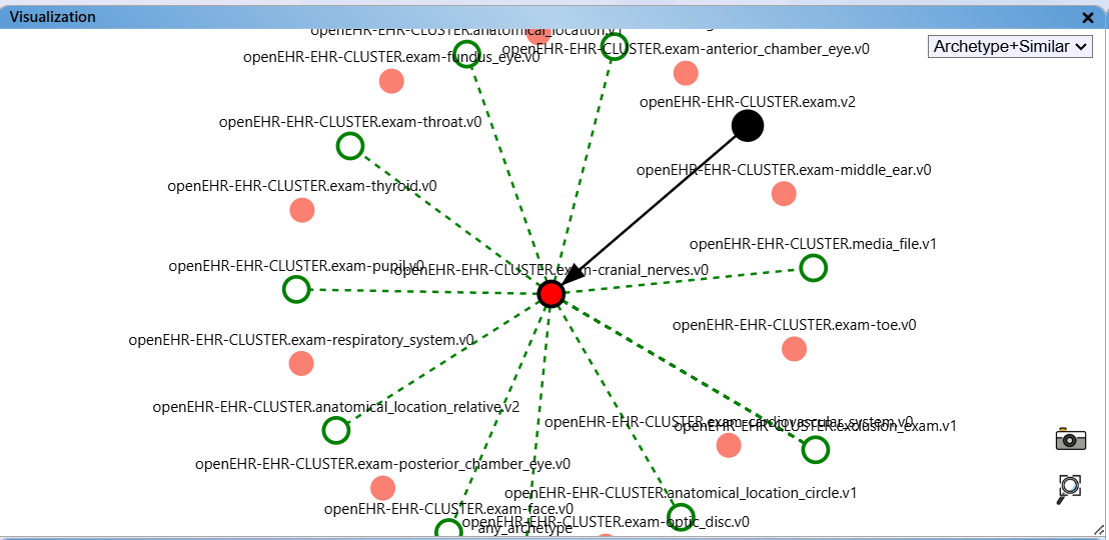
The combined archetypes view.
Collection:
- The "Collection" view shows relationships between archetypes in your collection list.
- There is no red focused archetype.
- Node colours distinguish between archetypes from the database (yellow) and new archetypes (blue).
- Clicking a node selects it and displays its information.
- Relationships are shown with solid black lines (parent-child) and dashed red or green lines (exclusions or inclusions).
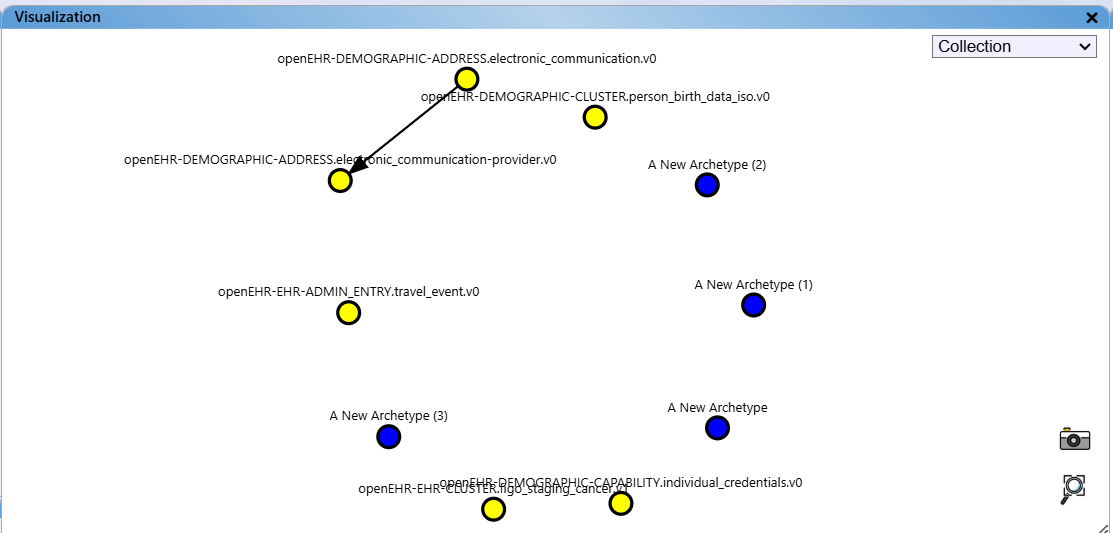
The collection view.
Project:
- The "Project" view displays the assignment of archetypes to data elements defined in your checklist.
- Three columns show section names (pink), data elements (green), and assigned archetypes (blue or yellow).
- Data elements are connected to their sections with grey dashed lines, and assigned archetypes are shown in the third column, connected to data elements with grey dashed lines.
- Node colours again distinguish between database and new archetypes.
- This view provides an overview of all archetypes and checklists in your project, including their dependencies.
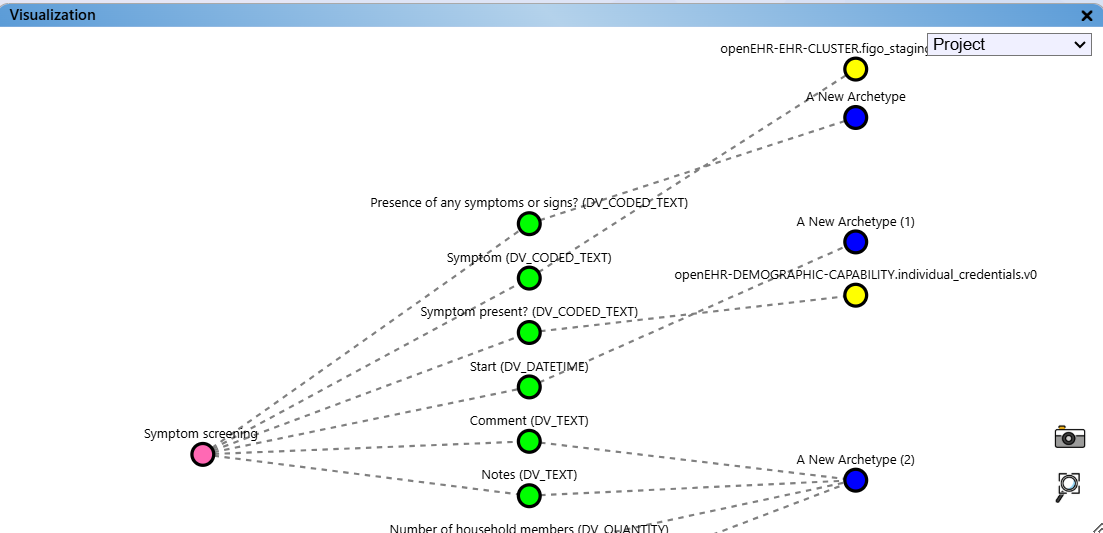
The project view.
Template Planner:
- The "Template Planner" view displays the archetype and data element structure created with the Template Planner module.
- Archetypes are shown as blue nodes, data elements as green nodes.
- The structure of archetypes and data elements is indicated by a grey line.
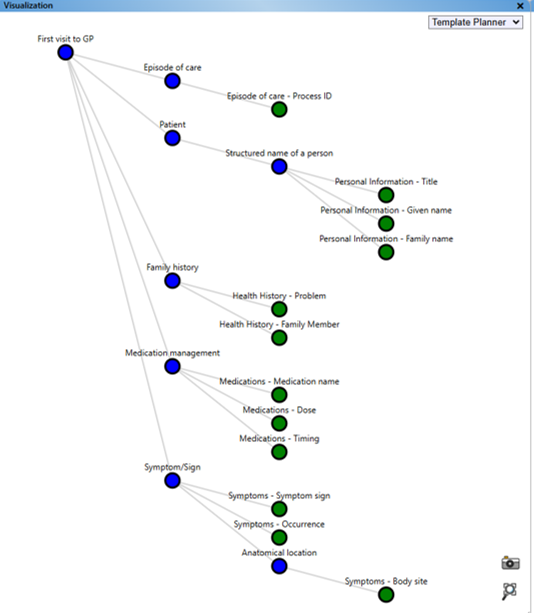
The Template Planner view.
Archetype Ecosystem
The Archetype Ecosystem view provides a visual map of all archetypes and their relationships. Similar archetypes are grouped into “neighborhoods” to give a rough clustering by similarity.
- The Archetype Ecosystem view displays all archetypes from the original source.
- The currently selected archetype is highlighted in red.
- The position and connections between archetypes are based on the “similar archetypes” identified by the recommendation algorithm.
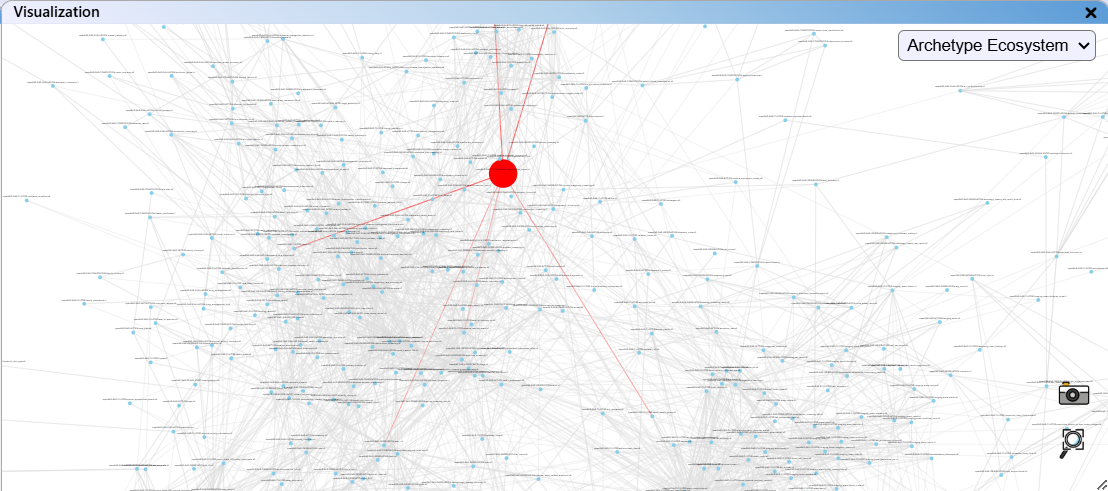
The Archetype Ecosystem view.
Export Visualisation View
For documentation, you can export the current visualisation as an SVG image. Click the "Save as SVG image" button in the lower right-hand corner of the visualisation.
Save to SVG file button.
The file is saved automatically to your browser's download directory, with a filename containing the time, date, project name, and view mode. The project name may be modified for compatibility.
Glossary
The Archetype Companion provides a glossary of openEHR classes. The information on openEHR classes has been extracted previously from the following sources:
- BASE Types 1.2.0
- Reference Model: Common
- Reference Model: Data Structures
- Reference Model: Data Types
- Reference Model: Demographic
- Reference Model: EHR Extract
- Reference Model: EHR
- Reference Model: Integration
- Reference Model: Support
- openEHR Class Index
Legal Notice:
This glossary is provided for informational purposes only. We do not claim authorship of the original
openEHR content, nor do we assert any copyright over it. All copyrights and intellectual property rights
remain with the respective owners and authors. The information is presented as is, without warranty of
any kind, either express or implied. Users must ensure that any use of this content complies with the
applicable licences and terms set by the original copyright holders. No modifications or redistribution
of the original material are implied or encouraged by this resource.
Where to Find the Glossary
The glossary can be accessed easily via the icon in the upper right-hand corner of the interface:
Opening the glossary with the icon.
You can also access the glossary by clicking on the data type of the individual items in the information view or the Template Planner Editor view.
How to Search the Glossary
In the upper left-hand corner of the window, you will find the search bar. Here you can type a search term. With every keystroke, the search result list beneath is updated. Click on one of the search results to see the corresponding entry.
By default, only the class name and description are searched. You can add class description, attribute names, descriptions and data type to the search by ticking the corresponding checkboxes.
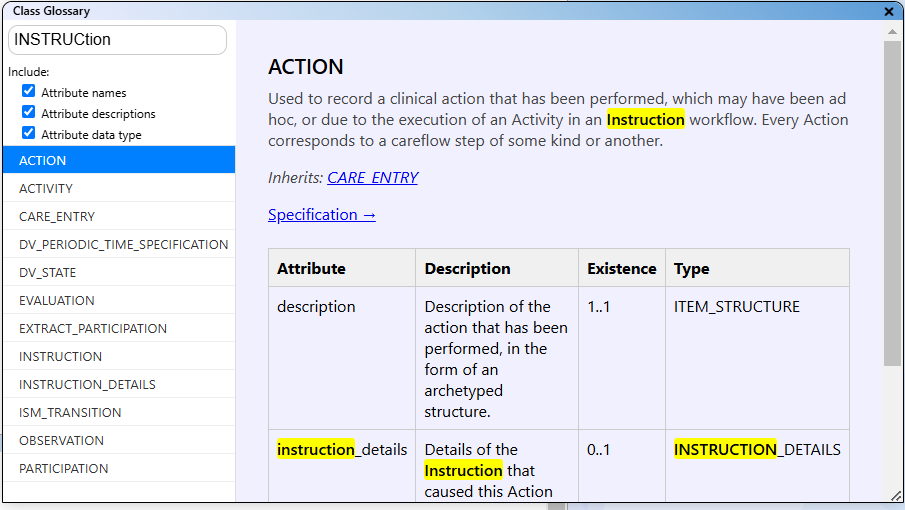
The glossary.
Close the Glossary
You can close the glossary window with the "X" button in the upper right-hand corner of the window.
Data Storage
Local Storage
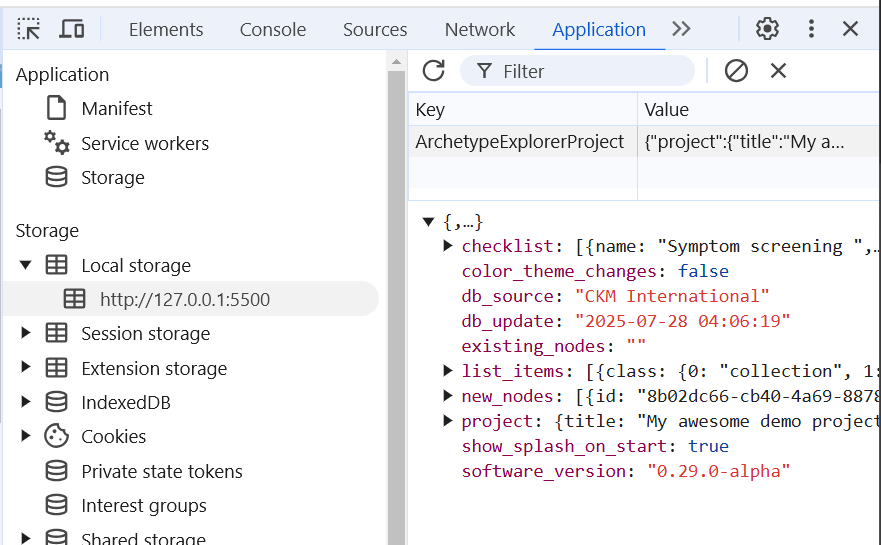
When using the visualisation tool, your project data is saved in your browser's local
storage under the key ArchetypeExplorerProject. This ensures your work is not
lost when you refresh or close the page*.
Here's how you can find, back up, or delete this data in different browsers:
Google Chrome
- Open Developer Tools: Press Ctrl + Shift + I (Windows/Linux) or Cmd + Option + I (Mac), or right-click the page and select Inspect.
- Go to the Application tab.
- In the left sidebar, expand Local Storage and select your website's URL.
- Find
ArchetypeExplorerProjectin the list. You can view, edit, or delete it by right-clicking the entry.
Mozilla Firefox
- Open Developer Tools: Press F12 or Ctrl + Shift + I (Windows/Linux) or Cmd + Option + I (Mac), or right-click and select Inspect.
- Click the Storage tab.
- Expand Local Storage and select your website.
- Locate
ArchetypeExplorerProjectin the list. You can view, edit, or delete it as needed.
Microsoft Edge
- Open Developer Tools: Press F12 or Ctrl + Shift + I (Windows/Linux) or Cmd + Option + I (Mac), or right-click and select Inspect.
- Go to the Application tab.
- Expand Local Storage and select your website.
- Find
ArchetypeExplorerProjectin the list. Right-click to edit or delete.
Safari
- Enable the Develop menu: Go to Safari > Preferences > Advanced and check Show Develop menu in menu bar.
- Open Web Inspector: Press Cmd + Option + I or select Develop > Show Web Inspector.
- Click the Storage tab.
- Expand Local Storage and select your website.
- Find
ArchetypeExplorerProjectin the list. You can view, edit, or delete it.
*Note: Clearing your browser's cache will remove this data.
Archetype Database
The archetype data used in the online version of the Archetype Companion has been extracted from an archetype repository with the ADL Extraction Tool, developed for this project. Please refer for more information to: ADL Extraction Tool.
Note: The information about openEHR archetypes presented in this tool has been extracted automatically from external sources (such as CKM) and is provided for convenience only. We do not guarantee the accuracy, completeness, or correctness of the extracted data, nor do we claim that it is up to date. This tool does not assert or imply any copyright ownership over the archetypes themselves. For authoritative information regarding authorship, copyright, and licensing, users are strongly advised to consult the original archetype source as stated within the tool.
The archetype data is stored in the "allNodes" variable, found in the "data.js" file.
Note: If the database is updated and there are changes in the archetype database, the
database of the project is updated automatically. A detailed warning is issued in this case.
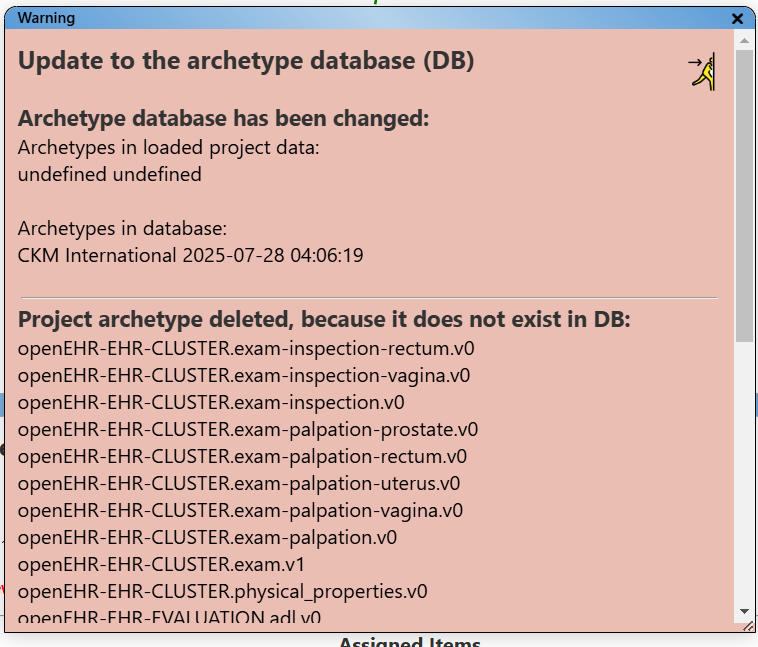
Update warning for the archetype database.
Running Archetype Companion Locally
-
Download the Package
- Go to the project repository: https://github.com/martinkochdesign/openEHR_fellowship_2025_project/tree/main
- Click on Code and select Download ZIP.
- Unpack the ZIP file to your destination folder.
-
Start Archetype Companion
- Navigate to the extracted folder.
- Double-click on
index.htmlto launch the Archetype Companion in your browser.
Updating the Archetype Data Dictionary
-
Generate the Data Dictionary
- Open the
distfolder inside your extracted package. - Double-click on the latest version of the executable, for example:
create_existing_JSON_from_ADL_V4_15.exe. - Select the source for your archetypes when prompted.
- Click on Download and create dataset.js.
-
The tool will:
- Download a ZIP file from the selected source.
- Extract all ADL 1.4 archetypes.
- Compile the relevant information into a file named
dataset.js.
- The
dataset.jsfile will be saved in the same directory as the executable.
- Open the
-
Update the Application
- Copy the newly created
dataset.jsfile to the directory containingindex.html. - Restart the Archetype Companion if it is already running.
- Copy the newly created